Salesforce To Salesforce Integration: A Comprehensive Guide
Last Updated on February 27, 2025
Summary:
This blog covers a comprehensive overview of Salesforce to Salesforce Integration, highlighting its significance in improving business performance for organizations with multiple Salesforce instances. It also covers methods, adoption benefits, best practices, and real-world use cases that demonstrate how this integration strategy optimizes operations and unlocks untapped opportunities for business growth.
In today’s dynamic and interconnected society, enterprises continuously seek innovation to optimize their workflows, enhance cooperation and drive growth. Here is when Salesforce to Salesforce Integration emerges as a transformative solution. It refers to the process that allows organizations to connect and share data seamlessly through multiple instances of Salesforce. It enables the exchange of information such as leads, opportunities, accounts, and custom objects that foster collaboration and streamline processes across different companies.
The Salesforce integration revolutionizes administrative performance by achieving a unified view of customer data, improving sales and marketing alignment, and unlocking new opportunities. Let’s understand how to integrate multiple Salesforce instances and why business owners need to grasp its potential to drive their businesses forward in today’s interlinked world.
Integration of Salesforce with multiple instances is essential for businesses undergoing mergers or acquisitions as it enables smooth integration of Salesforce data from both parties. This integration is valuable when sharing marketing data with potential buyers or customers or when collaborating with distributors or suppliers who require access to sales data.
Let’s imagine your company utilizes multiple Salesforce organizations for various purposes or works closely with another business that relies on Salesforce; here, you might encounter the need to collaborate and share records across these distinct Salesforce organizations. This integration will reduce costs, optimize customer relationship management processes, improve operational efficiency, eliminate manual data entry, and improve overall data accuracy.
Benefits organizations can witness through Salesforce to Salesforce Connect.
Various methods can be used to Integrate Salesforce with other Salesforce instances. Here are some commonly used methods.
This built-in feature provided by Salesforce enables integration and data synchronization between multiple Salesforce org. It simplifies, eliminating the need for complex configurations and external tools and providing a standardized method for easy data sharing and collaboration. It simplifies salesforce 2 salesforce connect, ensuring a unified view of customer information.
Salesforce APIs play a crucial role in Salesforce to Salesforce instances by enabling developers to integrate quickly and flexibly. Here are a few types of API which provide standardized methods for integrating with salesforces.
Middleware/Integration platforms like MuleSoft Anypoint platform, Dell Bhoomi, Jitterbit, Informatica Cloud, and SnapLogic assist with Salesforce to Salesforce Integration by providing connectors, data transformation capabilities, orchestration tools, data synchronization, error handling, and monitoring features. They enhance connectivity, enable data exchange, automate workflows, ensure data integrity, and optimize performance during S-to-S integration.
Exalate is an app available on the Salesforce AppExchange that facilitates integration between Salesforce orgs. It provides synchronization rules and configuration options to define which records and data should be synchronized between the orgs.
Custom development in Salesforce enables tailored solutions for Salesforce 2 Salesforce Integration. It allows you to write code using tools like Apex, Visualforce, LWC, and other systems. With custom development, data can be transformed, complex integration logic can be implemented, event-driven processes can be created, and user interfaces can be enhanced.
These methods offer different approaches for Salesforce to Salesforce integration, each with its own strengths and features. Businesses can choose the best method for their integration requirements, technical capabilities, and preferences.
Now that we have covered the various methods of integrating multiple Salesforce instances. Let’s understand how to integrate the Salesforce to Salesforce Connector Using the Standard Connector in detail.
To utilize the Salesforce to Salesforce Connector, it may be necessary to switch to the Salesforce Classic UI for configuring the Standard Connector.
However, there are four key areas that you need to configure when you work with this standard connector.
Here is a step-by-step explanation of configuring Salesforce to Salesforce Integration using Standard Connector.
After enabling the feature, you will see a screen similar to the example below.
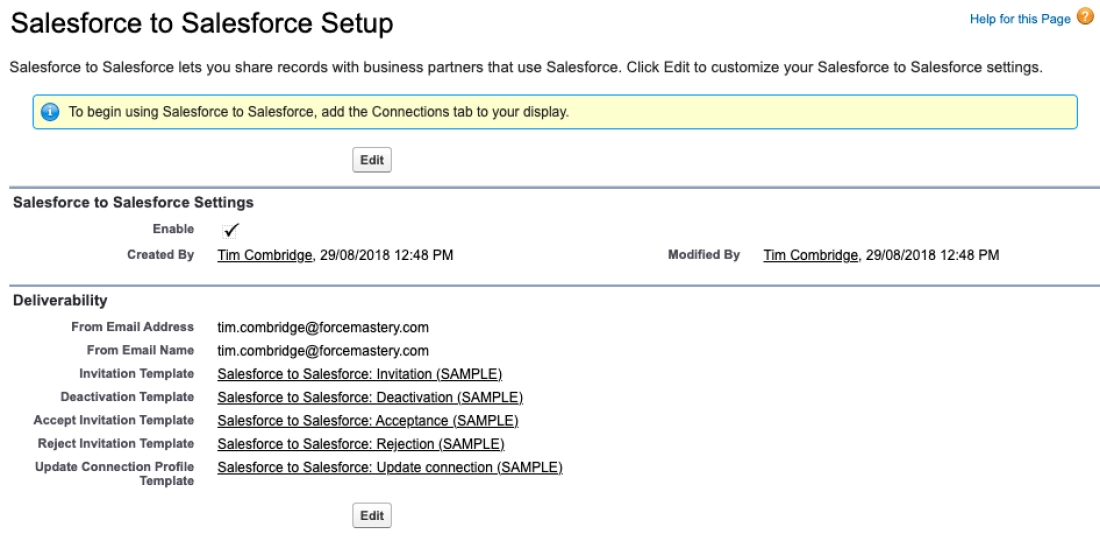
To enable data sharing between the two orgs, make sure you allow the feature in both the orgs.
Now that the org to org salesforce feature is established, all you need to do is build a connection between them; follow the steps below to establish a secure connection.
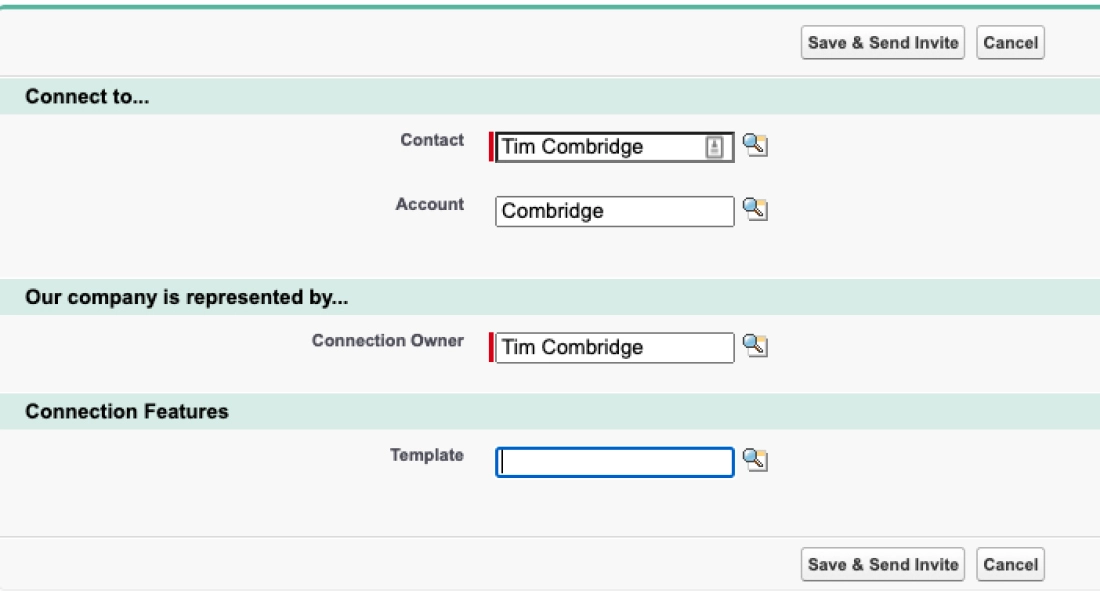
Now that you have successfully established a connection between your two salesforce orgs. The next step is to specify the data that should be shared between the two orgs and configure the settings accordingly.
Perform these steps to ensure the data configuration is applied in both organizations. In this example, we will synchronize the Accounts records between both the orgs. To achieve this, select the Account object on the following page, and do not forget to save your changes.
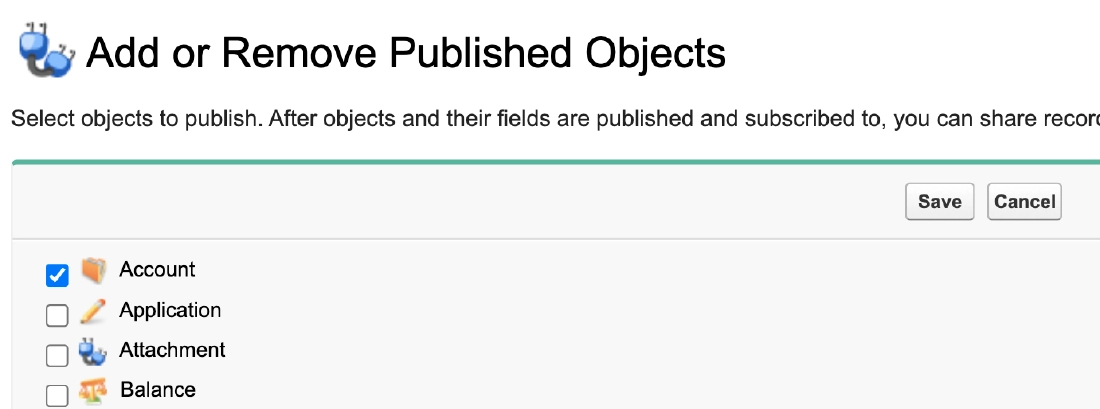
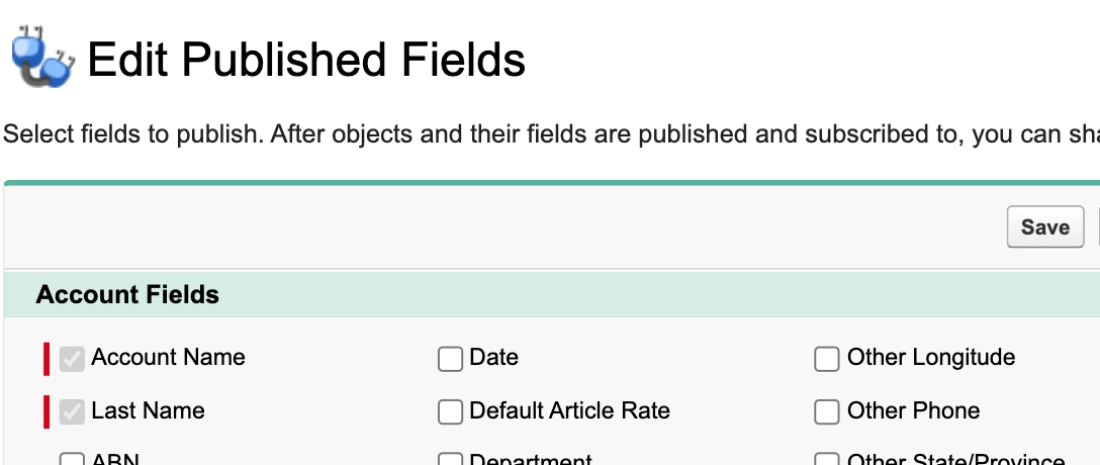
Always keep in mind that specific fields, such as Account name and last name, if Personal Accounts are enabled) are mandatory and cannot be deselected. You can select additional fields to be shared with the other org if required.
Lets now understand how to integrate Salesforce to Salesforce Connection using the REST API.
Optimize Your Business Processes with Salesforce To Salesforce Integration
Enhance efficiency and productivity by integrating your Salesforce instances. Our Salesforce Integration services will streamline data exchange, enabling seamless cross-org collaboration.
Setting up a salesforce to salesforce integration using the REST API involves the following four key steps:
Here’s an example of an Apex class for the Account object:

@RestResource(urlMapping='/Account/*')
global with sharing class AccountAPI {

    //this section handles deletions through the API
    @HttpDelete
    global static void doDelete() {
        RestRequest req = RestContext.request;
        RestResponse res = RestContext.response;
        String accountId =
req.requestURI.substring(req.requestURI.lastIndexOf('/')+1);
        Account account = [SELECT Id FROM Account WHERE Id = :accountId];
        delete account;
    }

    //this section handles queries through the API
    @HttpGet
    global static Account doGet() {
        RestRequest req = RestContext.request;
        RestResponse res = RestContext.response;
        String accountId =
req.requestURI.substring(req.requestURI.lastIndexOf('/')+1);
        Account result = [SELECT Id, Name, Phone, Website FROM Account WHERE Id = :accountId];
        return result;
    }

    //this section handles inserts through the API
    @HttpPost
    global static String doPost(String name, String phone, String website) {
        Account account = new Account();
        account.Name = name;
        account.phone = phone;
        account.website = website;
        insert account;
        return account.Id;
    }
}
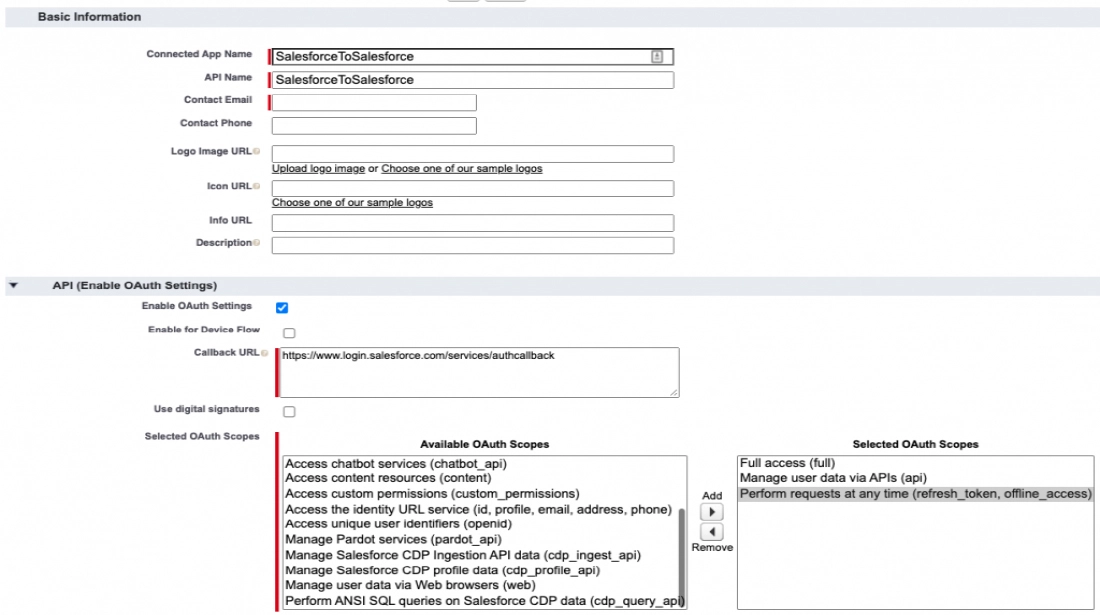
After saving the Connected App, you will see the Consumer Key and Consumer Secret. Remember to copy these, as you will need them later. Remember to keep the Consumer Secret confidential.
Note:Note: The above instructions assume you are performing these steps in Org 1, the destination org for the Salesforce to Salesforce integration example.
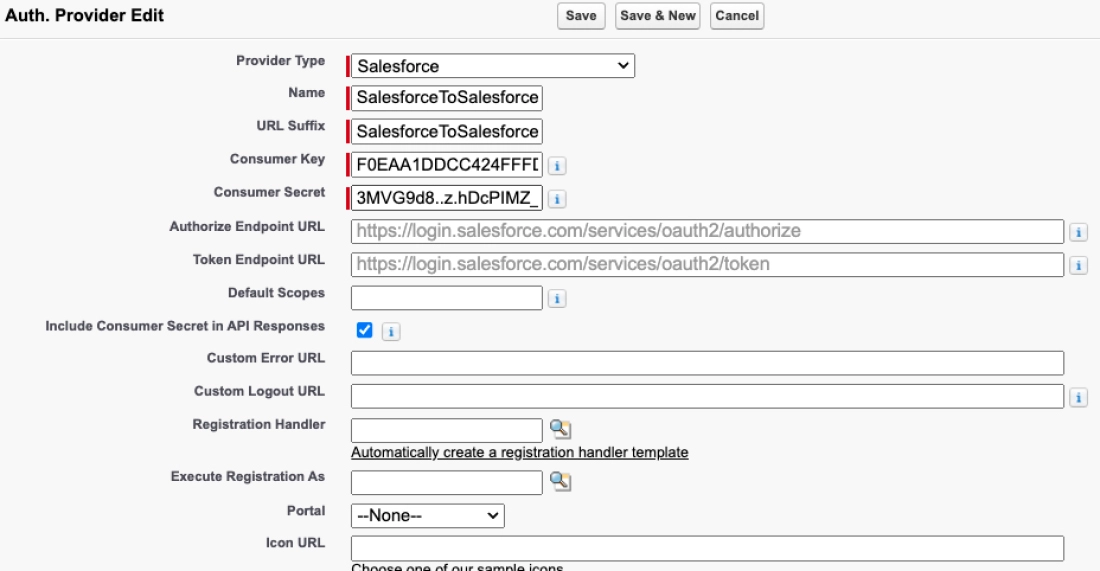
After saving, a callback URL will be generated in the “Salesforce Configuration” section at the bottom of the page. Copy this URL and update the Callback URL in the previously created Connected App.

Testing the connection involves opening the URL and looking for the login screen.If it doesn’t show up, verify the callback URL and allow some time for the changes to apply.
Following these steps, you will successfully configure the Auth Provider in Org 2 for the Salesforce to Salesforce integration.
Quick Read: NetSuite Salesforce Integration
You can establish a Salesforce to Salesforce integration using REST API with these steps and the corresponding code.After completing these steps, you can test the Salesforce to Salesforce integration by invoking the REST API endpoints from Org 2 to access and manipulate data in Org 1.
Test the class using a few lines of anonymous Apex code by calling the “ add numbers” method with specific values and verifying the expected output.

Class

public with sharing class AccountWebService {

    public static Http http = new Http();
    public static HTTPResponse response;
    public static HttpRequest request;

public class NewAccountRequestWrapper {
    public String name {get; set;}
    public String phone {get; set;}
}

//test querying an Account record
public static void getAccount(Id accId) {
    request = new HttpRequest();
    request.setMethod('GET');

request.setEndpoint('callout:SalesforceAccount/services/apexrest/Account/' + accId);
    response = http.send(request);
    System.debug(response.getBody());
}

//test creating an Account record
public static void addAccount(NewAccountRequestWrapper newAccount) {
    request = new HttpRequest();
    request.setMethod('POST');

request.setEndpoint('callout:SalesforceAccount/services/apexrest/Account');
    request.setHeader('Content-Type',
'application/json;charset=UTF-8');
    request.setBody(JSON.serialize(newAccount));
    response = http.send(request);
    System.debug(response.getBody());
}

//test deleting an Account recoord
public static void deleteAccount(Id accId) {
    request = new HttpRequest();
    request.setMethod('DELETE');

request.setEndpoint('callout:SalesforceAccount/services/apexrest/Account/' + accId);
    response = http.send(request);
    System.debug(response.getBody());
    }
}
Class

//Add a new Account
AccountWebService.NewAccountRequestWrapper newAccount = new AccountWebService.NewAccountRequestWrapper();
newAccount.name = 'Test Account';
newAccount.phone = '61412345678';
AccountWebService.addAccount(newAccount);

//get Account details based on Id
AccountWebService.getAccount('61412345678');

//delete Account based on Id
AccountWebService.deleteAccount('61412345678');
Please note that the provided code and steps assume a simplified scenario and may require further customization to align with your specific requirements and Salesforce to Salesforce connection setup.
Here is a wide range of use cases that revolutionize how businesses collaborate and operate using this org to org integration in Salesforce.
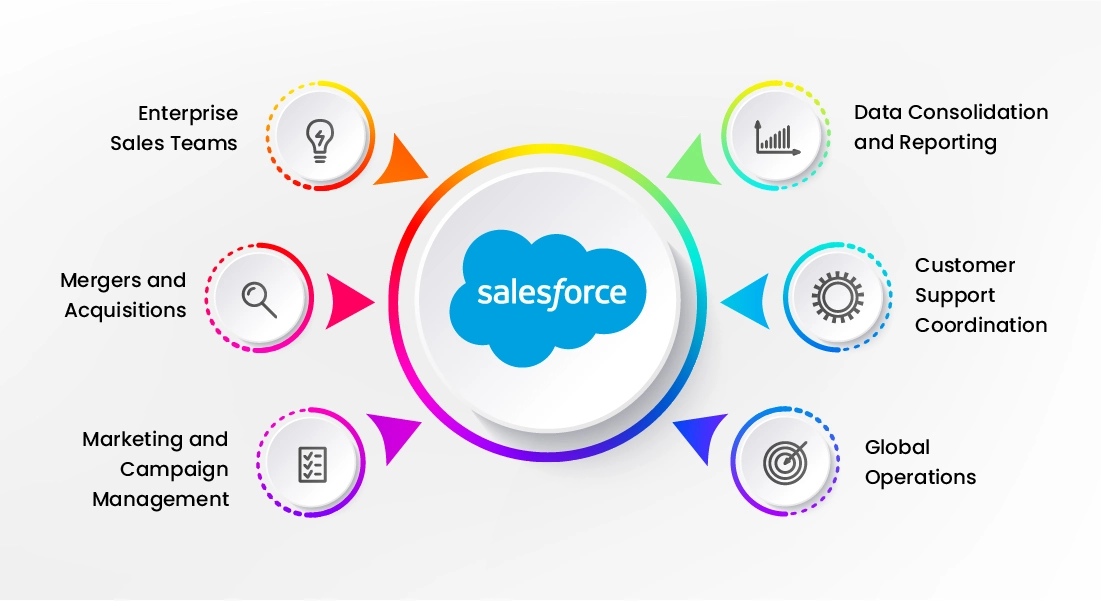
Large organizations with multiple sales teams can benefit significantly from this integration. It allows better collaboration, lead sharing, and pipeline visibility across different teams, ensuring a unified sales approach and maximizing revenue potential.
When companies merge or acquire each other, integrating their salesforce instances is crucial for data consolidation and streamlining sales processes. It ensures opportunities and sales pipelines, facilitating a smooth transition and optimizing post-merger operations.
The integration enhances market and campaign management by easily sharing leads, campaign data, and performance metrics between marketing teams. It allows for centralized campaign tracking, unified reporting, and a comprehensive view of marketing efforts, resulting in campaign effectiveness and ROI.
Integration between different Salesforce instances ensures data consolidation with a unified view for reporting purposes. It removes data discrepancies, facilitates timely reporting, and allows organizations to gain insights into sales performance, customer behavior, and key metrics, which assists with data-driven decision-making.
Integrating Salesforce helps with customer support coordination by sharing case information, customer history, and support ticket data between different support teams or departments, improving customer experience and response time with increased customer satisfaction.
Salesforce to Salesforce supports global operations by providing a centralized platform for managing customer data and reporting across different regions. It allows for the standardization of business practices and facilitates collaboration between countries.
To achieve a smooth and effortless experience with Data migration and integration using Salesforce involves following these best practices.
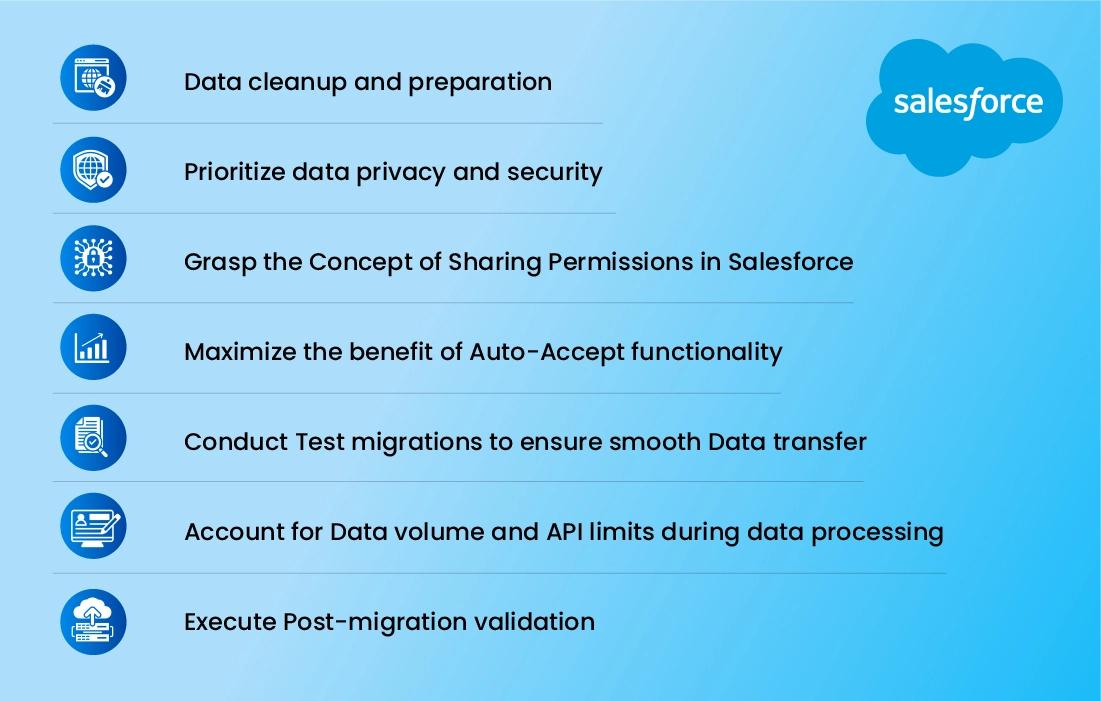
Before migrating data, cleaning up and preparing the data in both the source and target Salesforce organizations is crucial. It involves removing duplicate or Outdated records, standardizing data formats, and resolving data quality issues. You can promote a successful integration with reliable information by ensuring clean and accurate data.
Data and security should be the top priorities throughout the data migration and integration. Understanding relevant data protection regulations such as the General Data Protection Regulation (GDPR) is crucial. By Implementing measures like encryption, secure APIs, and access control to safeguard sensitive data during transit and at rest ensures data compliance and security.
Salesforce has a detailed sharing model determining who can access specific data and records. During the Salesforce to Salesforce integration, it is vital to understand and configure the sharing permissions in both organizations. It ensures the necessary sharing setting and rules are configured correctly to maintain appropriate data access controls across integrated organizations.
Salesforce also provides the auto-accept feature, automatically accepting records shared with you from other Salesforce organizations reducing manual effort. Enabling Auto-Accept streamlines the integration process by automatically accepting shared records, reducing manual records, and ensuring an easy transfer.
It is highly recommended to perform test migrations before executing the final data migration and integration. Test migrations help identify any issues or challenges that arise during the actual migration, allowing you to address them proactively. It minimizes the risk of data discrepancies and errors.
Salesforce implements limits on data volume and API usage, such as daily API call limits and maximum record counts. When planning the data migration and integration, consider these limits to ensure your integration process stays within the specified thresholds. It may involve batching data, optimizing data transfer methods, or utilizing bulk data loading tools provided by Salesforce to effectively manage data volume and API limits.
After the migration and integration, validating the migrated data in the target organization is essential. Perform thorough checks to ensure all the data has been accurately migrated, including record counts, relationships, and data integrity. Conduct data quality checks and address them to maintain data consistency.
Bacancy is a trusted provider of Salesforce Services. We are dedicated to helping businesses achieve a holistic view of their operations by enabling a seamless data flow and consolidating information between systems. With our expertise, we offer tailored solutions and services to unlock the full potential of this integration capability.
We understand that every business has unique integration requirements, so we collaborate closely to understand your specific needs and goals. We provide comprehensive assistance throughout your salesforce-to-salesforce integration journey, including meticulous planning, efficient implementation, customization of workflow, and ongoing support to ensure a smooth and successful integration experience. Hire Salesforce developer from Bacancy and experience the heightened efficiency and effectiveness that comes with our unparalleled support and expertise.
Salesforce to Salesforce integration emerges as a transformative solution for businesses. It transforms how data is shared and utilized across multiple Salesforce organizations. The integration empowers businesses with synchronized and accessible data, paving the way for enhanced collaboration, informed decision-making, and accelerated growth.
Don’t miss out on the opportunity to harness the power of Salesforce integration with multiple instances and take your business to new heights. You can also seek Salesforce consulting services to streamline your integration process and deliver successful results.
Using salesforce to salesforce connection, you can share standard and custom objects as well as specific fields and records.
Yes, absolutely, you can keep data up-to-date across both the orgs in real-time.
Yes, you can configure the integration based on your unique business requirements and workflows.
Your Success Is Guaranteed !
We accelerate the release of digital product and guaranteed their success
We Use Slack, Jira & GitHub for Accurate Deployment and Effective Communication.