React Table Tutorial: Project Setup, useTable, and useFilter
Last Updated on November 13, 2024
Quick Summary:
Organizing is one of the significant tasks, and when the data is in numbers, it has to have a table for presentation. But how would you implement it? Well, React Table is where you must ponder upon it. Look at it to know more about how to build and what you should perform to integrate Table in your application.
Table user interfaces are ubiquitous, mostly used, and organized UI preferred by users and developers. It makes the data look simple and easily accessible. Being a ReactJS developer, you might have heard of React Table V7; few might have implemented it too. If you are looking for a tutorial explaining React Table V7 with an Example, you have chosen the right blog. Today we are here with a react-table tutorial for you.
I understand how challenging it could be when you are trying to learn something new, but I also know how interesting is that! Isn’t it?
We have discussed some of the features at the beginning of this blog. Now let’s discuss some advanced features that might greatly help you.
Suppose you want to enable displaying personalized content for your customers or execute tricky UI elements like buttons or checkboxes inside the table. In that case, React Table will be of great help. It allows React developers to personalize individual cell rendering in the table.
Another great feature is column resizing by React Table; this feature allows developers to resize the width of the columns at their convenience. It will be a helpful feature when there are multiple columns to show, and you need more columns.
When there is a long table, it requires scrolling, but it can impact performance as well. With React Table, worry is a thing of the past. Keep scrolling without worrying about the performance glitch since the page loads as you go and doesn’t load simultaneously, saving memory.
If you want to add new functionality to your React Table, the custom plugins allow you to do so. These plugins are also useful in adding quite cool features like pagination, filtering, sorting, and personalizing the appearance and behavior of your table.
Since the Table takes time to load, server-side rendering will greatly help you. It loads the table on the backend and sends it to the client as HTML. Doing so will boost performance since it reduces loading time on the client side.
Refer to the next section that includes the points covered in this tutorial – React Table Tutorial – Project Setup, Installation, useTable, and useFilter.
Before starting the development process and implementing React-Table useTable and useFilter, let’s have a look at the below video so that you can understand what are we building.
The creator of React Table – Tanner Linsley, launched React Table v7 in March 2020. We might remember using the class component of react-table, but now the library provides the Hooks-based APIs and plugins for creating a hassle-free React Table. The release is considered a significant change as the approach to creating a table, table UI, and style has changed.
Considering the latest release note released for React-Table, here are the new features to see in its new version v7:
Create ReactJS project using the below command.
Install react-table and axios.
Looking for a Reactjs Development Company?
Built real-time web applications with dynamic UIs with one of the profound ReactJS Development Company in the industry.
After the project setup and installation are done, follow these steps to implement the useTable React-Table Example. I’ll be writing the entire code in two files, i.e.,

useEffect(() => {
axios("http://api.tvmaze.com/search/shows?q=girls")
.then((res) => {
setData(res.data);
})
.catch((err) => console.log(err))
}, []);
After preparing our data, let’s define the columns of the Table. The column structure would consist-
We will wrap it inside hook useMemo as far as the optimization is concerned.

const columns = useMemo(
() => [
{
Header: "TV Show",
columns: [
{
Header: "Name",
accessor: "show.name"
},
{
Header: "Type",
accessor: "show.type"
},
{
Header: "Language",
accessor: "show.language"
},
{
Header: "Official Site",
accessor: "show.officialSite",
Cell: ({ cell: { value } }) => value ? {value} : "-"
},
{
Header: "Rating",
accessor: "show.rating.average",
Cell: ({ cell: { value } }) => value || "-"
},
{
Header: "Status",
accessor: "show.status",
},
{
Header: "Premiered",
accessor: "show.premiered",
Cell: ({ cell: { value } }) => value || "-"
},
{
Header: "Time",
accessor: "show.schedule.time",
Cell: ({ cell: { value } }) => value || "-"
},
]
}
]
)
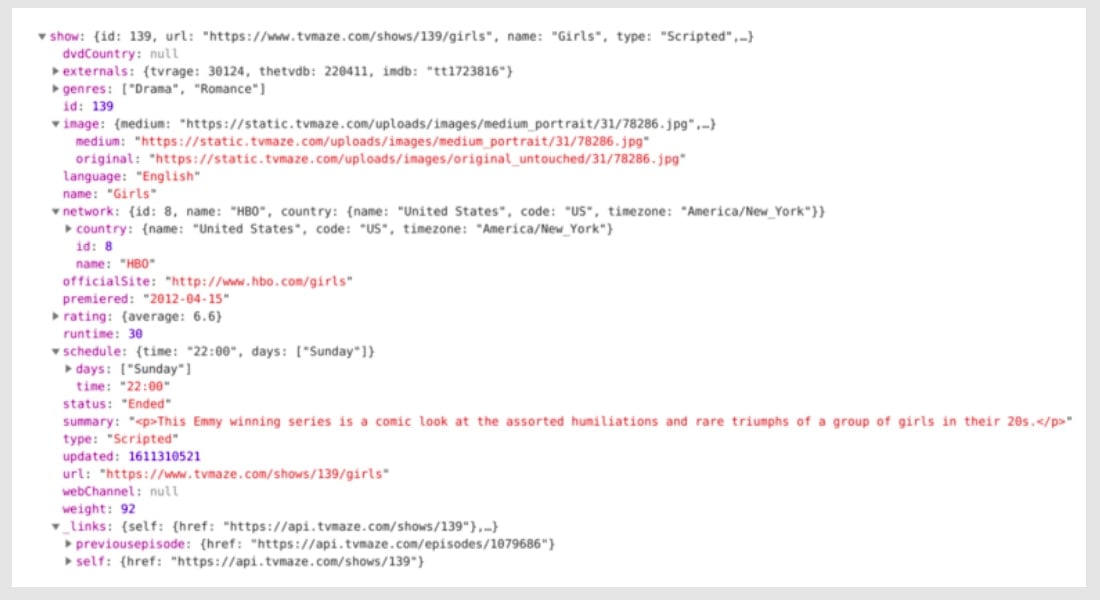
You might be wondering why I have written “show.name”, “show.type”, “show.rating.average” and so on. It is because the data is inside the show object, and for accessing the data, we will use show. as the prefix. Here is the sample of data-


{
Header: " Official Site ",
accessor: " show.officialSite ",
Cell: ( props ) => {
return < YourComponent { ...props } / >
}
},
We can have the custom cell for each row as shown above. A cell has access to the values of each row; you can console props to see what it consists of.
Our demo will implement the custom cell to check whether show.officalSite has the value or not. If it has the value then it will return or “-”

{
Header: "Official Site",
accessor: "show.officialSite",
Cell: ({ cell: { value } }) => value ?
{value} : "-"
},
We will create another file named – TableContainer.js, in which we will build our Table component using the React-Table useTable hook.
It will take two properties: data and columns, which we have defined in the above sections.

import React from "react";
import { useTable } from "react-table";
export default function Table({ columns, data }) {
const {
getTableProps,
getTableBodyProps,
headerGroups,
rows,
prepareRow,
} = useTable({
columns,
data,
})
return (
< table {...getTableProps()} >
< head >
{headerGroups.map(headerGroup => (
< tr {...headerGroup.getHeaderGroupProps()} >
{headerGroup.headers.map(column = > (
< th {...column.getHeaderProps()}>{column.render('Header')}< /th >
))}
))}
< /thead >
< tbody {...getTableBodyProps()} >
{rows.map((row, i) => {
prepareRow(row)
return (
< tr {...row.getRowProps()} >
{row.cells.map(cell => {
return < td {...cell.getCellProps()}>{cell.render('Cell')}< /td >
})}
< /tr >
)
})}
< /tbody >
< /table >
)
}
Import the Table from the TableContainer.js and then render on the UI using

import Table from './TableContainer'
< div className="App" >
< h1 >< center >React Table Demo< /center >< /h1 >
< Table columns={columns} data={data} />
< /div >
After implementing the above code snippets, following your App.js and TableContainer.js will look like this –

import React, { useState, useEffect, useMemo } from "react";
import axios from "axios";
import { useTable } from "react-table";
import './App.css';
function Table({ columns, data }) {
const {
getTableProps,
getTableBodyProps,
headerGroups,
rows,
prepareRow,
} = useTable({
columns,
data,
})
return (
< table {...getTableProps()} >
< head >
{headerGroups.map(headerGroup => (
< tr {...headerGroup.getHeaderGroupProps()}>
{headerGroup.headers.map(column => (
< th {...column.getHeaderProps()}>{column.render('Header')}< /th >
))}
< /tr >
))}
< /thead >
< tbody {...getTableBodyProps()}>
{rows.map((row, i) => {
prepareRow(row)
return (
< tr {...row.getRowProps()}>
{row.cells.map(cell => {
return {cell.render('Cell')}
})}
< /tr >
)
})}
< /tbody >
< /table >
)
}
function App() {
const [data, setData] = useState([]);
useEffect(() => {
   axios("http://api.tvmaze.com/search/shows?q=girls")
     .then((res) => {
       setData(res.data);
     })
     .catch((err) => console.log(err))
 }, []);
const columns = useMemo(
   () => [
     {
       Header: "TV Show",
       columns: [
         {
           Header: "Name",
           accessor: "show.name"
         },
         {
           Header: "Type",
           accessor: "show.type"
         },
         {
           Header: "Language",
           accessor: "show.language"
         },
         {
           Header: "Official Site",
           accessor: "show.officialSite",
           Cell: ({ cell: { value } }) => value ? {value} : "-"
         },
         {
           Header: "Rating",
           accessor: "show.rating.average",
           Cell: ({ cell: { value } }) => value || "-"
         },
         {
           Header: "Status",
           accessor: "show.status",
         },
         {
           Header: "Premiered",
           accessor: "show.premiered",
           Cell: ({ cell: { value } }) => value || "-"
         },
         {
           Header: "Time",
           accessor: "show.schedule.time",
           Cell: ({ cell: { value } }) => value || "-"
         },
       ]
     }
   ]
 )
return (
< div className="App" >
< h1 >< center >React Table Demo< /center >< /h1 >
< Table columns={columns} data={data} / >
< /div >
);
}
export default App;

import React from "react";
import { useTable } from "react-table";

export default function Table({ columns, data }) {
 const {
   getTableProps,
   getTableBodyProps,
   headerGroups,
   rows,
   prepareRow,
 } = useTable({
   columns,
   data,
 })

 return (
   < table {...getTableProps()}>
     < head >
       {headerGroups.map(headerGroup => (
         < tr {...headerGroup.getHeaderGroupProps()}>
           {headerGroup.headers.map(column => (
             < th {...column.getHeaderProps()}>{column.render('Header')}
           ))}
         < /tr >
       ))}
     < /thead >
     < tbody {...getTableBodyProps()} >
       {rows.map((row, i) => {
         prepareRow(row)
         return (
           < tr {...row.getRowProps()}>
             {row.cells.map(cell => {
               return {cell.render('Cell')}
             })}
           < /tr >
         )
       })}
     < /tbody >
   < /table >
 )
}
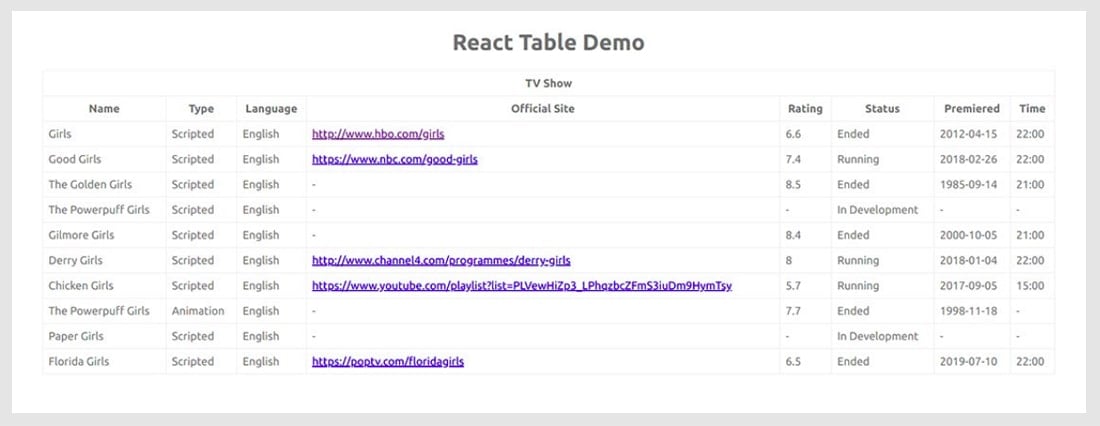
After running the command npm run start you will see something like this-

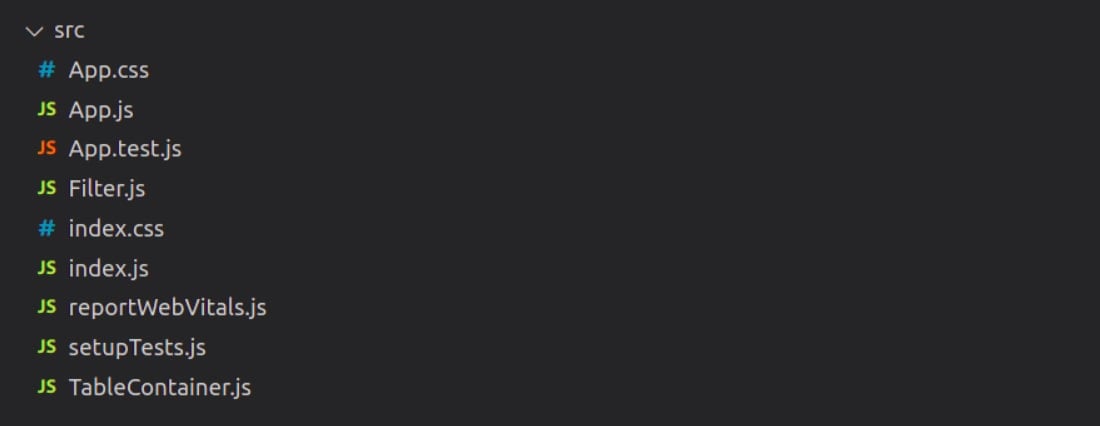
Now, moving on to useFilter and useGlobalFilter in our application. According to our UI, this will be our project structure.

We will implement the default filter and select column filter. For that, we will
Create a new file named – Filter.js (which will have functional components for Filter views)
Without further ado, let’s create Filter.js and define React table components for Filter UI.
In this React Table demo, we will implement three filter views –
We will create a common file named Filter.js (or with any suitable name) from where we will export the above-mentioned functional components for readability purposes.

import { React, useMemo, useState } from "react";
import { useAsyncDebounce } from "react-table";
import { Label, Input } from "reactstrap";

// Component for Global Filter
export function GlobalFilter({
   globalFilter,
   setGlobalFilter
}) {
 const [value, setValue] = useState(globalFilter);

 const onChange = useAsyncDebounce((value) => {
   setGlobalFilter(value || undefined);
 }, 200);

 return (
   <div>
     <Label>Search Table: </Label>
     <Input
       value={value || ""}
       onChange={(e) => {
         setValue(e.target.value);
         onChange(e.target.value);
       }}
       placeholder=" Enter value "
       className="w-25"
       style={{
         fontSize: "1.1rem",
         margin: "15px",
         display: "inline",
       }}
     />
   </div>
 );
}

// Component for Default Column Filter
export function DefaultFilterForColumn({
 column: {
   filterValue,
   preFilteredRows: { length },
   setFilter,
 },
}) {
 return (
   <Input
     value={filterValue || ""}
     onChange={(e) => {
       // Set undefined to remove the filter entirely
       setFilter(e.target.value || undefined);
     }}
     placeholder={`Search ${length} records..`}
     style={{ marginTop: "10px" }}
   />
 );
}

// Component for Custom Select Filter
export function SelectColumnFilter({
 column: { filterValue, setFilter, preFilteredRows, id },
}) {

 // Use preFilteredRows to calculate the options
 const options = useMemo(() => {
   const options = new Set();
   preFilteredRows.forEach((row) => {
     options.add(row.values[id]);
   });
   return [...options.values()];
 }, [id, preFilteredRows]);

 // UI for Multi-Select box
 return (
   <select
     value={filterValue}
     onChange={(e) => {
       setFilter(e.target.value || undefined);
     }}
   >
     <option value="">All</option>
     {options.map((option, i) => (
       <option key={i} value={option}>
         {option}
       </option>
     ))}
   </select>
 );
}
Explanation
A good developer takes care of the performance even while coding for a demo application. Try avoiding trash coding.
For GlobalFilter and DefaultFilterForColumn
Open TableContainer.js and Import components and hooks-

import { useTable, useFilters, useGlobalFilter } from "react-table";
import { GlobalFilter, DefaultFilterForColumn} from "./Filter";
Pass DefaultFilterForColumn to useTable hook as a default filter for all the columns. So by default, your columns will have these components as filters unless you provide a custom filter or disable the filter.

useTable(
  {
    columns,
    data,
    defaultColumn: { Filter: DefaultFilterForColumn },
  },
 useFilters,
 useGlobalFilter
Now for rendering the UI, use the following code-

{/* Rendering Global Filter */}
Your entire TableContainer.js will look like this-

import { React } from "react";
import { useTable, useFilters, useGlobalFilter } from "react-table";
import { GlobalFilter, DefaultColumnFilter } from "./Filter";

export default function Table({ columns, data }) {
  const {
   getTableProps,
   getTableBodyProps,
   headerGroups,
   rows,
   state,
   visibleColumns,
   prepareRow,
   setGlobalFilter,
   preGlobalFilteredRows,
 } = useTable(
   {
     columns,
     data,
     defaultColumn: { Filter: DefaultFilterForColumn },
   },
   useFilters,
   useGlobalFilter
 );

 return (
   <table {...getTableProps()}>
     <thead>
       <tr>
         <th
           colSpan={visibleColumns.length}
           style={{
             textAlign: "center",
           }}
         >
           {/* Rendering Global Filter */}
           <GlobalFilter
             preGlobalFilteredRows={preGlobalFilteredRows}
             globalFilter={state.globalFilter}
             setGlobalFilter={setGlobalFilter}
           />
         </th>
       </tr>
       {headerGroups.map((headerGroup) => (
         <tr {...headerGroup.getHeaderGroupProps()}>
           {headerGroup.headers.map((column) => (
             <th {...column.getHeaderProps()}>
               {column.render("Header")}
               {/* Rendering Default Column Filter */}
               <div>
                 {column.canFilter ? column.render("Filter")
                  :null}
               </div>
             </th>
           ))}
         </tr>
       ))}
     </thead>
     <tbody {...getTableBodyProps()}>
       {rows.map((row, i) => {
         prepareRow(row);
         return (
           <tr {...row.getRowProps()}>
             {row.cells.map((cell) => {
               return <td {...cell.getCellProps()}>
           {cell.render("Cell")}
         </td>;
             })}
           </tr>
         );
       })}
     </tbody>
   </table>
 );
}
For using SelectColumnFilter,
If you disable filter on any particular column, add the following line of code-

{
  Header: "Premiered",
  accessor: "show.premiered",
  // disable the filter for particular column
  disableFilters: true,
  Cell: ({ cell: { value } }) => value || "-",
},
Do you remember we added a line for implementing column filter-
The “Filter” is the property in the column definition. It will render whichever component is given as a value to the Filter key.
Here we have used defaultcolumn, so no need to define Filter for all the columns but we have to define the Filter key for custom filters (e.g. SelectColumnFilter)
The condition of column.canFilter will be executed and it will render component defined to key Filter.
Here we have mentioned the custom filter, SelectColumnFilter, in the object and set DefaultFilterForColumn as a default shown filter.
Feel free to visit the source code of the demo application- react-table-example.
So, this was about how to filter your table data using the useFilter hook. I hope the React Table tutorial was helpful for you. If you have any questions or suggestions about using React useTable or useFilter, you can feel free to reach out to our experts.
If you are a ReactJs enthusiast, check the ReactJS Tutorials page with more tutorials and its respective github repository.
At Bacancy, developers try their best to come up with optimum solutions and affordable problem-solving approaches. If you are looking for a helping hand for your project, contact us to hire React developers without wasting a minute.
React Table can greatly help you to organize statistical data in a tabular format. You must use it present data in the best readable form, for which you must leverage React Table library. It creates dynamic, responsive, user-friendly tables so your target audience won’t face challenges reading the data.
Yes, React Table supports server-side rendering, which is a notable feature. Having a table library might take time to load, but with React Table supporting server-side rendering, you don’t need to worry about page loading issues.
Every upgraded version has new features or better improvements than their previous versions. Basically, with every new version, the task of developers becomes easier and less time-efficient. TanStack Table boosts performance, adds new hooks, and enhances accessibility for the user.
Your Success Is Guaranteed !
We accelerate the release of digital product and guaranteed their success
We Use Slack, Jira & GitHub for Accurate Deployment and Effective Communication.