Set up Email Authentication Using React Native Firebase Auth + React Navigation
Last Updated on June 5, 2024
This beginners’ guide will help you build a React Native application and integrate it with Firebase. Furthermore, we will set up email authentication with Firebase in React Native. We all have heard how smoothly we can build native applications using React Native. Let’s combine its flexibility with Firebase and get started with this tutorial to implement email authentication and React Navigation using React Native Firebase auth.
We are building a basic React Native application integrated with Firebase Authentication that consists of Sign Up, Login/Logout, Forgot password, and User Profile.
Here is the flow for authenticating a user – whenever the user accesses the app, it will contain the authentication state, and based on that state; the user will have access to the screen or the services of the app. Based on this condition, authenticated and non-authenticated users will have access to different screens accordingly. Here in our demo, we will implement authentication on the Profile screen. It means that only an authenticated user will visit its Profile page; else, it will have only access to Sign Up and Sign In screens.
Without further ado, let’s start coding!
You can visit here – Github Repository and check the code or go through this tutorial. Follow these steps to build a React Native app and implement Firebase Authentication.
Initially, we will create a React Native app using-
We will require stack navigation for navigating through different screens.

npm install react-native-gesture-handler react-native-safe-area-context @react-navigation/native @react-navigation/stack
After this, we need to install the React Native Firebase auth library to implement authentication with Firebase in our react app.
Let’s set-up our Firebase Project.
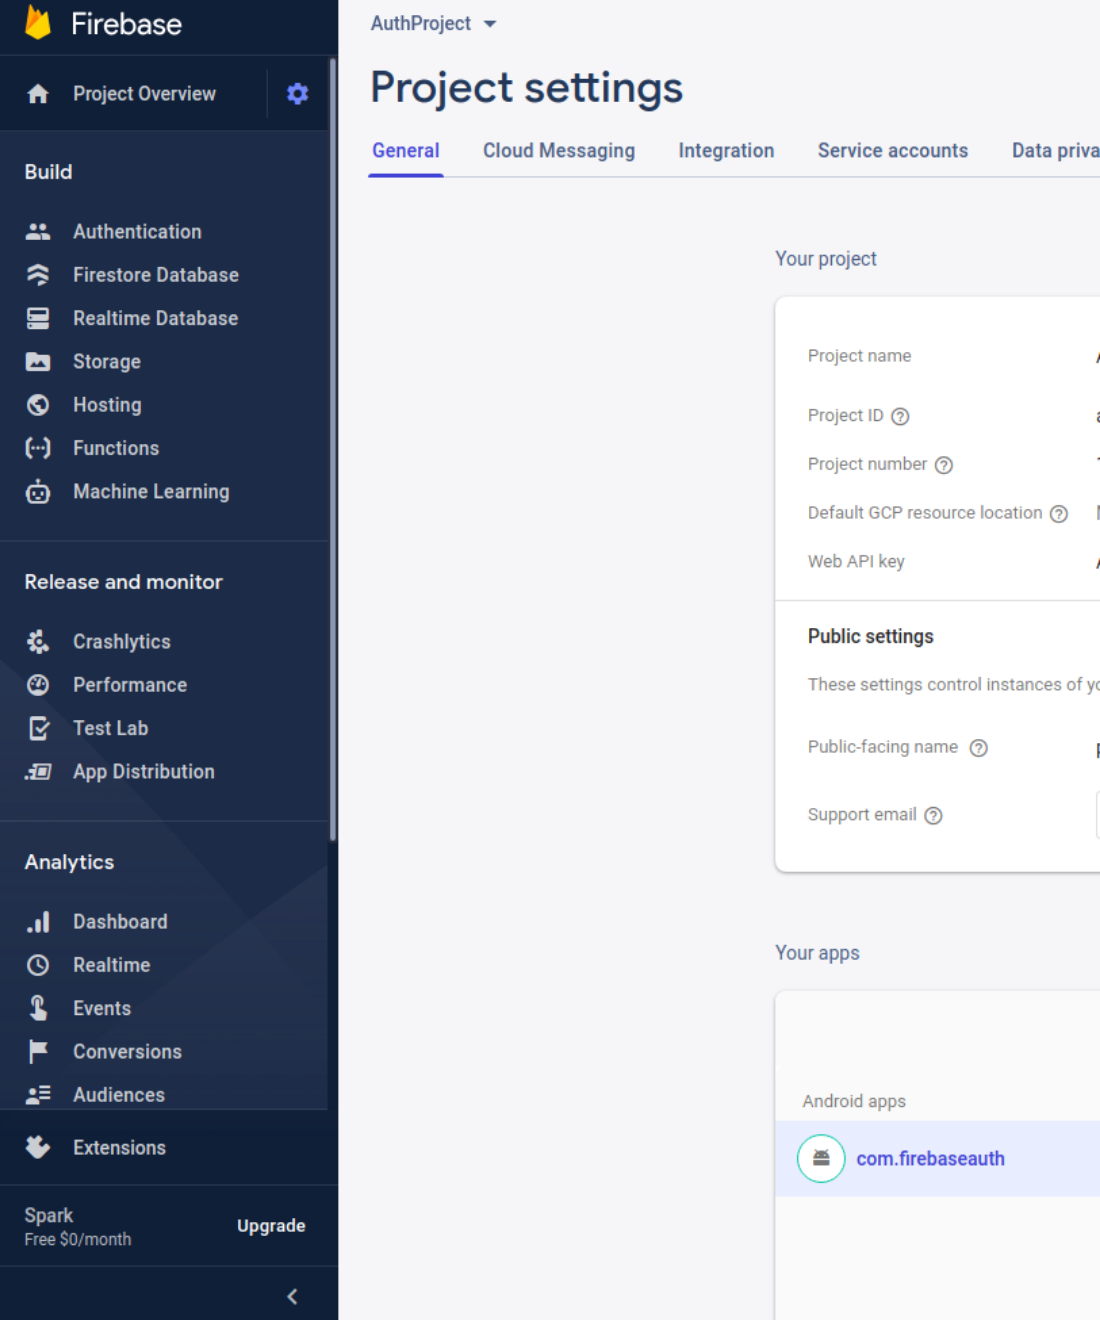
First, we need to create a Firebase Project. Visit the official Firebase website and click on Get Started. There you can create your new project. After that, you will be redirected to the Dashboard to use Authentication Service.
Here are the images that will help you understand the above process.


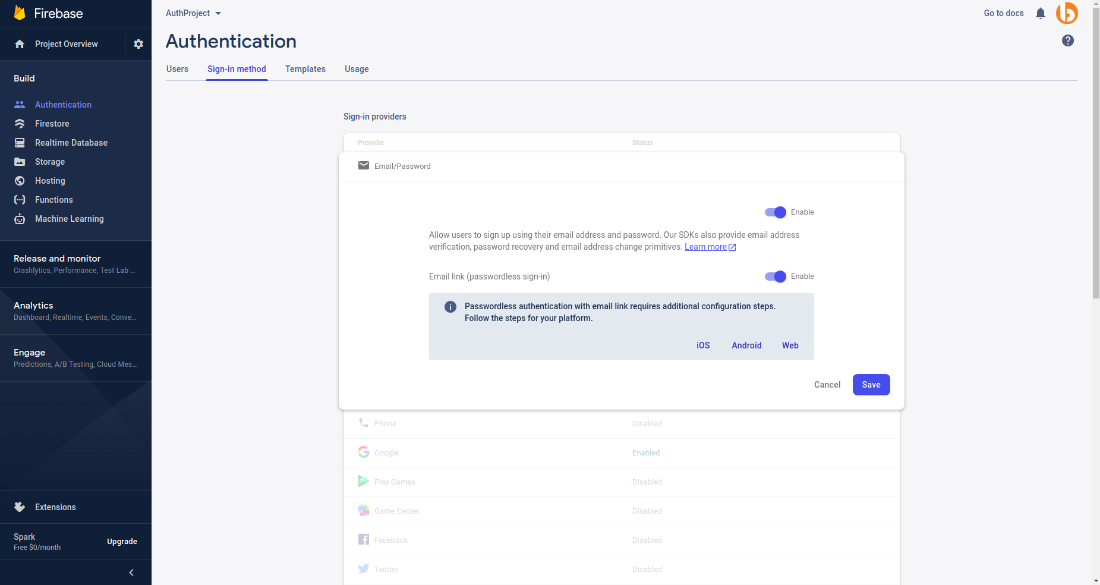
In our app, we have to set up authentication for email/password. For that, follow these steps-
I’ve attached an image below for your reference.

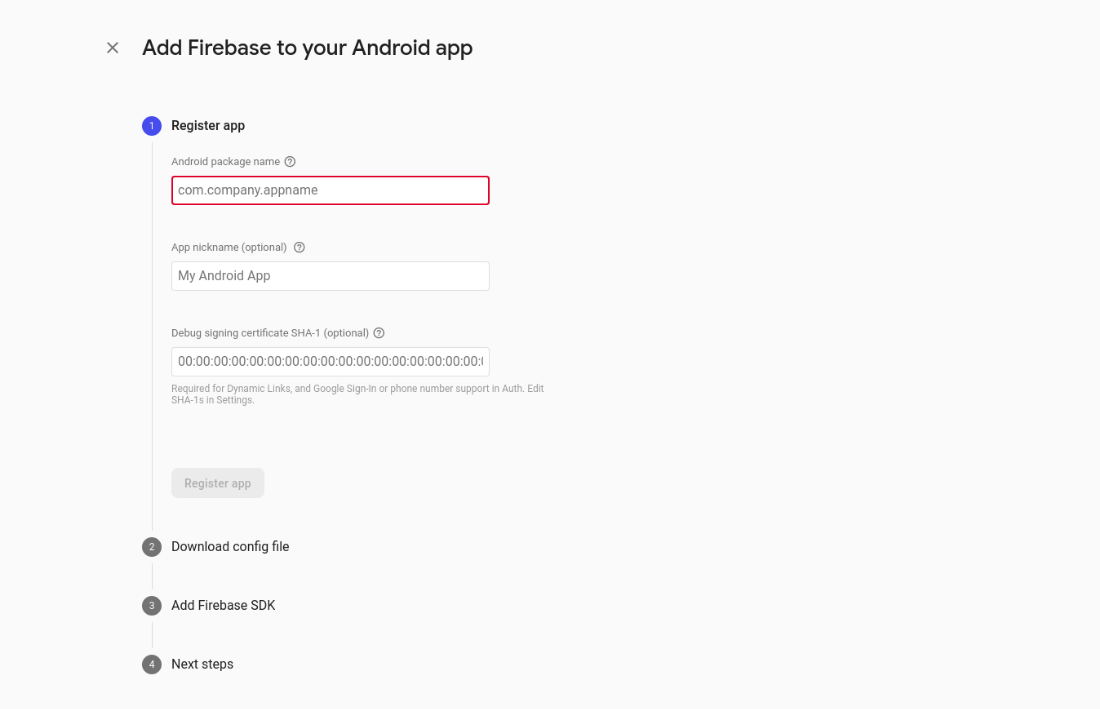
To configure our app with Firebase, go to the Project Dashboard, Add an app to the project, and follow the proper steps.

Now we have all the details related to Firebase configuration. Store these configurations in a file named FirebaseInfo.js

import firebase from @react-native-firebase/auth
const firebaseInfo={
apiKey:'Your API Key',
appId:'Your App Id',
messagingSenderId:'Your Sender Id',
projectId:'Your Project Id',
}
And then initialize the app using:
Let’s get started with creating components for our application. As it’s basic authentication, it will consist of the following components-
SignUp, Login/Logout, ResetPassword, User Details of the currently logged-in user, and a Navigator to move between screens.
After entering the required details, whenever a user clicks on the SignUp button, it will validate and check if there is an error related to the email registration. Here is the logic for implementing the Sign Up process.

const OnSignUp= async(email,password)=>{
    Keyboard.dismiss()
      if(!email)
      {
          Alert.alert("Email can't be empty");
      }
      else if(!EmailRegex.test(email))
      {
          Alert.alert("Email is not in the right format")
      }
      else if(!password && password.trim() && password.length<5)
      {
          Alert.alert("Password is too weak and required min 6 characters")
      }
      else{
      try{
          const Email=await firebase.auth().createUserWithEmailAndPassword(email,password)
          Email.user.updateProfile({displayName:username})
          Email.user.reload()

          setusername("")
          setemail("")
          setpassword("")
         props.navigation.navigate('Login')
    }
      catch(error)
      {
          console.log("error", error.message, error.code)
          switch (error.code)
          {

          case "auth/weak-password":
         Alert.alert("Password is invalid,requires min 6 char")
         break;
         case "auth/email-already-in-use":
           Alert.alert("Email is already registered")
           break;
           default:
             Alert.alert("Error")
          }
      }
    }
  }
Similarly, the Login screen will verify if the user is authenticated or not. It can be verified with the given parameters (email, password):
For Log Out, we will revoke the access from the user and let him sign out from the app with this:
If you don’t remember your password, Forget Password screen lets you recover your password using your email-id where Firebase will share a link to reset your password using:
The user profile will display user details (of the logged-in user) such as email-id and user name entered at the time of Sign Up:
This was about setting up email/ password authentication and React Navigation using React Native Firebase Auth. I hope the purpose for landing on this tutorial has been fulfilled as you’ve expected. If you are looking to develop one-of-a-kind React Native application, then get in touch with us to hire React Native developer from us to leverage to leverage our top-notch React Native app development services.
Your Success Is Guaranteed !
We accelerate the release of digital product and guaranteed their success
We Use Slack, Jira & GitHub for Accurate Deployment and Effective Communication.