Hello again!
I am writing this blog to get you through one of the easier ways to implement multi-language support in Angular application, and if you follow all the instructions that I am going to discuss in this blog post, then I am pretty sure that you will have your own multi-language support Angular application.
Table of contents:-
(1) What is Internationalization or i18n in Angular Application?
(2) What is multi-language support work in Angular application?
(3) How to implement Internationalization in Angular Application?
(4) Source code of Git repository.
(1) What is Internationalization or i18n in Angular Application?
➤ So Internationalization or i18 is a feature that is provided by the Angular team to support multi-languages on a website.
➤ By using Internationalization, users can change the language and can understand more about the website content in a supportive language.
➤ For more information, you can visit official website https://angular.io/guide/i18n
(2) What is Multi-Language Support Work in Angular Application?
➤ Multiple language support is to offer support for different languages on a website or web page.
➤ By which users can change the language, and some content will be changed based on language preference.
(3) How to implement Internationalization in Angular Application?
➤ Let’s do some practice with the new Angular project, so before finishing this blog, you will have a good multi-language support application ready.
➤ So first of all, let’s create a new project.
➤ Here I am using Angular version 9.
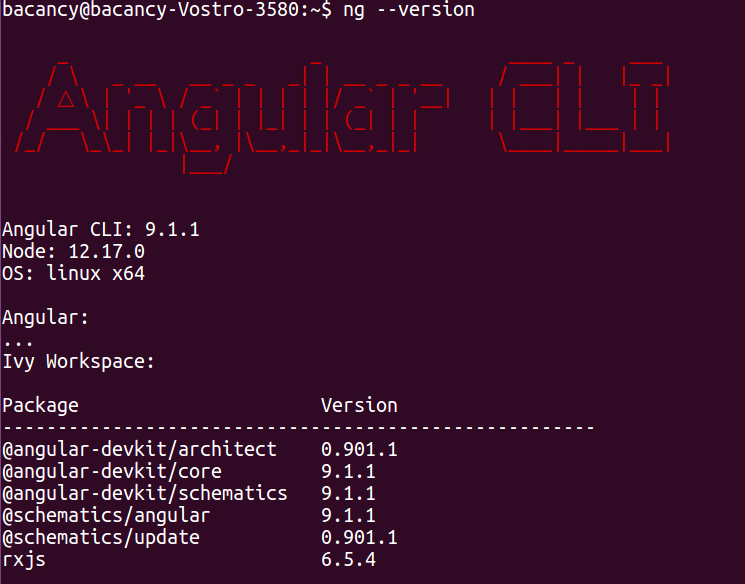
➤ Create a new Angular project by the below command.
ng new i18n – – routing
➤ Now go to the root folder and run this project and check on localhost:4200 in a browser
cd i18n
ng serve -o
So let’s start with creating components and set routing with a nice bootstrap header for redirection to the different pages.
Go to the terminal and create 3 components
ng g c profile
ng g c blog
ng g c certificate
It will create 3 components with HTML, CSS, spec and ts files.
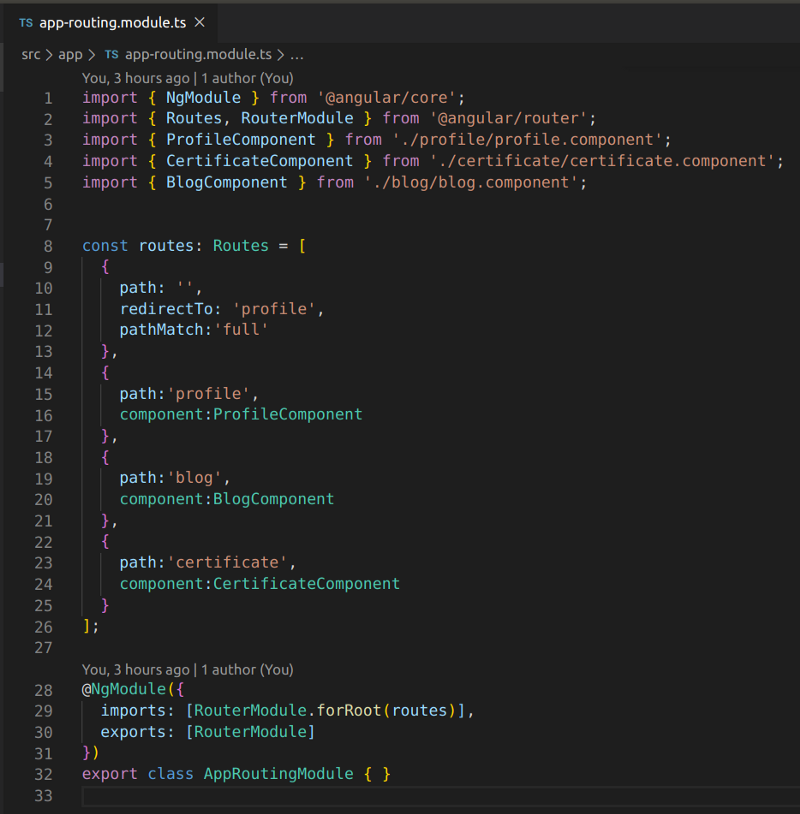
Now go to the app-routing.module.ts file and set the routing as shown in the below image.
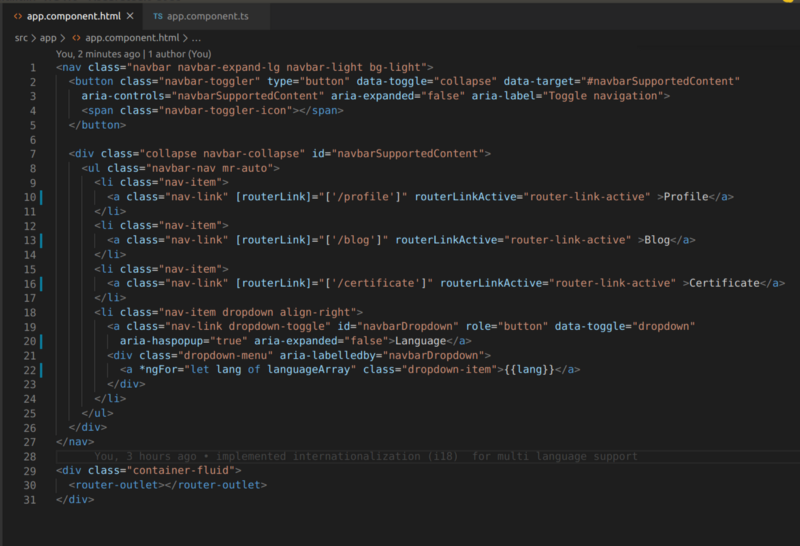
Now create a good bootstrap header in app.component.html and app.component.ts file like, below image.
Note: – I have used bootstrap CDN for some design purpose, so you need to add CDN in index.html file or to use package.json as per your choice, or you can use your own CSS for the header.
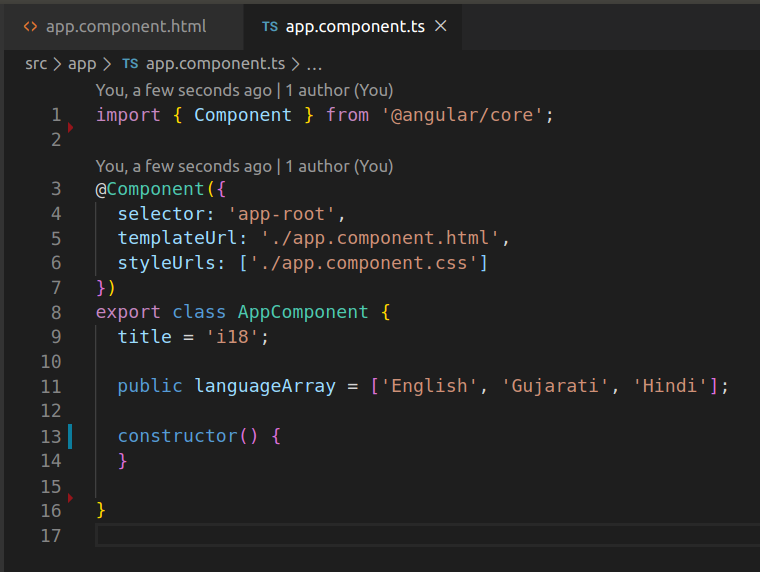
And now, if you run this project, then its output is something like the below image.

I hope your Angular project is running without any error, so now we can start to implement internalization in this project.
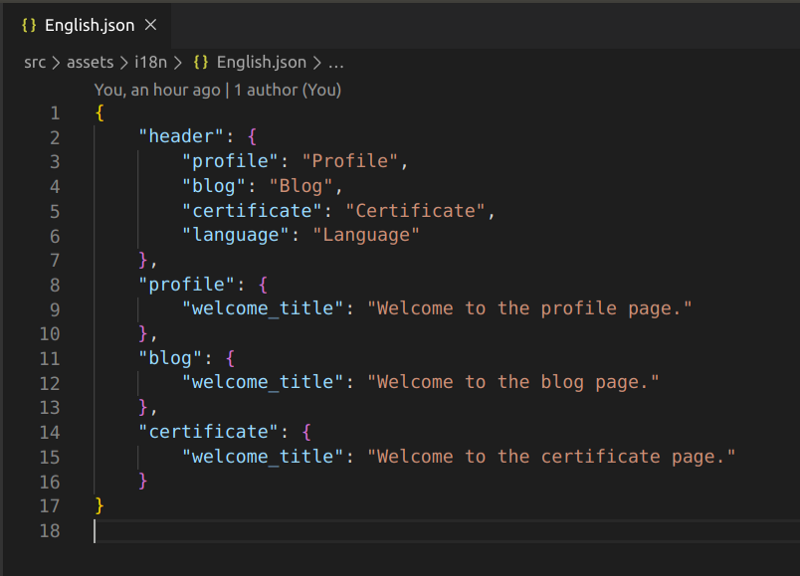
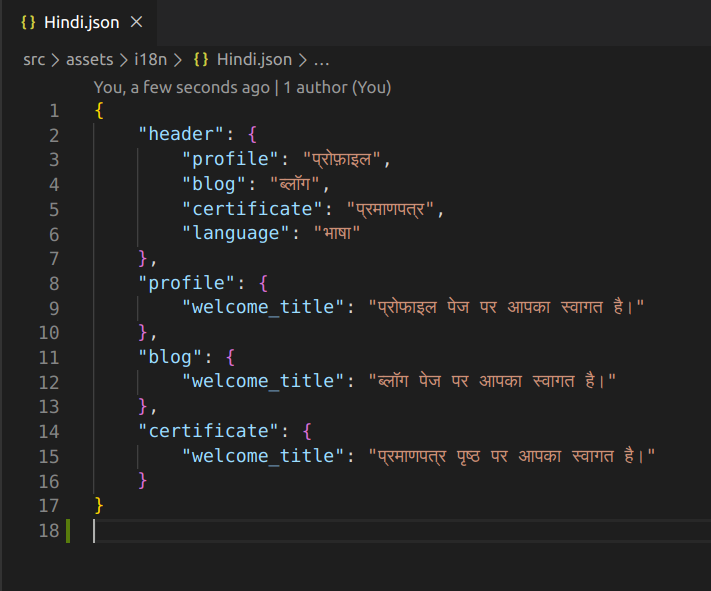
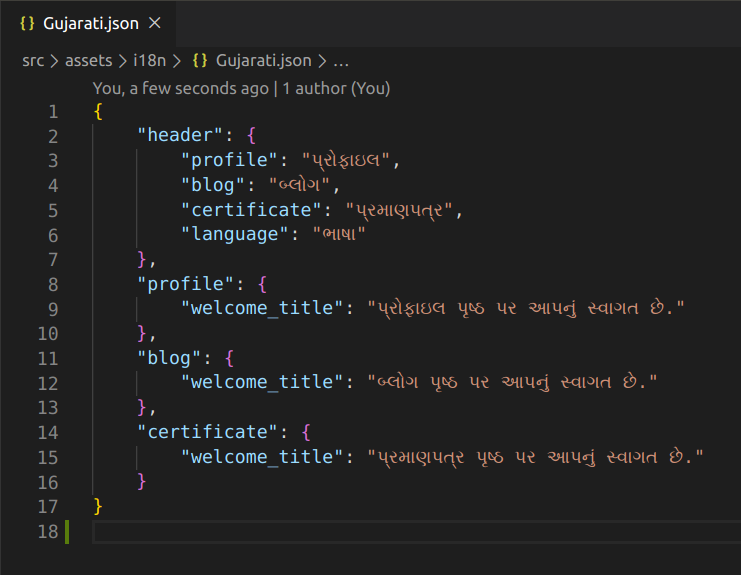
So in this project, we are going to add 3 languages support, which are English, Hindi, and Gujarati, and for that, we need to create 3 JSON files that refer to those languages, and then we will use that file in our project for language support.
So first, go to the assets folder which is inside the src/assets and create 1 folder named i18n and inside that create a 3 language JSON file with some key-value pair as I show in the images below…
(1) English.json
(2) Hindi.json
(3) Gujarati.json
Now we need to install 2 dependencies by using the below command.
npm install @ngx-translate/core @ngx-translate/http-loader
So now we need to use TranslateModule, TranslateLoader from @ngx-translate/core, and TranslateHttpLoader from @ngx-translate/HTTP-loader in app.module.ts for configuration of the language-translation.
As I show in the below image, we need to create a function “createTranslateLoader” and need to add in an import array as well for configuration of the language JSON files, which we created earlier.
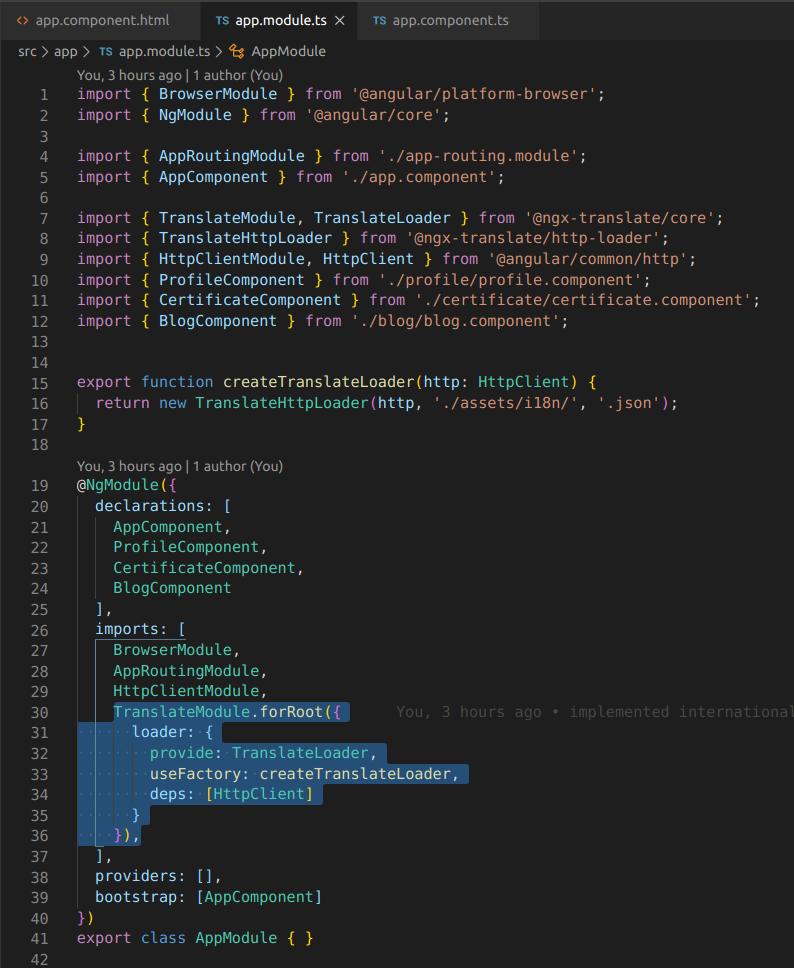
As we are using HTTP so we will be required to import HttpClientModule as well in the app.module.ts file, as shown in the above image.
Now we are almost ready to show the different languages.
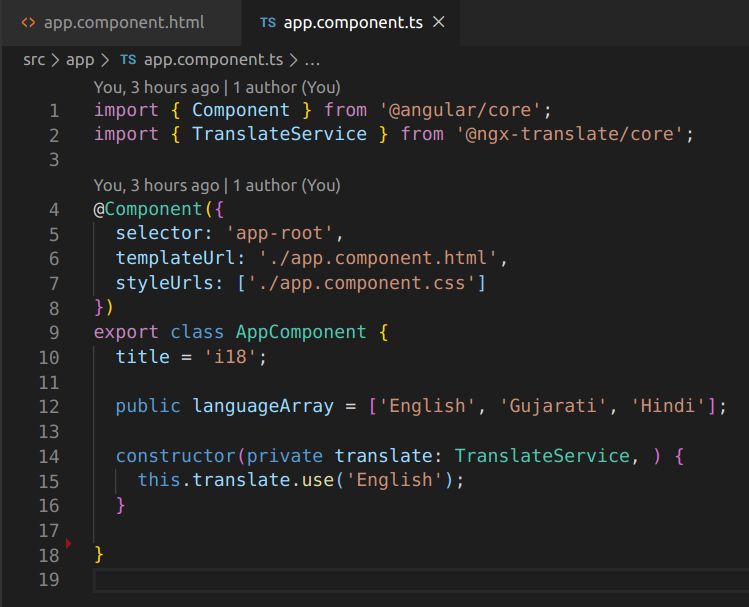
First, we need to set the default language in a constructor of app.component.ts file as shown in the below image.
-> this.translate.use(‘English’);

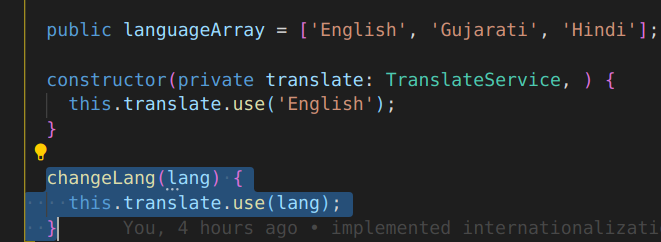
Now select the different languages we need to set in a translation.
We need to create a method and set it to the dropdown language select in app.component.html and app.component.ts file just like below image
Now the central part comes into the picture. Where precisely, we want to show the different languages we need to use a translation pipe, just like in the image below.
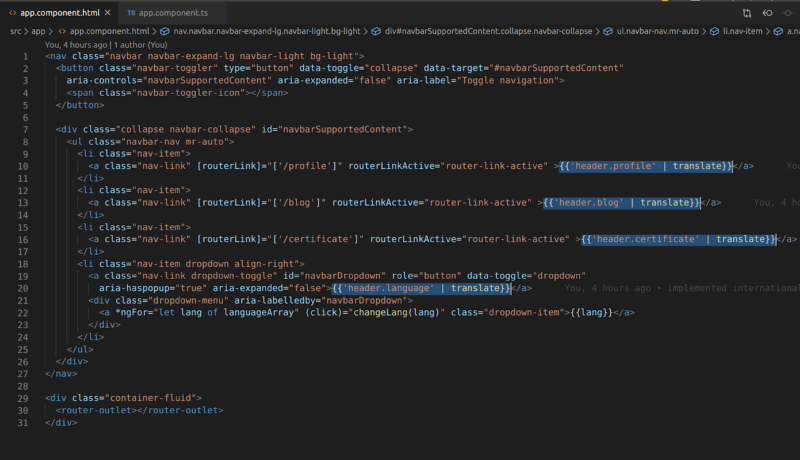
In the above image, you can see that we replace Profile to {{‘header.profile’ | translate}}, so basically header and profile is a key in the language JSON file like.
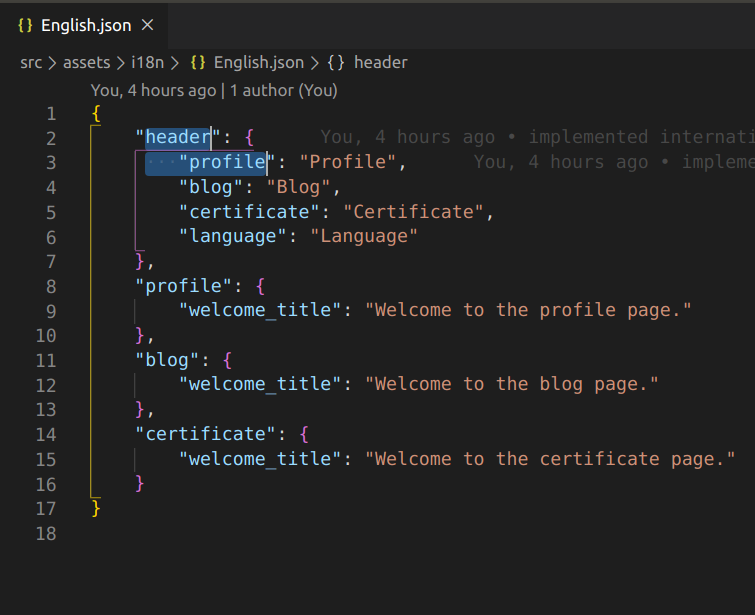
So if we want to show “Welcome to the profile page.” then we need to do something like.
![]()
So now we are done with internalization or i18n or Multi-language support in our Angular project.
You can save all the changes and run this project on the browser, and you will see the changes.
Output Video link:-https://drive.google.com/file/d/1kUmjbv6Bxeapvn2Qx0MEBL5XWF5xjXRy/view?usp=sharing
(4) Source code of Git repository.
Github:- https://github.com/parthsardhara/NG-Internationalization-i18n
Project Setup:-
⦿ Clone this project using the below command.
⦾ git clone https://github.com/parthsardhara/NG-Internationalization-i18n.git
⦿ Go to the project root folder.
⦾ cd NG-Internationalization-i18n
⦿ Install node modules dependency by
⦾ npm install
⦿ Run this project by
⦾ ng serve or ng s
⦿ Go to the browser and check on localhost:4200
Wrapping Up
I hope you have enjoyed reading this blog post. If you are looking for a helping hand to build Angular application with Internationalization (I18N) or looking for support with your existing app, then get in touch with us to integrate skilled and seasoned Angular developers into your existing team. We are a top-rated Angular appliaction development company, offering the best Angular development services and also let you hire dedicated Angular application developers at your convenience engagement model.


