How to Handle Offline Data Storage with Flutter Hive?
Last Updated on December 27, 2024
The storage of the data locally is a requirement for almost every app. The storage and manipulation of information is a crucial part of app development, and the same holds for Flutter apps. Perhaps you want to cache REST API responses, build an application that runs offline or store customer information for a food delivery app.
Several options are available for developers to persist local data in Flutter.shared_preferences: Provides a good way to store small pairs of keys and values .sqflite : It’s a good choice when your database must handle complex relationships between relational data.
However, if you’re looking for a fast and secure local database that’s also compatible with Flutter Web(), in that case, to handle offline data storage with Flutter hive is one of the best available ways.

Hive is a lightweight and blazing fast key-value database written in pure Dart, which allows you to store and sync application data offline.
As a key-value data store written in Dart, Hive supports primitive and complex data structures while providing the highest level of performance.
Additionally, it is encrypted with AES-256.
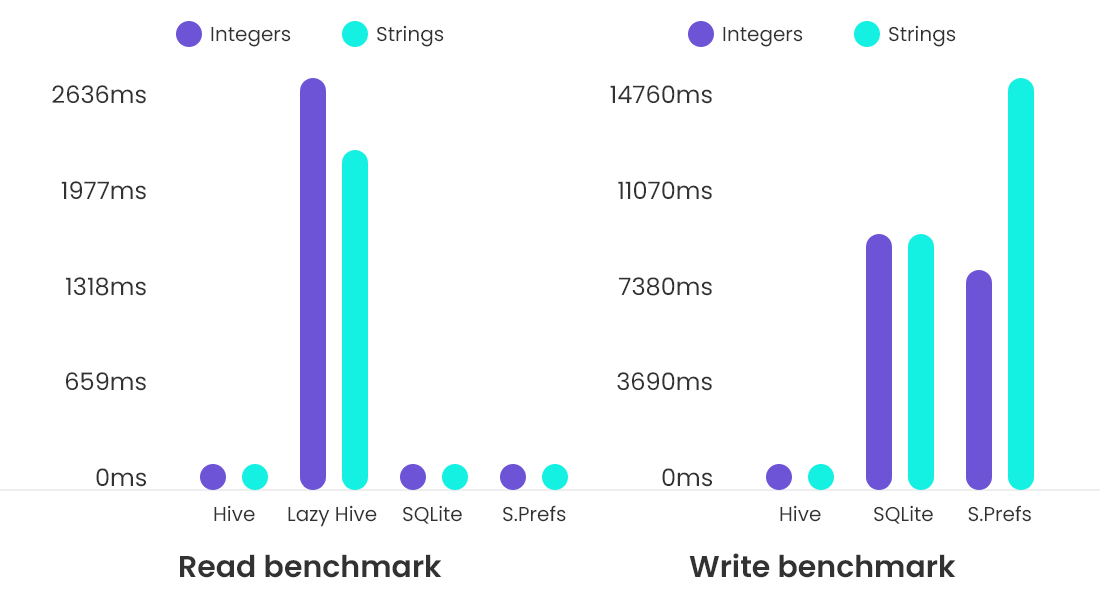
As an example, here is a graph that compares Flutter Hive to other similar databases:

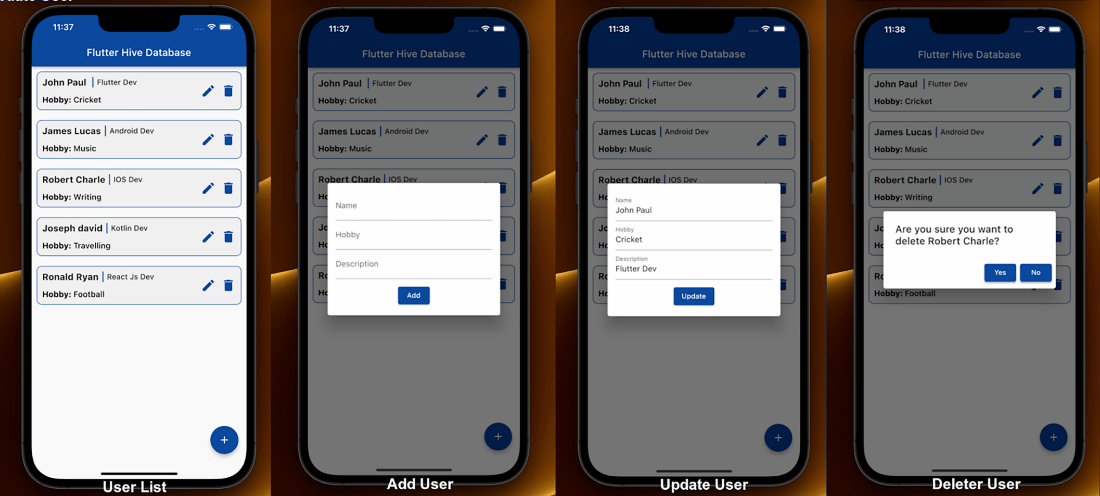
In this blog, we will explore the Hive DataBase With TypeAdapter In Flutter. We will also create a simple app with only one page that shows a list of users, add new users, update existing users, and delete users.

hive and hive_flutter
Add the dev dependencies
First, we must initialize Hive before calling runApp in the flutter app.

void main() async{
 WidgetsFlutterBinding.ensureInitialized();
   // Initializes Hive with a valid directory in your app files
 await Hive.initFlutter();
 runApp(const MyApp());
}
The initFlutter() function is provided by Hive.Basically, it initializes Hive by using the path returned by getApplicationDocumentsDirectory

Leverage the benefits of Hive- a straightforward key-value database solution to store data locally. Get instant benefits over Sqflite as Hive also allows you to manipulate the data on the targeted devices.
Hire Flutter DeveloperHere’s how to handle offline data storage with Flutter Hive.
The data stored in Flutter Hive is organized into boxes. The box is similar to a table in SQL, but it has no structure and can hold anything. As I mentioned in the introduction, Hive encrypts data.Additionally, encrypted boxes can be used to store sensitive information.
Using key-value sets, Hive stores its data. First of all, you need to open your box.

void main() async{
 WidgetsFlutterBinding.ensureInitialized();
// Initializes Hive with a valid directory in your app files
 await Hive.initFlutter();
// open box
await Hive.openBox("userBox");
runApp(const MyApp());
}
Our example contains several users with information such as name, hobby, and description.

import 'package:hive/hive.dart';

part 'user_model.g.dart';

@HiveType(typeId: 0)
class UserModel extends HiveObject {
@HiveField(0)
 final String name;
 @HiveField(1)
 final String hobby;
 @HiveField(2)
 final String description;

 UserModel({
required this.name,
required this.hobby,
 required this.description,
});
}
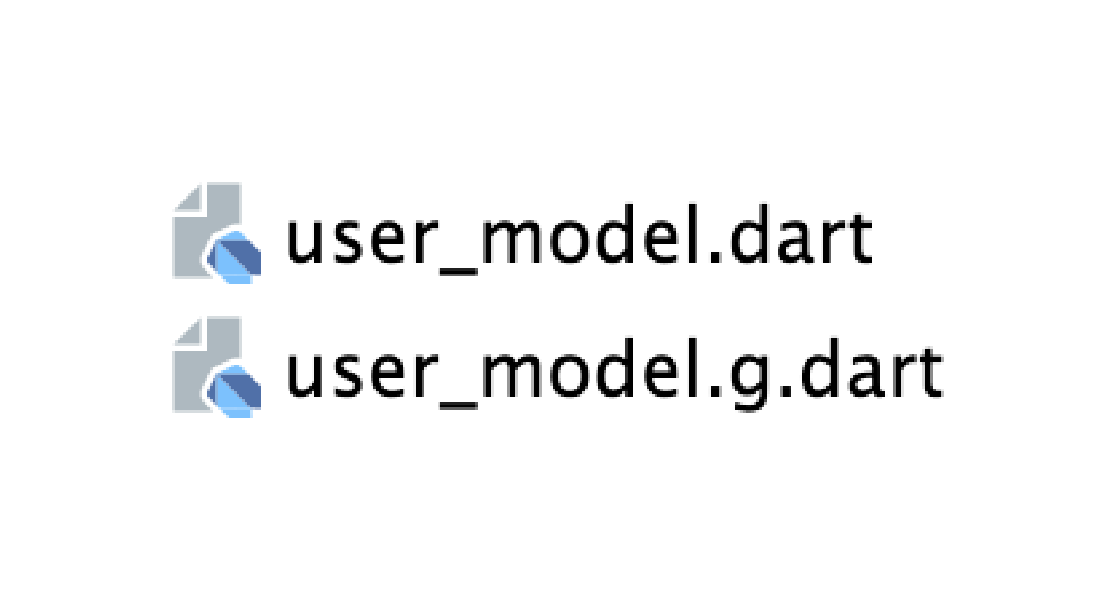
First of all, we need to import hive. In order to generate the type adapter, add a section called user_model.g.dart.TypeAdapter does not need to be constructed manually since we are using the hive generator package.
It automatically builds TypeAdapters for almost any class using the hive_generator package.
As you can see, the userModel class is annotated with several fields.
@HiveType(): Make the model class clear with @HiveType(), so that the generator realizes that this should be a TypeAdapter.
@HiveField(index): Annotating the class’s fields with this field and their corresponding index is mandatory.
To construct a TypeAdapter class, run the following command.

Here File name is user_model.dart, and the data_model.g.dart file will be added where g stands for generated. As a result, user_model.g.dart would be the new generated file.
It is time to register UserModelAdapter now that it has been built successfully.
In order to accomplish this, we must write that adapter before calling the run app function.

void main() async{
 WidgetsFlutterBinding.ensureInitialized();
// Initializes Hive with a valid directory in your app files
 await Hive.initFlutter();
// Register Hive Adapter
Hive.registerAdapter(UserModelAdapter());
// open box
await Hive.openBox("userBox");
runApp(const MyApp());
}
You can use the reference to the Hive box to add data by calling add() function.A key-value pair is accepted by this method.
A dialog box will open when we tap on the floating button, and we can enter a name, hobby, and description. After that, we will press the add button, and data will appear.
The ValuelistenableBuilder() stream in Flutter Hive can also be used to listen to what is happening inside the box.
Box objects can be read by using the get() method. To retrieve its value, you simply need to provide the key, like this
In case you are using auto-incrementing values, you can use the getAt(index) method of the box object to read using the index,like this

var userData = box.getAt(index);


ValueListenableBuilder(
 valueListenable: HiveDataStore.box.listenable(),
   builder: (context, Box box, widget) {
   return SafeArea(
       child: box.length > 0 ? ListView.builder(
           shrinkWrap: true,
           itemCount: box.length,
           itemBuilder: (BuildContext context, int index) {
             var userData = box.getAt(index);
             return Container(
               padding: const EdgeInsets.all(10),
               margin: const EdgeInsets.all(10),
               decoration: BoxDecoration(color: Colors.grey.withOpacity(0.1),
                   border: Border.all(color: Colors.blue.shade900),
                   borderRadius: const BorderRadius.all(Radius.circular(10))),
               child: Row(
                 children: [
                   Expanded(
                     flex: 1,
                     child: Column(
                       crossAxisAlignment: CrossAxisAlignment.start,
                       children: [
                         IntrinsicHeight(
                           child: Row(
                             children: [
                               Text(userData.name, style: const TextStyle(fontSize: 18, fontWeight: FontWeight.w700),
                               ),
                               VerticalDivider(color: Colors.blue.shade900,thickness: 2,),
                               Text(userData.description, style: const TextStyle(fontSize: 15, fontWeight: FontWeight.w500),
                               ),
                             ],
                           ),
                         ),
                         const SizedBox(height: 15),
                         RichText(text: TextSpan(text: 'Hobby: ', style: const TextStyle(color: Colors.black, fontSize: 16, fontWeight: FontWeight.w700),
                             children: <TextSpan>[
                               TextSpan(text: userData.hobby, style: const TextStyle(fontSize: 16, fontWeight: FontWeight.w500)),
                             ],
                           ),
                         ),
                       ],
                     ),
                   ),
                   Expanded(
                     flex: 0,
                       child: Row(
                         children: [
                           InkWell(
                             onTap:(){
                               isUpdate.value = true;
                               nameEditingCtr.text = userData.name;
                               hobbyEditingCtr.text = userData.hobby;
                               descriptionEditingCtr.text = userData.description;
                               _showDialog(context,index);
                             },
                             child: Icon(Icons.edit, size: 30, color: Colors.blue.shade900,),
                           ),
                           const SizedBox(width: 10),
                           InkWell(
                             onTap: ()async{
                                       await showDialog(
                                         context: context,
                                         builder: (context) => AlertDialog(
                                           title: Text('Are you sure you want to delete ${userData.name}?'),
                                           actions: <Widget>[
                                             TextButton(
                                               style: ButtonStyle(
                                                 backgroundColor: MaterialStateProperty.all(Colors.blue.shade900),
                                                 elevation: MaterialStateProperty.all(3),
                                                 shadowColor: MaterialStateProperty.all(Colors.blue.shade900), //Defines shadowColor
                                               ),
                                               onPressed: () {dataStore.deleteUser(index: index);},
                                               child: const Text('Yes', style: TextStyle(color: Colors.white),
                                               ),
                                             ),
                                             TextButton(
                                               style: ButtonStyle(backgroundColor: MaterialStateProperty.all(Colors.blue.shade900),
                                                 elevation: MaterialStateProperty.all(3),
                                                 shadowColor: MaterialStateProperty.all(Colors.blue.shade900), //Defines shadowColor
                                               ),
                                               onPressed: () {Navigator.of(context, rootNavigator: true).pop(); },
                                               child: const Text('No',
                                                 style: TextStyle(color: Colors.white),
                                               ),
                                             ),
                                           ],
                                         ),
                                       );
                                     },
                               child: Icon(Icons.delete,size:30,color: Colors.blue.shade900,))
                         ],
                       )),
                 ],
               ),
             );
           }):const Center(child: Text("No Data Found"),));
 }
)
The put() method can update the data you originally stored for a key.In this way, the newly provided value will be updated at that key.

/// update user data FutureupdateUser({required int index,required UserModel userModel}) async { await box.putAt(index,userModel); }
Here we have used the auto-incrementing values, you can use the putAt(index) method of the box object to update using the index.
In order to delete data, you can pass the key to the delete() method.
Here we have used the auto-incrementing values, you can use the deleteAt(index) method of the box object to delete using the index.
Every time we create a regular box, its contents are stored in memory.Performance is high as a result.
A LazyBox is a great way to access data quickly when you have lots of data inside a Box and don’t want to load it all into memory.
We have now completed most of the coding for the app. It’s time to clean up: the Hive is an append-only store.It is possible to manually use the .compact() method or let Hive handle it for us.
As a result, I have overridden the dispose method in order to close the Openbox.

@override
void dispose(){
   // to free up space
  Hive.box('userBox').compact();
  // close all the open boxes before closing the page.
  Hive.close();
}
All the code can be found here:
https://github.com/mohitsolankee22/flutter_hive_db_blog
I hope you have understand the basic structure of the Hive DataBase. There is no doubt about Hive being an excellent, easy-to-use, fast, efficient database, and especially it is blazing fast and supports almost all platforms. If you need assistance to handle offline data storage with Flutter Hive, then feel free to get in touch with a Flutter app development company like Bacancy. Contact us Now.
Your Success Is Guaranteed !
We accelerate the release of digital product and guaranteed their success
We Use Slack, Jira & GitHub for Accurate Deployment and Effective Communication.