Flutter State Management Using GetX
Last Updated on June 3, 2024
Whenever we start building any application in a flutter, we must decide which state management we need to use. It would be easier for you to make this decision with this blog. Here, in this tutorial: Flutter state management using GetX, I would like to explain GetX, a powerful flutter framework.
State management allows you data transferring within the application. And whenever data is passed, the application’s state is updated, consequently rebuilding the system. Thus, developers have to be particularly careful about managing the state of an application because state updation may sometimes seem costly for a complex application.
Flutter traditionally provides Stateful Widget to manage states in applications. However, we need to deal with a few limitations when using Stateful Widgets.
To overcome the limitations, we can choose Flutter state management using GetX.
GetX is a powerful and lightweight solution provided by Flutter to manage states and their updation. It provides:
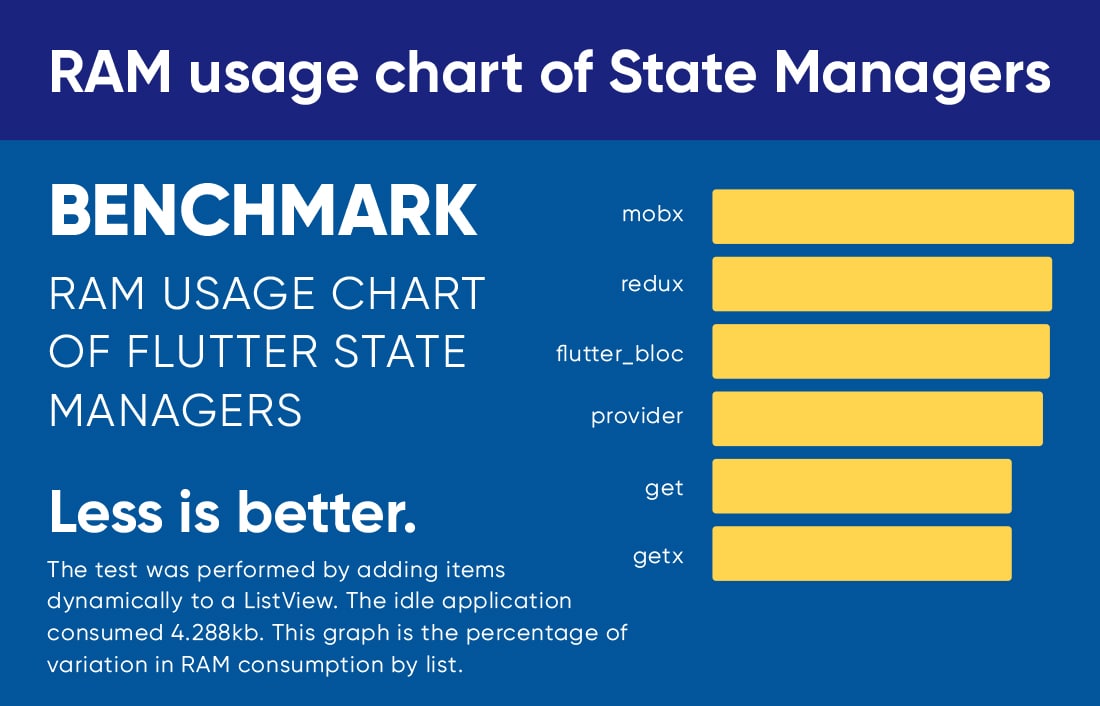
So, let’s dive a little deeper into why we need GetX to manage the state in the flutter app. GetX improves flutter application in three different criteria:

Enough of the theory part. Let’s move forward in our Flutter state management using GetX tutorial and implement it in our application.

Run the above command in Android studio/vs code’s terminal, and it will add the latest GetX plugin to pubspec.yaml.
We are going to cover three sections in this further tutorial
1. State management for basic counter app
2. Navigation using GetX
3. Inflating UI components without context
Put forward your requirements, and we will provide solutions!
Develop best, cost-effective, and high-performance Flutter applications with Bacancy! Stop wasting your time and connect us to hire Flutter developer!
In Getx dependency injection allows you to put/retrieve your class instance with just 1 line of code no context is required to put/retrieve your class instance.
Get.put() helps you put your instance alive throughout your app.
While Get.lazyPut helps you to manage your app memory by instantiating the class when it required by the screen and remove it later when it is no longer needed.
One of the powerful feature of this package. By using this you can connect your screen to their controllers. So whenever the screen is removed from the widget stack all the streams, variables and instances present in the controller will be cleared automatically from memory.
Every screen goes into feature folder
In every screen
Here I will create one counter app by separating UI logic and business logic using a controller, and I would use Obx for this. Don’t worry if you are not aware of all this; I am explaining all these in detail one by one.

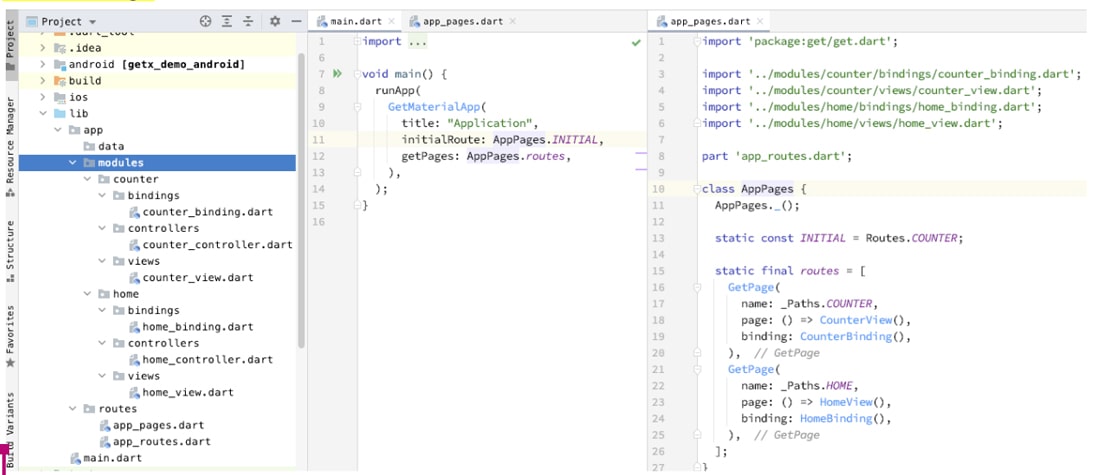
You can see the project structure I have created using the recommended GetX pattern, with a view, controller, and binding class. View class handles the code for inflating the UI, which will appear on the screen. The binding class would be associated with a particular page, and in that class, we can instantiate controller classes. In controller class, we can define variables and business logic functions, in our case increment function. Also, In the main.dart, we have declared GetMaterialApp not MaterialApp so we can use all the functionalities of GetX framework.

abstract class CounterRepository {
  const CounterRepository();

  Rx get count;

  void increment();
}

class CounterIncrementOneRepository extends CounterRepository {
  CounterIncrementOneRepository();

  @override
  final Rx count = 0.obs;
  final int _incrementValue = 1;

  @override
  void increment() => count.value += _incrementValue;
}
CounterRepository provides an abstraction so that you can mock the underlying data sources without affecting your presentation or business logic layer.

class CounterController extends GetxController {
  final CounterRepository repo;

  CounterController(this.repo);

  void navigateToReverseCounterScreen() {
    Get.offAllNamed(ReverseCounterRoute.name);
  }
}
Counter controller contains the repository instance and other business logic which can be used in your screen. Here I have declared the count variable with .obs, which means count is observable, and whenever there is a change in this value, we can listen to that value via controller class. Unlike providers, we do not need to call notifylisteners. In the increment function, I am simply incrementing the count variable value.

class CounterBinding implements Bindings {
  const CounterBinding();

  @override
  void dependencies() {
    Get.lazyPut(() => CounterController(CounterIncrementOneRepository()));
  }
}
As discussed earlier Get.lazyPut() helps you to instantiate your controller when it is needed like when your screen is visible to the user and remove the controller when your screen is removed from the widget stack.

class CounterRoute {
  const CounterRoute._();

  static const String name = '/';
  static const Bindings binding = CounterBinding();
  static const Widget screen = CounterScreen();

  static final GetPage page = GetPage(
    name: name,
    binding: binding,
    page: () => screen,
  );

  static GetPageRoute get pageRoute => GetPageRoute(
        settings: const RouteSettings(name: name),
        binding: binding,
        page: () => screen,
      );
}
Counter route contains your route-related info like name, binding and screen.

class CounterScreen extends StatelessWidget {
  const CounterScreen({Key? key}) : super(key: key);

  @override
  Widget build(BuildContext context) {
    final CounterController controller = Get.find();

    return Scaffold(
      appBar: AppBar(
        title: const Text('Counter'),
      ),
      body: Center(
        child: Column(
          mainAxisAlignment: MainAxisAlignment.center,
          children: [
            ElevatedButton(
              onPressed: controller.navigateToReverseCounterScreen,
              child: const Text('Go to reverse counter screen'),
            ),
            const SizedBox(height: 16),
            const Text(
              'You have pushed the button this many times:',
            ),
            Obx(
              () => Text(
                '${controller.repo.count.value}',
                style: Theme.of(context).textTheme.headline4,
              ),
            ),
          ],
        ),
      ),
      floatingActionButton: FloatingActionButton(
        onPressed: controller.repo.increment,
        tooltip: 'Increment',
        child: const Icon(Icons.add),
      ),
    );
  }
}

final CounterController controller = Get.find();
The above line provides the reference of the controller.
To make your getx binding work you need to pass route info in GetMaterialApp -> getPage property. Here we will use the CounterRoute class that we already created
main.dart

void main() {
  runApp(const MyApp());
}

class MyApp extends StatelessWidget {
  const MyApp({super.key});

  @override
  Widget build(BuildContext context) {
    return GetMaterialApp(
      title: 'Flutter Getx Demo',
      theme: ThemeData(
        primarySwatch: Colors.blue,
      ),
      initialRoute: CounterRoute.name,
      getPages: [
        CounterRoute.page,
        ReverseCounterRoute.page,
      ],
    );
  }
}
For testing getx binding I have created a second screen same as counter but it is a reverse counter so when a user clicks on minus button counter will decrement
Here are all the files used in reverse counter


abstract class ReverseCounterRepository {
  const ReverseCounterRepository();

  Rx get count;

  void decrement();
}

class ReverseCounterDecrementOneRepository extends ReverseCounterRepository {
  ReverseCounterDecrementOneRepository();

  @override
  final Rx count = 0.obs;
  final int _decrementValue = 1;

  @override
  void decrement() => count.value -= _decrementValue;
}
Here you can see that this repository decrements the value by one. This is the only change done in reverse counter screen.

Here you can see the logs CounterController gets created and initialized when user navigates to counter screen and gets deleted from memory when user moves to new screen
Same goes for reverse counter controller ReverseCounterController gets created and initialized when user navigates to reverse counter screen and gets deleted from memory when user moves to new screen
Add “Get” before your MaterialApp, turning it into GetMaterialApp
And assign initialRoute and getPages

class MyApp extends StatelessWidget {
  const MyApp({super.key});

  @override
  Widget build(BuildContext context) {
    return GetMaterialApp(
      title: 'Flutter Getx Demo',
      theme: ThemeData(
        primarySwatch: Colors.blue,
      ),
      initialRoute: CounterRoute.name, // Route for home page
      getPages: [ // Routes/Screen available throughout app
        CounterRoute.page,
        ReverseCounterRoute.page,
      ],
    );
  }
}

Here CounterRoute.page is

static final GetPage page = GetPage(
    name: name, // This name is used to assign named route
    binding: binding,
    page: () => screen,
  );


To navigate to a named route use
Get.toNamed('/some_page');
Get.offNamed('/some_page');
Get.offAllNamed('/some_page');
Get.offNamedUtil('/some_page');
Using the above syntax in the build method, I have defined the controller class. Text button will call the increment method defined in the controller class and Text which will show the updated value of count. But the main thing you can see is the text widget is wrapped with Obx, which means it can get the value of the observable variable; without Obx, the value would not get reflected.
Here I have used one simple example of counter application to understand all the classes, structure, and state management easily. We can achieve many more using GetX flutter using following this observable pattern and writing cleaner code.
Let’s dive into the navigation part.
In the screenshot attached in the state management block, we have also created a page name home. So let’s say we need to go to the home page from the counter class on one button click. We can simply call the GetX navigation block, as shown below.
Pretty simple. Isn’t it? Rather than calling up a lot of boilerplate code, we can simply call this and move to a different screen. Moreover, there are different options to redirect to another page too.
For instance, you can simply replace the home screen with a currently open screen below. It means the current screen which would get replaced won’t be in the stack.
And, if we need to remove all previous stacks, we can call Get.off(HomeView());
Apart from that, we can pass data between routes and show animation before opening another route and open a screen as a dialog using flutter GetX.
Now let’s move to our final point of Inflating UI components without context.
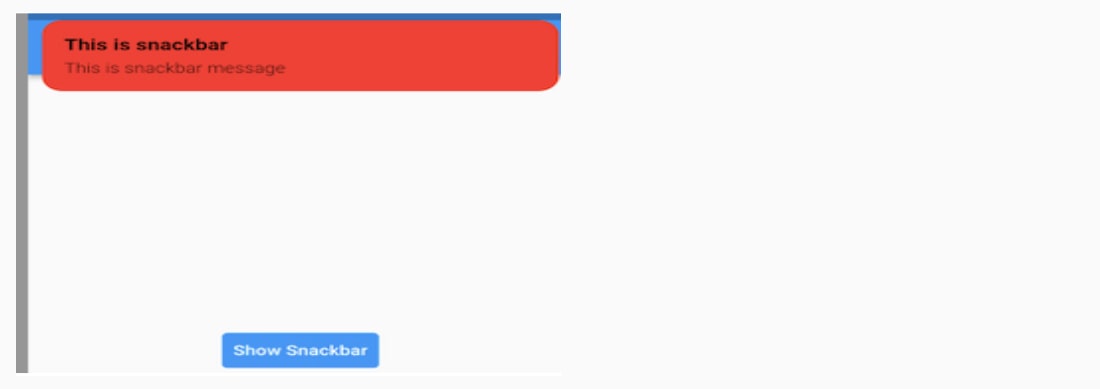
Traditionally, to open a dialog or bottom sheet. If you have a separate file that handles common widgets, we also need to pass context to that class. But with GetX, it is not the case. We can simply inflate that kind of UI block without using context and in an easier way.


Get.defaultDialog(
   title: 'This is dialog',
   middleText: 'This is middle text',
   buttonColor: Colors.green,
   textCancel: "cancel",
   textConfirm: "confirm");


Get.bottomSheet(
 Container(
   child: Wrap(
     children: [
       ListTile(
         leading: Icon(Icons.wb_sunny_outlined),
         title: Text("Light theme"),
         onTap: () => {Get.changeTheme(ThemeData.light())},
       ),
       ListTile(
         leading: Icon(Icons.wb_sunny),
         title: Text("Dark theme"),
         onTap: () => {Get.changeTheme(ThemeData.dark())},
       )
     ],
   ),
 ),
 backgroundColor: Colors.green
);

I think this is it for GetX. You can go through the below official link to explore more about GetX.
https://pub.dev/packages/get
With the Git Cli plugin, you can make the project structure more trouble-free. You can check out the link below.
https://pub.dev/packages/get_cli
That’s it for Flutter state management using GetX tutorial. If you are a flutter enthusiast, the Flutter tutorials page is for you! Try the tutorials and start implementing them in your application. Write us back if you have any suggestions, queries, or questions.
Your Success Is Guaranteed !
We accelerate the release of digital product and guaranteed their success
We Use Slack, Jira & GitHub for Accurate Deployment and Effective Communication.