Basic Routing with Flutter Navigator 2.0 Example
Last Updated on December 27, 2024
Navigator 2.0 was introduced by the Flutter team to handle complex routing Navigator 1.0, it was simply adding and removing the pages from stacks that were very complex for handling deep linking or URI parsing for Flutter Web hence Navigator 2.0 to the rescue or is it?.
Navigator 2.0 is a declarative API created by flutter as opposed to Navigator 1.0, an Imperative API, though, at root, it also works in an imperative style.
In navigator 1.0, we were provided a stack to which we could PUSH or POP pages which was pretty simple and convenient until our application had simple routing that is few screens and didn’t need to be used on the web.
The problem started when we were required to make complex applications, implementing ‘deep linking,’ directly going to a product page from notifications, O.S events handling, and URI parsing for Flutter web back button handling.
Then came Navigator 2.0, which is declarative, i.e., you get more control over the Navigation stack; using nav 2.0, we control the stack as per our app state and handle back button events fired by O.S. Using this, we do not only can PUSH and POP from the top, but from anywhere we wanted to by providing a list of pages and URI parsing by using routeInformationParser and provider.
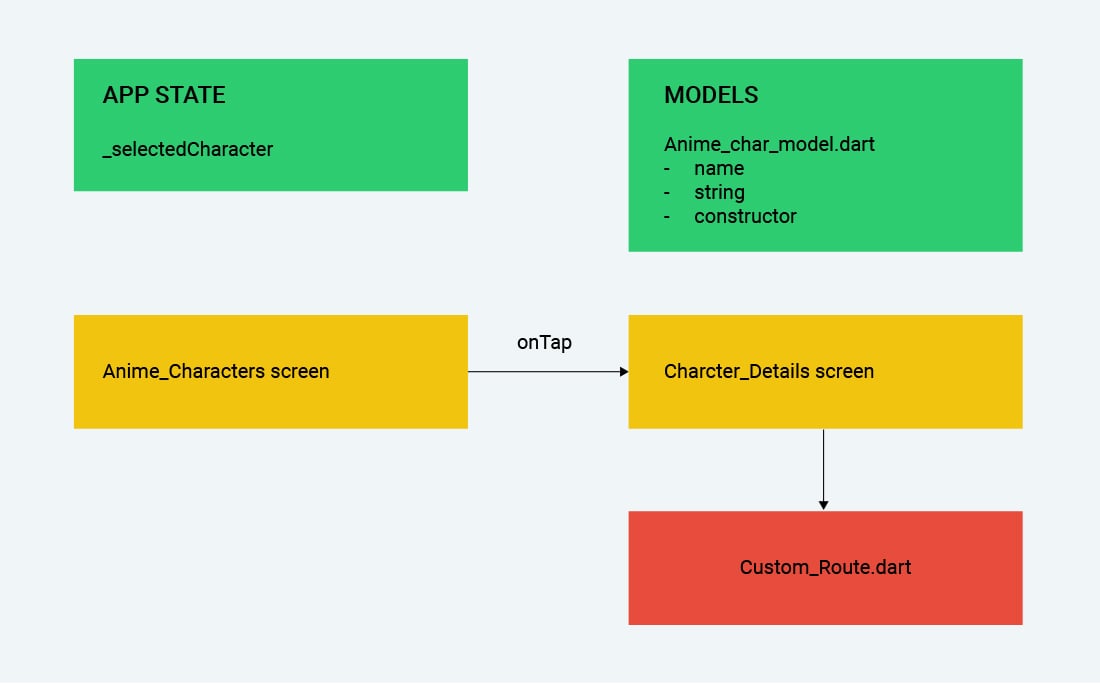
In our tutorial, we are going to build a simple demo application consisting of two screens:
Goal: To demonstrate the working of Navigator 2.0, i.e., changing screens based on our application state (selectedChar != null) without using simple POP & PUSH and by passing our stack of pages to MaterialApp via Navigator
Developing a Flutter application is easier and hustle-free with Bacancy!
Are you looking for top-notch Flutter developers for your requirements? Trust our expertise! Contact us today and hire Flutter developer.
Navigator 2.0 adds extra classes to implement the app screen as a product of the app state and to be able to parse routes from URLs for flutter web. Navigator 2.0 provides a new declarative API design, i.e.,
In our example: Flutter Navigator 2.0, we will basically develop a Flutter application and learn how to add pages and routers.
There are four classes as mentioned below:
We will talk about them in another blog as it will create unnecessary confusion. For now, we will keep this tutorial simple but assure to write about them in the future in detail.

These are the classes that we will be working with.
Now let’s set up our pages inside app state. After that, create a variable to track application state and further display the screen as per state.
https://gist.github.com/MukulKrSingh/0cfe0dddc39d718e303fb5bbe0c1544d

// ignore_for_file: dead_code, prefer_const_constructors

import 'package:flutter/material.dart';
import 'package:navigator_2/Models/anime_char_model.dart';
import 'package:navigator_2/Screens/anime_characters.dart';
import 'package:navigator_2/customRoute.dart';

class MyApp extends StatefulWidget {
  const MyApp({Key? key}) : super(key: key);

  @override
  State createState() => _MyAppState();
}

class _MyAppState extends State {
  //AnimeCharModel? _selectedChar = AnimeCharModel('Escanor', '7 deadly sins');
  AnimeCharModel? _selectedChar;
  //bool unknown = false;

  List animeChars = [
    AnimeCharModel('Hashirama', 'Naruto'),
    AnimeCharModel('Madara', 'Naruto'),
    AnimeCharModel('Gojo', 'Jujutsu Kaisen'),
    AnimeCharModel('Zoro', 'One Piece')
  ];
  void onCharTapped(AnimeCharModel selectedChar) {
    setState(() {
      _selectedChar = selectedChar;
      //print(selectedChar.anime);
    });
  }
  @override
  Widget build(BuildContext context) {
    return MaterialApp(
      title: 'Anime Characters',
      home: Navigator(
        // ignore: prefer_const_literals_to_create_immutables
        pages: [
          MaterialPage(
            key: ValueKey('anime_chars'),
            child: AnimeChars(
              animeChar: animeChars,
              onTapped: onCharTapped,
            ),
          ),
          if (_selectedChar != null) CustomRoute(character: _selectedChar)
        ],

        onPopPage: (route, result) {
          if (!route.didPop(result)) {
            return false;
          }
          setState(
            () {
              _selectedChar = null;
            },
          );
          return true;
        },
      ),
    );
  }
}
Here you can see that we have set up our pages by passing MaterialPage as children for each page for the custom routing. Just to show that we can also configure pages as per our needs I have created a customRoute.dart for Character_details screen just for example.
Page: We will use the key to uniquely identify each page.
onPopPage: The use of onPopPage is to ensure we do not into any unexpected state while POP is executed. When a POP operation is successful it returns true else false.
List<> animeChars: It holds a list of anime characters that is being passed to Anime_characters_screen.
_selectedChar: It is used to keep track of the application’s state so as to display the character_details screen.
Thus, this was about implementing Navigator 2.0 in our Flutter application.
So far, we have mentioned the core implementation of Navigator 2.0. The rest of the code is just connectivity between all the classes. For the entire application, you can clone the source code and feel free to play around with it.
There is a google dev fest for the announcement of Navigator 2.0 you can check that out too
Dev Fest GDG Saudi Arabia by Chun-heng-Tai.
Till now we have just barely scratched the surface that has just started to manage routes declaratively that are dependent on app states and not telling it ourselves to do. Now what’s left is mostly the flutter web part that is parsing the URL to go to certain pages directly and vice-versa.
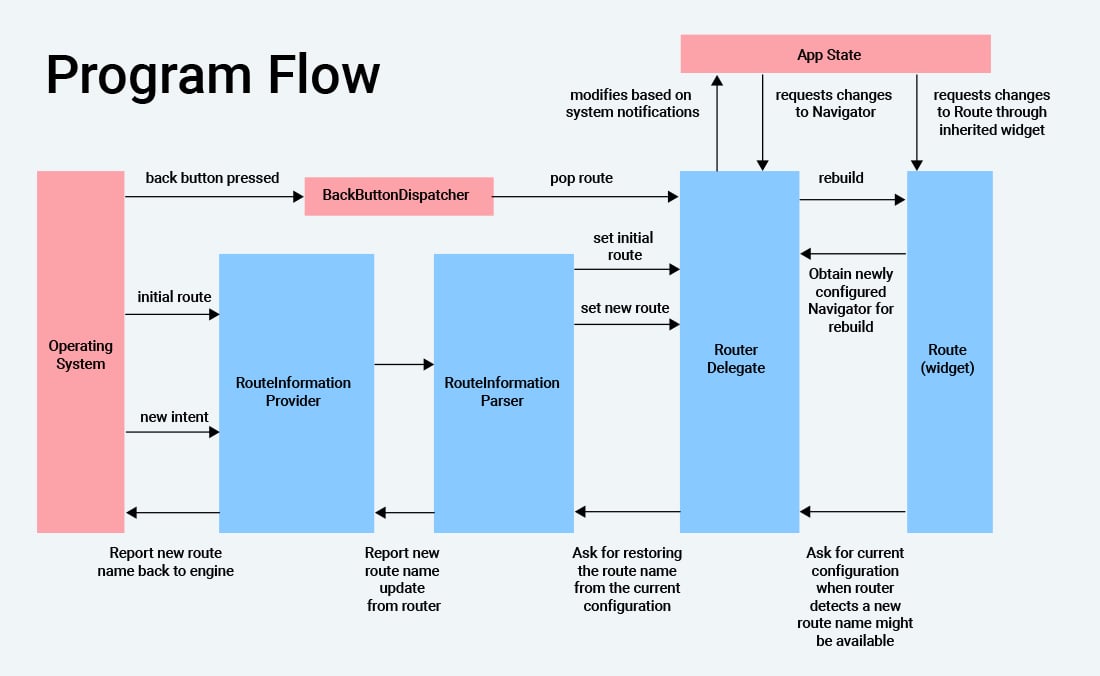
To do the leftover part we will have provided you with an architecture used by the Flutter team to explain Navigator 2.0. You can study it and understand what is happening so that in our next blog/video it would help to understand more. Even if you don’t go through it thoroughly, no issues we will surely cover it in depth.

So, this was all about Flutter Navigator 2.0 and how to implement basic routing with Navigator 2.0 in your app. We hope the tutorial will help you get started with implementing navigation in the application. If you are a Flutter enthusiast, then the Flutter tutorials page is for you. We have got a github repository that you can clone and explore more about Flutter.
Your Success Is Guaranteed !
We accelerate the release of digital product and guaranteed their success
We Use Slack, Jira & GitHub for Accurate Deployment and Effective Communication.