Web Development is one of the fascinating areas of the IT industry. There exists a huge repository of tools and libraries, each of which aims at improving the functionality and performance of an application. However, cashing in every new opportunity isn’t wise unless you have a clear understanding of the same.
Testing and playing with your code is an ideal way to enhance and optimize an application, yet unless you are aware of the change, adopting it is futile. Taking this forward, we here define what Redux is and how you can leverage the technology to build exceptional apps with React.
Redux: Defining the Technology
Going by the definition put up by the developers, Redux is a predictable state container for JavaScript applications. It is an open-source JavaScript library that is most commonly used with libraries such as React or Angular for building interactive user interfaces. Redux is inspired by Facebook’s architecture.
Breaking the above, Redux is more of a state management tool. Each of the components created using Redux is placed in a store as an independent unit, and the components have the freedom and flexibility to get hold of states as per their directly from the store.
Why there is a need of state management tool?
True that the idea of having a state management tool seems fascinating, one question that a majority of developers ask is there an actual need for Redux?
Let’s understand taking the example of React.
React is one library that allows components to manage their own state internally without imposing the need to have a third-party tool. Now, this works well when there is a small application as the data shared or passed between components is limited.
Imagine having an application with 100s of interlinked components; managing states internally is no less than a daunting task. In React, all of the states live in the parent component. Whenever a new update is to be made, the state is passed onto the siblings by the parent component as props. As the number of components increases, the complexities rise to make it practically difficult to manage and hence, the need for a state management tool.
Redux being lightweight and super flexible, stands as one of the best tools to use along with React when building scalable applications.
Looking for scalable and cost-effective React Js application development?
Connect with us to hire Reactjs developer to get your job done at your ease and convenience.
How to Use Redux With React?
Without much ado, let’s move ahead to see how you can configure Redux to manage state in React.
Step #1: Build Your React Application
To begin with, we will first use create-react-app to build the application. Type in the following command on your terminal to get started with the application:
create-react-app simple_counter
cd simple_counter
The aforementioned command leads to the creation of React boilerplate code. To enter the directory, simply click on the next. In case you are working on a visual studio, follow the instructions given below.
Code.
Now to start the react dev server, open your editor and type:
yarn start
Or,
npm start
This will display a screen confirming the start of the application.
Step #2: Library Installation
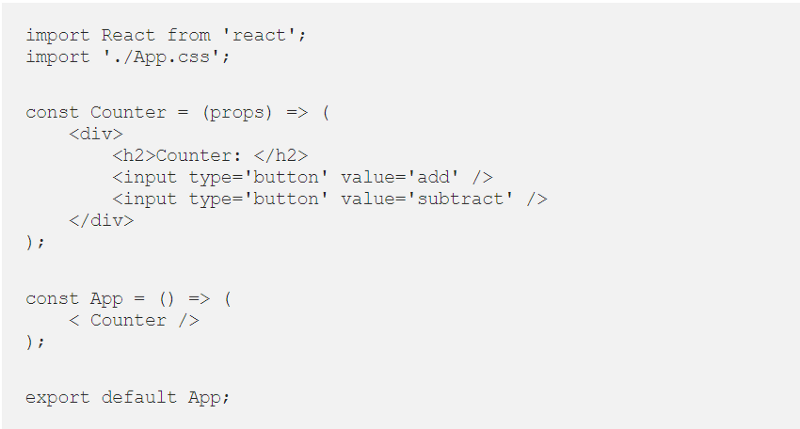
The next thing you need to do is set up all your libraries and tools. Simply copy-paste the given below code in the src file and start your dev server.

Source: Medium
Step #3: Download Chrome Extension
Here, you need to install and set up the Chrome extension of Redux to work along with your server.
Step #4: Importing Libraries

Source: Medium
Run the above code by embedding the same below CSS in your source file.
Step #5: Architectural Viewpoint
Now let’s understand what the core architecture of Redux is. It has primarily three elements
1. Store
2. Reducer
3. Action
Firstly, a store is created that is home to all of the states. Whether the application state or the global state, it is the store that encompasses all.
Action refers to the passing of the store to the view part. This is analogous to the forwarding of commands or significant instructions. Actions are transported to the reducer (function), which then refers to the store to extract a state and then modify the same as per the need. The state is then updated to the store as well.
Step #6: Defining Actions
To help you understand how actions are defined and the corresponding functionality, we take a simple example of addition and subtraction.
// Actions Type
const MULTIPLY_NUMBER = 'mul_number';
const SUBTRACT_NUMBER = 'sub_number';
// Actions
const mulAction = () => ({
    type: MULTIPLY_NUMBER,
    payload: 1,
});
const subAction = () => ({
    type: SUBTRACT_NUMBER,
    payload: 2,
});
Here, it is necessary to have a return object of type in every action. If needed, you can pass data using external parameters.
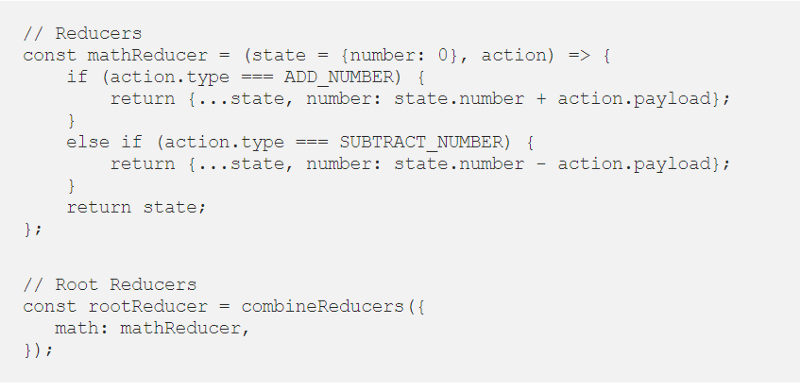
Step #7: Reducer in React
Sticking to the example said earlier, we define reducers for the scalable React App.

Source: Medium
Here, we have defined a mathReducer that can accept two parameters as state and action. With respect to the state parameter, a default value of 0 is passed, which is used to initialize the value of the state when the store is created for the first time. For the next cases, the value passed is used to update the current state value.
Step #8: Redux Store Creation
So, we have action, the libraries, reducer for the application. What’s left?
The Redux Store.
We will make use of the create store function from the library for your Redux createstore.
// Store
const store = createStore(
    rootReducer,
    window.__REDUX_DEVTOOLS_EXTENSION__ && window.__REDUX_DEVTOOLS_EXTENSION__()
);
The above-mentioned store has two parameters. The first is the root reducer, and the second parameter is the code to get the same displayed on the chrome.
Step #9: Props Mapping
Now that we are all set with the elements needed, we will see how to pass the values to the react app or simply dispatch actions.
// mapStateToProps
const mapStateToProps = (state => {
    return {
        number: state.math.number,
    };
});
// mapDispatchToProps
const mapDispatchToProps = dispatch => ({
    multiply: () => dispatch(mulAction()),
    subtract: () => dispatch(subtractAction()),
});
Here, we made use of two different functions. One is mapStateToProps, and the other is mapDispatchToProps.
Step #10: Connect and Render Redux
const Counter = (props) => (
    < div >
        < h2 >Counter: {props.number}< /h2 >
        < input type='button' value='multiply' onClick={props.mul} / >
        < input type='button' value='subtract' onClick={props.subtract} / >
    < /div >
);
const ConnectedCounter = connect(mapStateToProps, mapDispatchToProps)(Counter);
const App = () => (
    < Provider store={store} >
        < ConnectedCounter / >
    < /Provider >
);
This is the final step. We have a counter function created that has separate states as props.number, props.sub, props.mul. Each of the states can be accessed and called as per the need. In case you wish to pass the props:
const ContainerCounter = connect(mapStateToProps, mapDispatchToProps); const ConnectedCounter = ContainerCounter(Counter)
The above code would be placed.
const App = () => (
    < Provider store = {store} >
        < ConnectedCounter / >
    < /Provider >
);
This is the final app function, where the store is passed as a parameter to the Provider component.
And your code is now ready to run. You can test the functionality of the app by running the code and entering values to see whether the two are working properly. You can also tweak the actions to perform different functions and see how the app responds.
Wrapping Up
Redux adds a great deal of value to the React application. It adds maintainability within the application making it predictable. Not to mention the fact that it simplifies the debugging and testing process of the React application. If you are still skeptical, then get in touch with us, we have the best React Redux developer. Being a globally renowned reactjs development services provider, we have helped hundreds of clients around the world, with the state management solution to improve the performance of their React-Redux application.


