How to Build Twitter Bot Using Golang From Scratch
Last Updated on June 4, 2024
As the title suggests, you already know what the tutorial is about! So, yes, we are going to build Twitter bot using Golang from scratch. Yes, we won’t be using any third-party library to develop our demo application. The tutorial has mainly two sections: Twitter Set Up and Coding part. So, without further ado, let’s get started with our development.
Following questions will be answered in this tutorial: how to build twitter bot using Golang–
Visit Twitter Developer Platform and fill out the required information.
You will see the below screen. Name your application. Here I have named tweet_b@t.
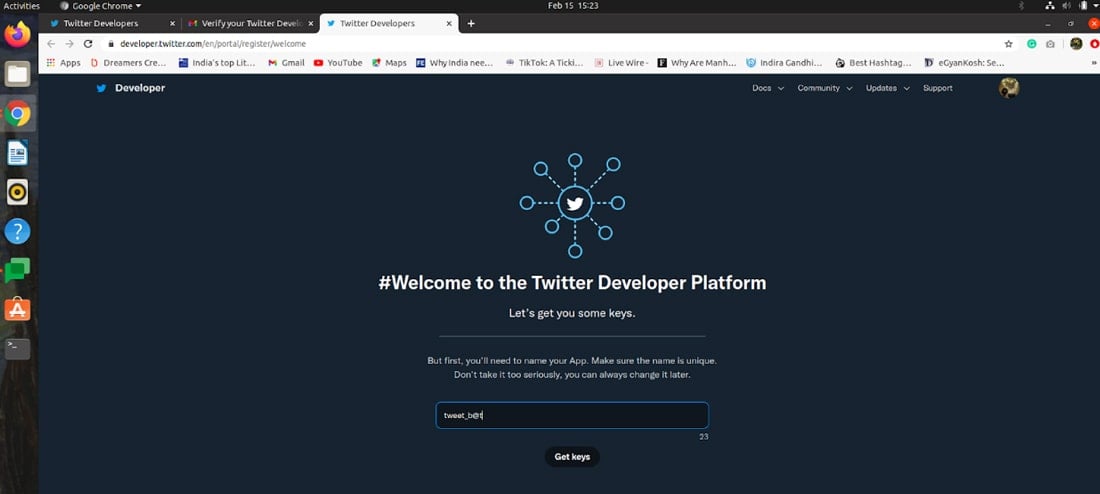
After successful completion you will be redirected to the dashboard as shown below.
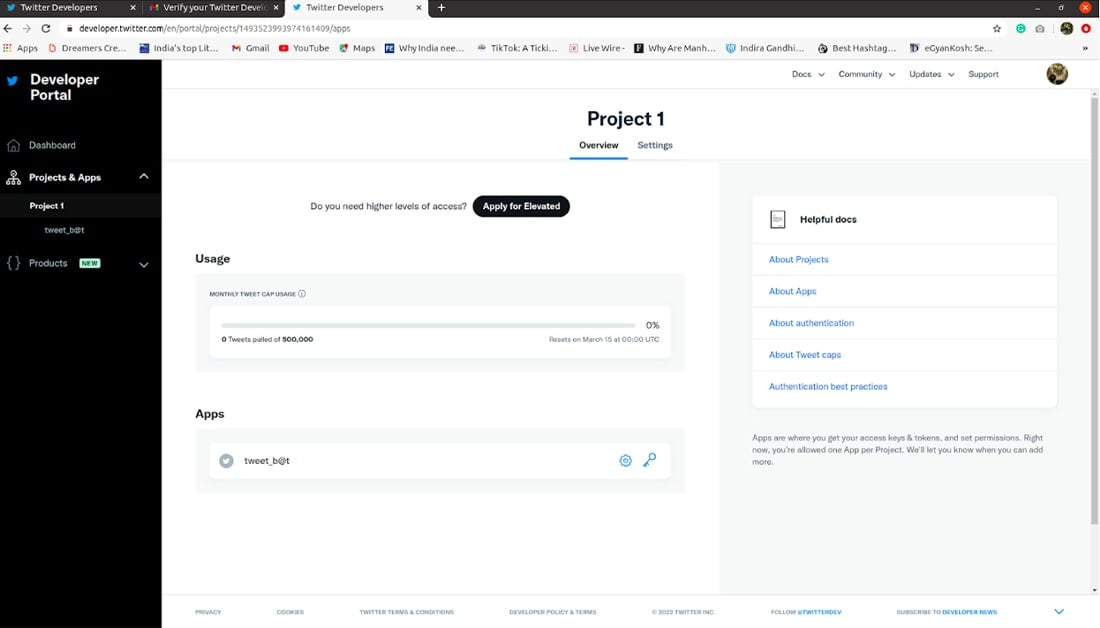
Twitter offers read-only permission but for our demo application we will need write permission as well. So click Apply for Elevated.
You can see your application name under Apps. Follow the below instructions:
Follow the instructions:
Once you receive confirmation mail for elevating your account. The sidebar will display more options under Products.
Development, Optimization, and Maintenance? All at one – Bacancy!
Hire Golang developer from us and start developing your dream project. We have proficient and best Go developers with exceptional problem-solving skills. Contact us today!
On selecting Dev Environments under Premium you will see the following image.
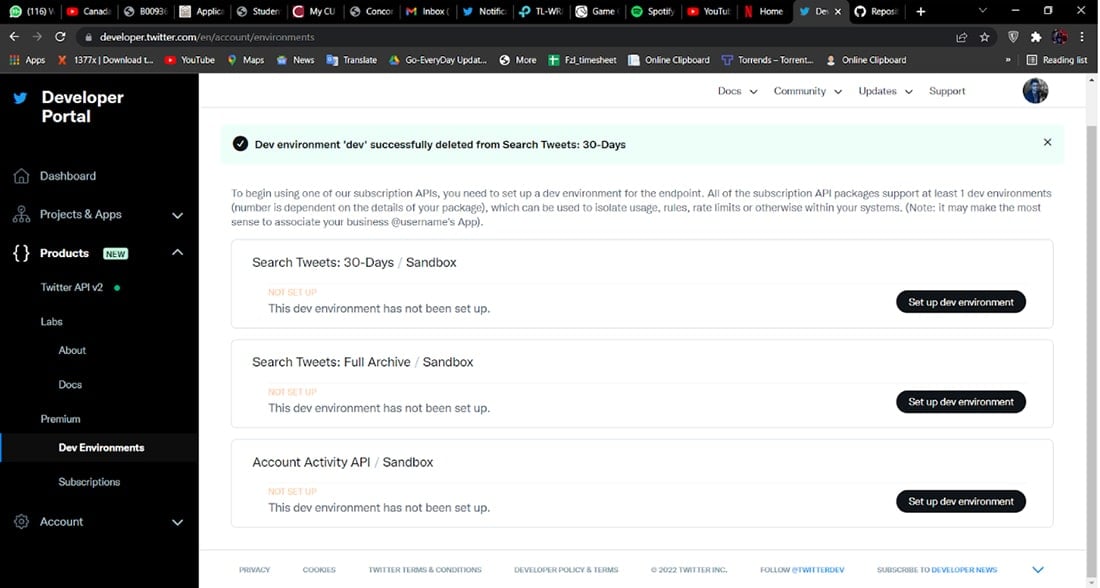
To set the dev environment fill the required fields under Account Activity/Sandbox as shown below.
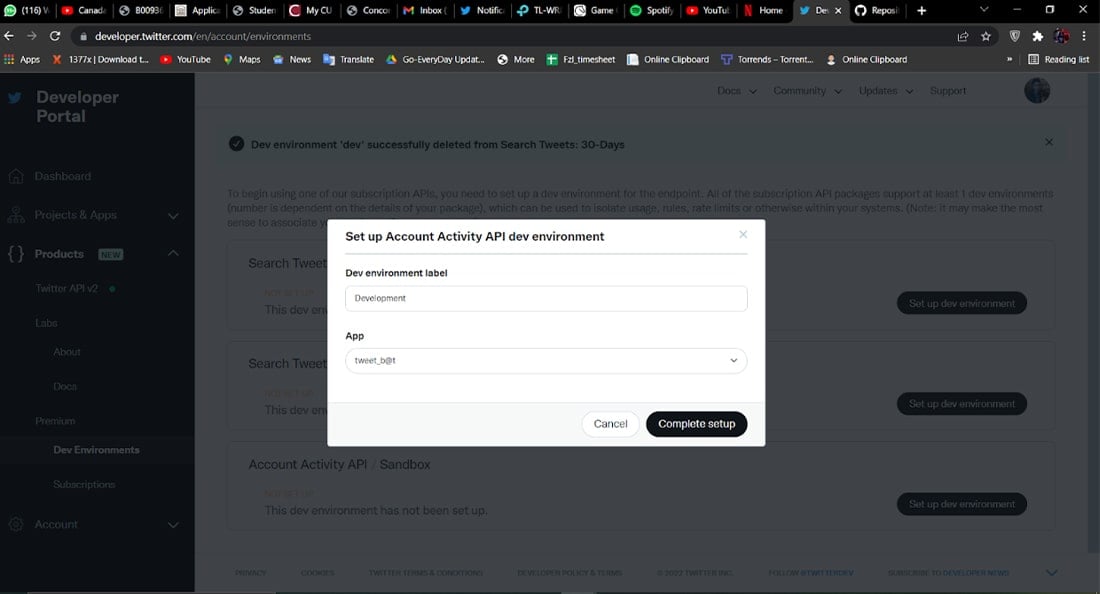
So, this was about setting up your Twitter developer account. Now. moving on to the coding part.
The initial step is to create a project. So, run the below command for the same. You can name it anything, here we will use twit_bot as our project name.
We will be using go get to install following dependencies-
Now, with the help of the godotenv plugin load your .env file. Below is the format. You can configure your file accordingly.
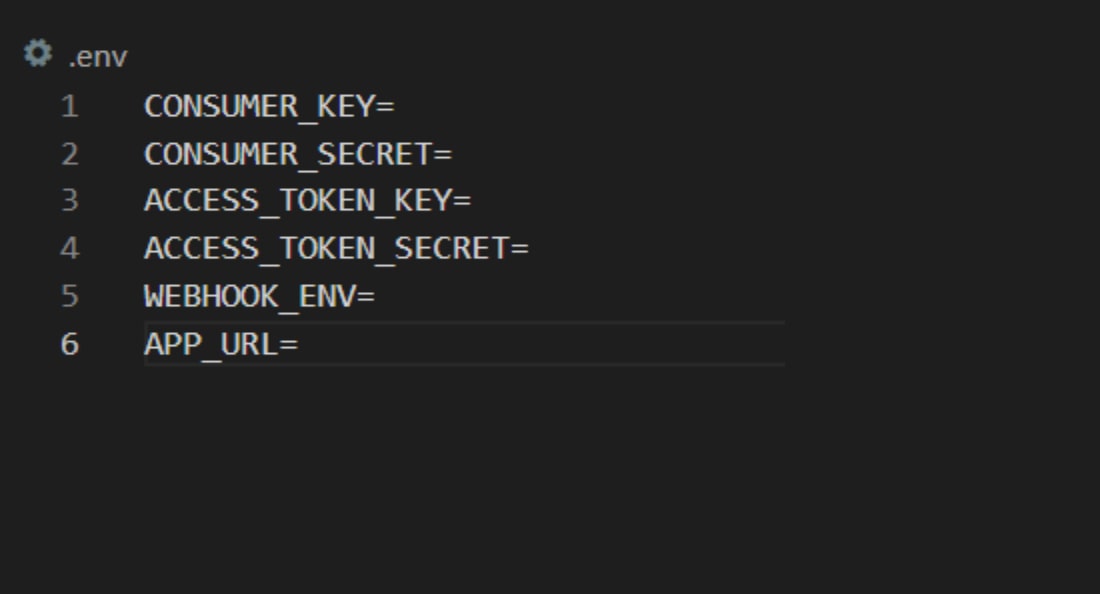
Now, let’s start our coding part. Create main.go. Your initial file will look like this.
We have divided further the coding section into various sections as shown below.
Twitter will trigger CRC to make sure that you are both app’s owner and webhook URL. Challenge-Response-Check is different from Cyclic Redundancy Check.
We need to update func CrcCheck(){ … } for CRC validation.

func CrcCheck(writer http.ResponseWriter, request *http.Request) {
   	writer.Header().Set("Content-Type", "application/json")

	token := request.URL.Query()["crc_token"]
	if len(token) < 1 {
		fmt.Fprintf(writer, "No crc_token given")
		return
	}

	h := hmac.New(sha256.New, []byte(os.Getenv("CONSUMER_SECRET")))
	h.Write([]byte(token[0]))
	encoded := base64.StdEncoding.EncodeToString(h.Sum(nil))

	response := make(map[string]string)
	response["response_token"] = "sha256=" + encoded

	responseJson, _ := json.Marshal(response)
	fmt.Fprintf(writer, string(responseJson))
}
Explanation
The above code snippet does the following:
Navigate to localhost:8080/webhook/twitter?crc_token=test and you’ll see something like this.

Our CRC route is working perfectly!
Now, our next step is to register for a webhook. But before learning how to do that we need to install ngrok. The reason behind this is Twitter has some protocols and based on them Twitter won’t be accepting following URLs:
So, for development purposes, what we will do is install ngrok. Use the below command to install and start the server using the 8080 port.
If you have done it rightly, you should see something like this-
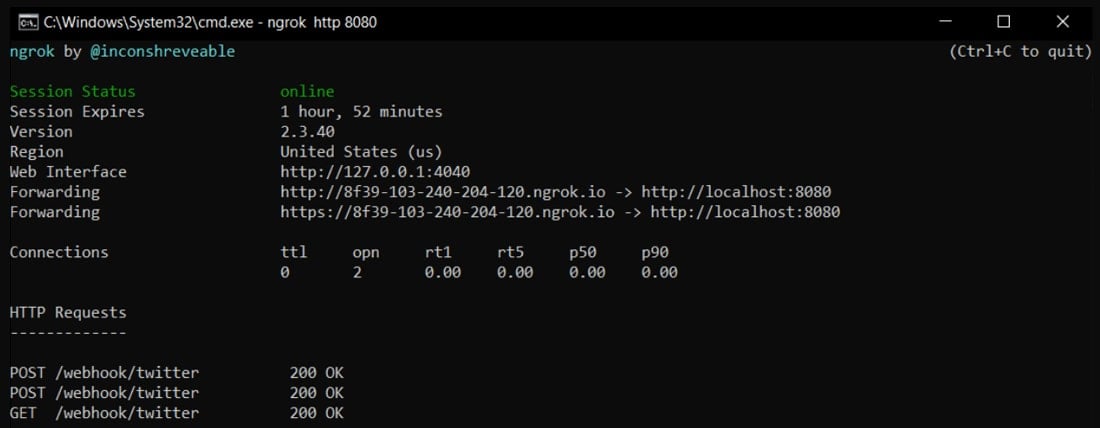
Go to
Now, moving towards registering webhook for our bot. We will check whether the register flag is present or not in the argument lists. After checking the flag it executes the function RegisterWebhook as a goroutine. Open client.go and define the function RegisterWebhook as shown below. The function will be used for all the Twitter requests.

func RegisterWebhook() {
	fmt.Println("Registering webhook...")
	httpClient := CreateClient()
	path := "https://api.twitter.com/1.1/account_activity/all/" + os.Getenv("WEBHOOK_ENV") + "/webhooks.json"
	values := url.Values{}
	values.Set("url", os.Getenv("APP_URL")+"/webhook/twitter")
	fmt.Println(values, path)

	resp, _ := httpClient.PostForm(path, values)
	defer resp.Body.Close()
	body, _ := ioutil.ReadAll(resp.Body)
	var data map[string]interface{}
	if err := json.Unmarshal([]byte(body), &data); err != nil {
		panic(err)
	}
	fmt.Println(data)
	fmt.Println("Webhook id of " + data["id"].(string) + " has been registered")
	SubscribeWebhook()
}
Explanation
For subscribing the webhook we have created a SubscribeWebhook() function in client.go file. The following function will be used for subscribing to the events and checking for a status code 204.

func SubscribeWebhook() {
	fmt.Println("Subscribing webapp...")
	client := CreateClient()
	path := "https://api.twitter.com/1.1/account_activity/all/" + os.Getenv("WEBHOOK_ENV") + "/subscriptions.json"
	resp, _ := client.PostForm(path, nil)
	body, _ := ioutil.ReadAll(resp.Body)
	defer resp.Body.Close()
		if resp.StatusCode == 204 {
		fmt.Println("Subscribed successfully")
	} else if resp.StatusCode != 204 {
		fmt.Println("Could not subscribe the webhook. Response below:")
		fmt.Println(string(body))
	}
}
After go install run the following command
Now, it’s time to make the webhook listen to the events. Open main.go and update the WebhookHandler() function. The code is pretty straightforward.

func WebhookHandler(writer http.ResponseWriter, request *http.Request) {
	fmt.Println("Handler called")
	body, _ := ioutil.ReadAll(request.Body)
	var load client.WebhookLoad
	err := json.Unmarshal(body, &load)
	if err != nil {
		fmt.Println("An error occured: " + err.Error())
	}
	if len(load.TweetCreateEvent) < 1 || load.UserId == load.TweetCreateEvent[0].User.IdStr  {
		return
	}
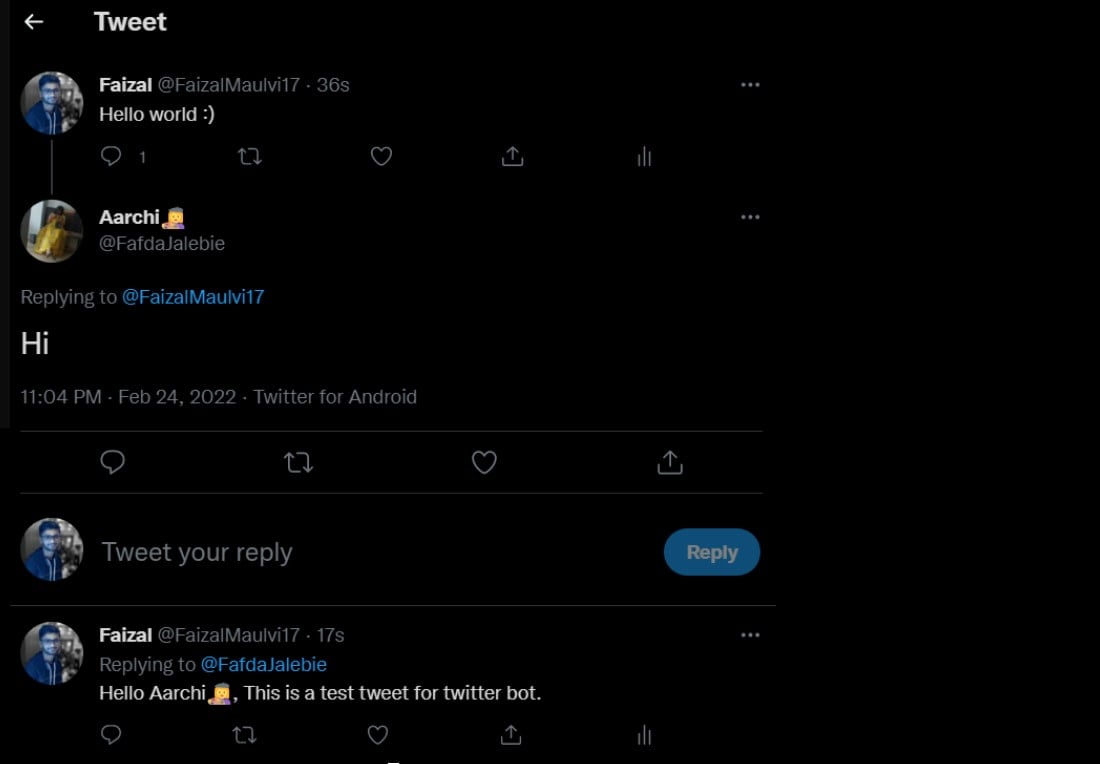
	_, err = client.SendTweet("@"+load.TweetCreateEvent[0].User.Handle+" Hello "+load.TweetCreateEvent[0].User.Name+", This is a test tweet for twitter bot.", load.TweetCreateEvent[0].IdStr)
	if err != nil {
		fmt.Println("An error occured:")
		fmt.Println(err.Error())
	} else {
		fmt.Println("Tweet sent successfully")
	}
}
Explanation
The function SendTweet() will be used for sending the tweet by the bot to the user. As you can see the function will accept two parameters received from WebhookHandler(). The reply sent by the bot will have the Twitter handle of the user and automated string.

func SendTweet(tweet string, reply_id string) (*Tweet, error) {
	fmt.Println("Sending tweet as reply to " + reply_id)
	var responseTweet Tweet
	//Add params
	params := url.Values{}
	params.Set("status", tweet)
	params.Set("in_reply_to_status_id", reply_id)
	client := CreateClient()
	resp, err := client.PostForm("https://api.twitter.com/1.1/statuses/update.json", params)
	if err != nil {
		return nil, err
	}
	defer resp.Body.Close()
	body, _ := ioutil.ReadAll(resp.Body)
	fmt.Println(string(body))
	err = json.Unmarshal(body, &responseTweet)
	if err != nil {
		return nil, err
	}
	return &responseTweet, nil
}
This section will cover the code for setting up the server in main.go. You can go through the code logic as it’s pretty simple.

func main() {
	err := godotenv.Load()
	if err != nil {
		log.Fatal("Error loading .env file")
		fmt.Println("Error loading .env file")
	}

	fmt.Println("Starting Server")

	m := mux.NewRouter()
	m.HandleFunc("/webhook/twitter", CrcCheck).Methods("GET")
	m.HandleFunc("/webhook/twitter", WebhookHandler).Methods("POST")

	server := &http.Server{
		Handler: m,
	}
	server.Addr = ":8080"

	if args := os.Args; len(args) > 1 && args[1] == "-register" {
		go client.RegisterWebhook()
	}
	server.ListenAndServe()
}
If everything is successfully done the bot should send a reply to your handle as shown in the below image.
You can find the entire source code here: twitter-bot-using-golang-demo. Feel free to clone the repository and play around with the code.
I hope you have got an idea of how to build twitter bot using Golang. So, what are you waiting for get started with developing your demo application! Write us back if you have got any suggestions, feedback, or queries. Always happy to answer!
For more such Golang blogs and tutorials, visit Golang tutorials page and start polishing your skills.
Your Success Is Guaranteed !
We accelerate the release of digital product and guaranteed their success
We Use Slack, Jira & GitHub for Accurate Deployment and Effective Communication.