Web API in .NET 6.0 Tutorial: How to Build CRUD Operation
Last Updated on December 27, 2024
In this tutorial, we will build .NET 6 Web API that uses Entity Framework core and SQL to create API endpoints. It will allow clients to perform CRUD operations in API on the data stored in the database.
In our demo application, we will be using the database first approach. We will start with creating a table in the SQL database and then use an entity framework to create DBContext and Model.
A Web API, or Application Programming Interface, is a platform designed to develop HTTP services that can be accessed by various client-side applications such as mobile devices, web browsers, and desktop applications. It acts as a medium for multiple applications to exchange data and interact with each other.

Developers can create functions that can be requested through HTTP calls with API. This function allows you to save or retrieve data for your clients, enabling them to perform certain tasks and access specific information that is made available to them through the API.
Key features of API
People nowadays use multiple devices such as smartphones, tablets, and iPhones; therefore, more than a web-based application is needed to reach out to all users. We need an API to expose all these service data to all the different device apps and browsers. Adding a web API project makes it easier to bridge the two ends, making it easier to manage and update.
In this case, we need a Web API to manage the database interactions and business logic between a website, an Android app, and an iOS app.
All three applications can communicate with the database through the Web API project, which handles all database interactions and ensures that the database is not directly accessible through the websites or applications.
By using a Web API, we can ensure secure and efficient communication between the different applications and devices, making it an essential tool in modern application development.
Let us have a look at some of the major highlights.
Start Visual Studio and create a new project with the type ASP.NET Core Web API and click Next.

Enter the project name ProductCrudAPI, select the location where you want to save your project, and click Next.

Select .Net 6.0 (Long-term support) as a framework. Fill in the required information as shown in the below image, and click on Create.

Once you click on Create, a Web API project will be created.
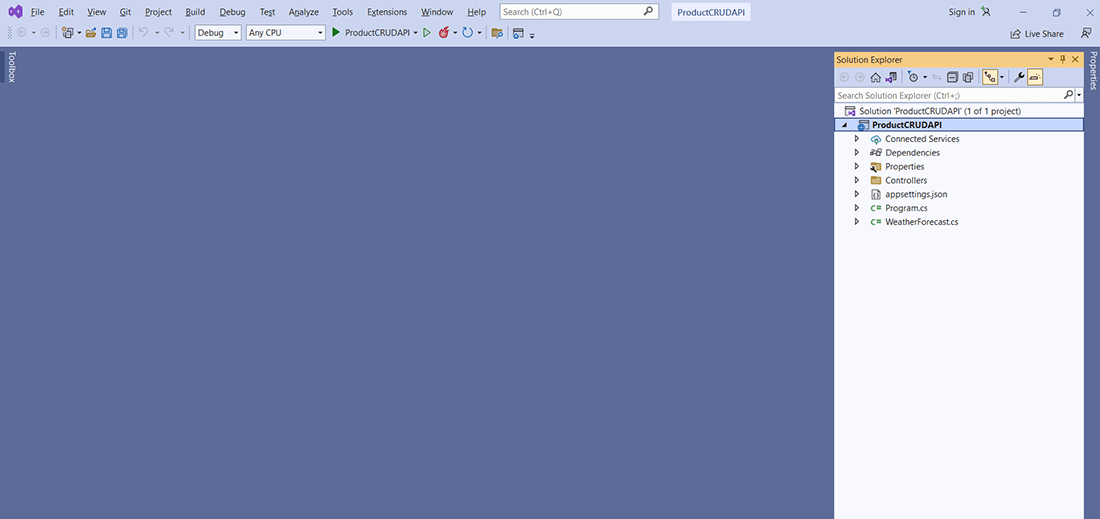
To use the entity framework core in our project, we need to install two NuGet packages:
Follow the below instructions to install NuGet packages.
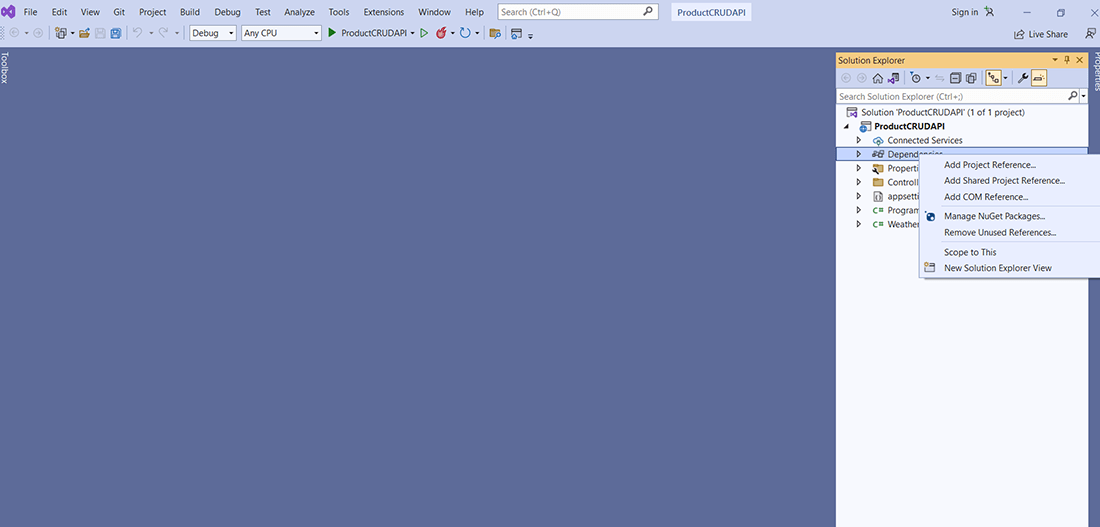
Right-click on Dependencies and select Manage NuGet Packages.
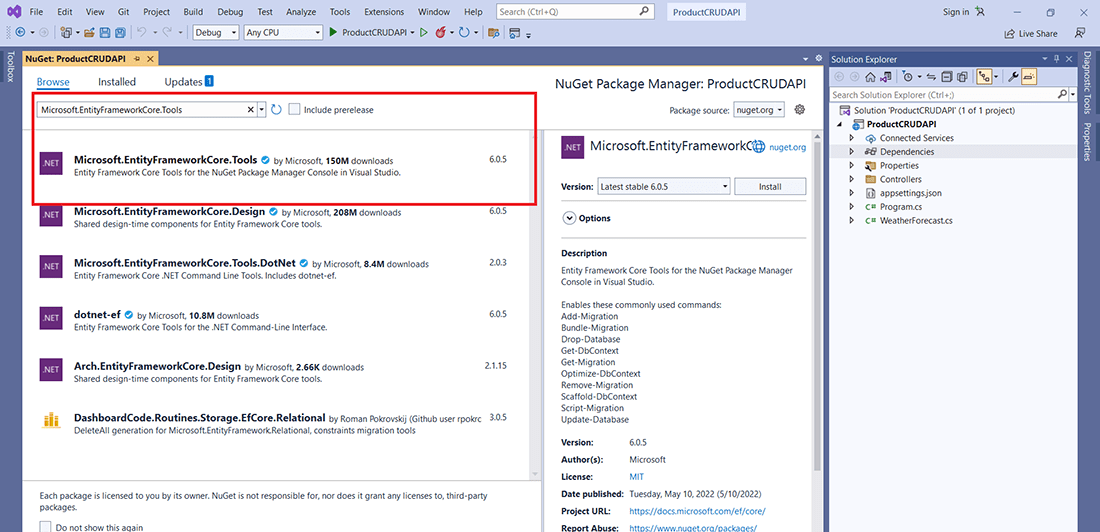
Microsoft.EntityFrameworkCore.Tools
Select the Browse tab and search for Microsoft.EntityFrameworkCore.Tools and install its latest stable version.
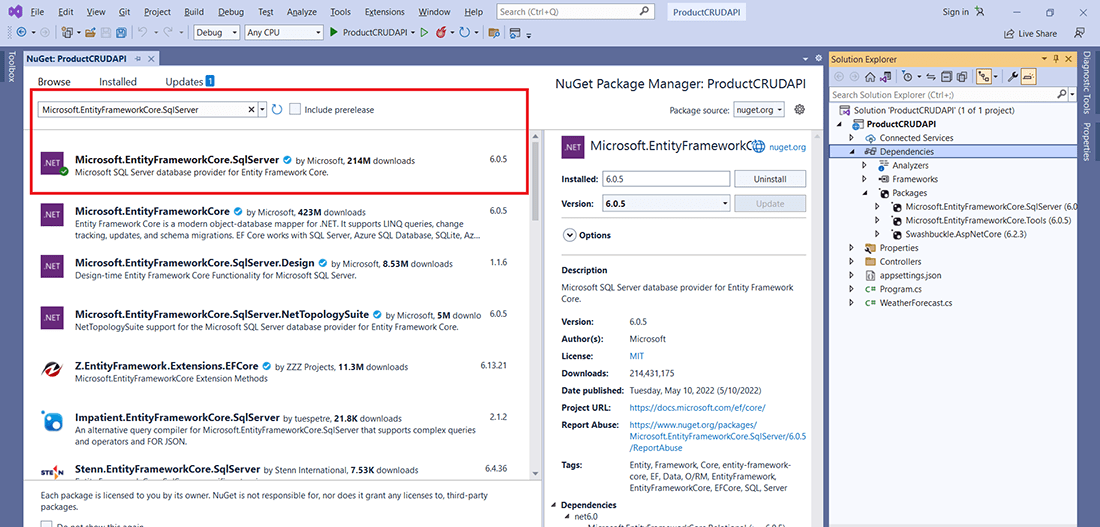
Microsoft.EntityFrameworkCore.SqlServer
Once the above package is installed, Search for Microsoft.EntityFrameworkCore.SqlServer and install its latest stable version.
Moving to the next section of the Web API in .NET 6.0 Tutorial, create New Database ProductDB in SQL, and execute the below script to create a Product table.

USE [ProductDB]
GO

SET ANSI_NULLS ON
GO

SET QUOTED_IDENTIFIER ON
GO

CREATE TABLE [dbo].[Products](
	[Id] [int] IDENTITY(1,1) NOT NULL,
	[Name] [varchar](50) NOT NULL,
	[Description] [varchar](250) NULL,
	[Price] [decimal](18, 2) NOT NULL,
PRIMARY KEY CLUSTERED
(
	[Id] ASC
)WITH (PAD_INDEX = OFF, STATISTICS_NORECOMPUTE = OFF, IGNORE_DUP_KEY = OFF, ALLOW_ROW_LOCKS = ON, ALLOW_PAGE_LOCKS = ON, OPTIMIZE_FOR_SEQUENTIAL_KEY = OFF) ON [PRIMARY]
) ON [PRIMARY]
GO
Now, let’s move on to the next step of our web API tutorial, where we will create the DBContext and Model.
We are using the database first approach of entity framework.
We have created a database table, and using the Scaffold-DbContext command of the entity framework; we will create the required class in the C# project.
Open Package Manager Consol (Tool => Package Manager => Package Manager Consol) and run below command:

Scaffold-DbContext "Server=SERVERNAME;Database=ProductDB;Integrated Security=True" Microsoft.EntityFrameworkCore.SqlServer -OutputDir Models
Replace SERVERNAME with your database server name.
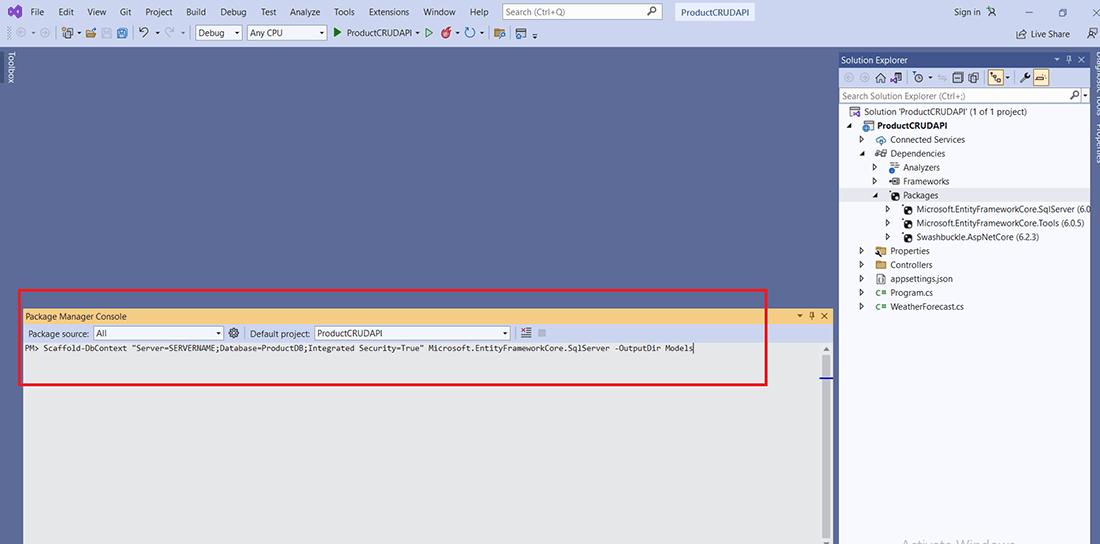
Once this command is executed, the Model folder is created in the project solution. Model folder contains two files, ProductDBContext.cs and Product.cs.
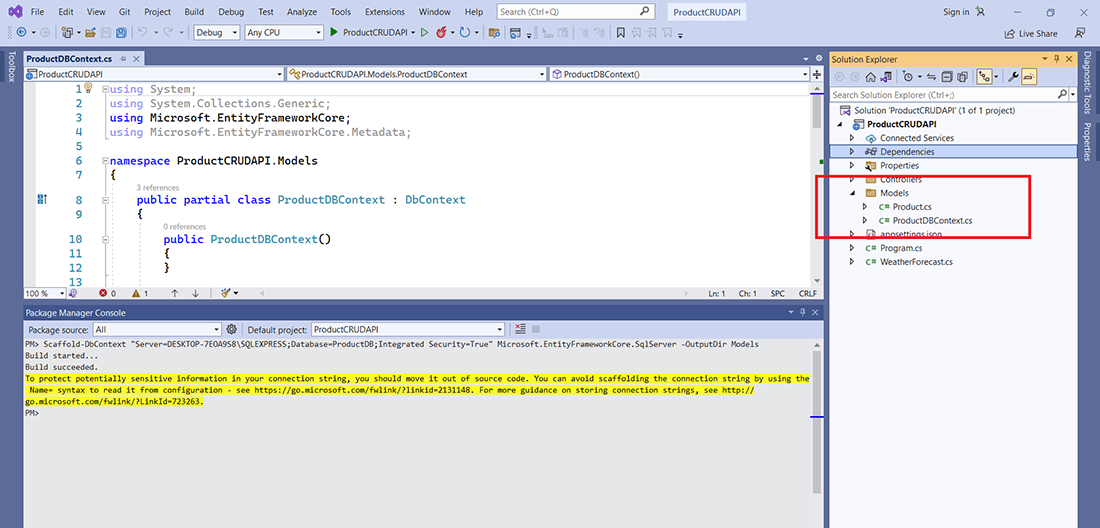
ProductDBContext.cs is responsible for database interaction, and Product.cs is a model of the Products table.
Remove OnConfiguring() method from ProductDBContext.cs; it contains a database connection string and is not a good practice. We will add the connection string in the appsettings.json file.
Also remove ProductDBContext() constructor from this file.
Build a .NET application is easier and hustle-free with Bacancy!
Hire NET developer who will help you meet your project requirements efficiently with commendable problem-solving skills.
Add database connection string in appsettings.json file.

{
  "Logging": {
    "LogLevel": {
      "Default": "Information",
      "Microsoft.AspNetCore": "Warning"
    }
  },
  "AllowedHosts": "*",
  "ConnectionStrings": {
    "ProductDB": "Server=SERVERNAME;Database=ProductDB;Integrated Security=True;"
  }
}
Replace SERVERNAME with your database server name.
As we are using the .Net 6 version, we need to make the required configuration changes in Program.cs file. Microsoft eliminates Startup.cs in .Net 6. In the previous .Net version, Startup.cs was used for configurations.
Add below lines in Program.cs. Please refer to the below image for this.

var connectionString = builder.Configuration.GetConnectionString("ProductDB");
builder.Services.AddDbContextPool(option =>
option.UseSqlServer(connectionString)
);
Also, add the below lines at the top of the Program.cs.

Add a new empty API controller ProductsController.cs under the controller folder.
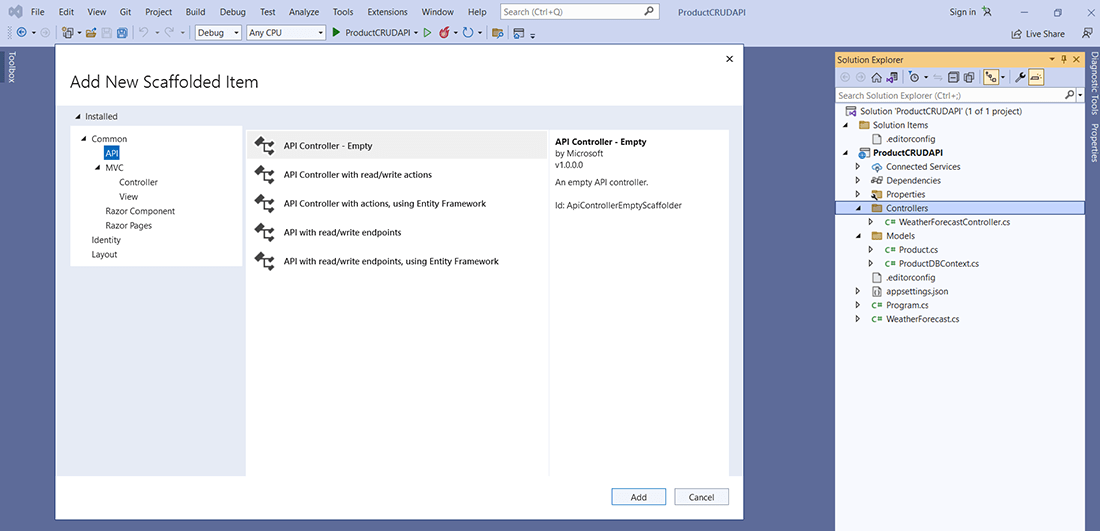
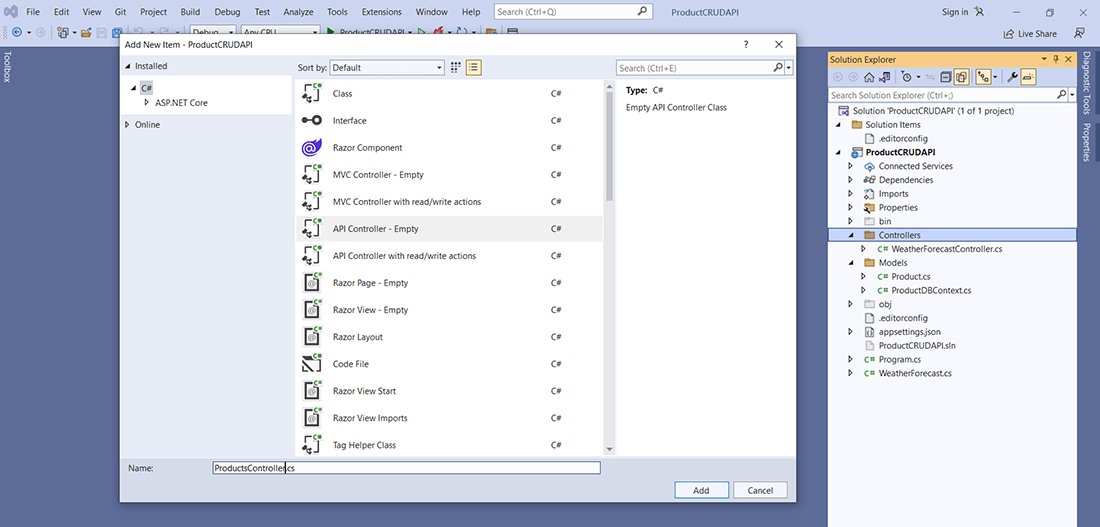
Bacancy is not an option. Bacancy is a reliable choice!
Are you looking for a leading NET development company to develop your dream product? We are here for you! Trust your choice. Connect Now!
In ProductsController.cs, we will add GET, POST, PUT, and DELETE endpoints to achieve CRUD operations.
Please use the below code in your ProductsController.cs.

using Microsoft.AspNetCore.Mvc;
using Microsoft.EntityFrameworkCore;
using ProductCRUDAPI.Models;

namespace ProductCRUDAPI.Controllers
{
    [Route("api/[controller]")]
    [ApiController]
    public class ProductsController : ControllerBase
    {
        private readonly ProductDBContext _context;

        public ProductsController(ProductDBContext context)
        {
            _context = context;
        }

        [HttpGet]
        public async Task<IEnumerable<Product>> Get()
        {
            return await _context.Products.ToListAsync();
        }

        [HttpGet("{id}")]
        public async Task<IActionResult> Get(int id)
        {
            if (id < 1)
                return BadRequest();
            var product = await _context.Products.FirstOrDefaultAsync(m => m.Id == id);
            if (product == null)
                return NotFound();
            return Ok(product);

        }

        [HttpPost]
        public async Task<IActionResult> Post(Product product)
        {
            _context.Add(product);
            await _context.SaveChangesAsync();
            return Ok();
        }

        [HttpPut]
        public async Task<IActionResult> Put(Product productData)
        {
            if (productData == null || productData.Id == 0)
                return BadRequest();

            var product = await _context.Products.FindAsync(productData.Id);
            if (product == null)
                return NotFound();
            product.Name = productData.Name;
            product.Description = productData.Description;
            product.Price = productData.Price;
            await _context.SaveChangesAsync();
            return Ok();
        }

        [HttpDelete("{id}")]
        public async Task<IActionResult> Delete(int id)
        {
            if (id < 1)
                return BadRequest();
            var product = await _context.Products.FindAsync(id);
            if (product == null)
                return NotFound();
            _context.Products.Remove(product);
            await _context.SaveChangesAsync();
            return Ok();

        }
    }
}
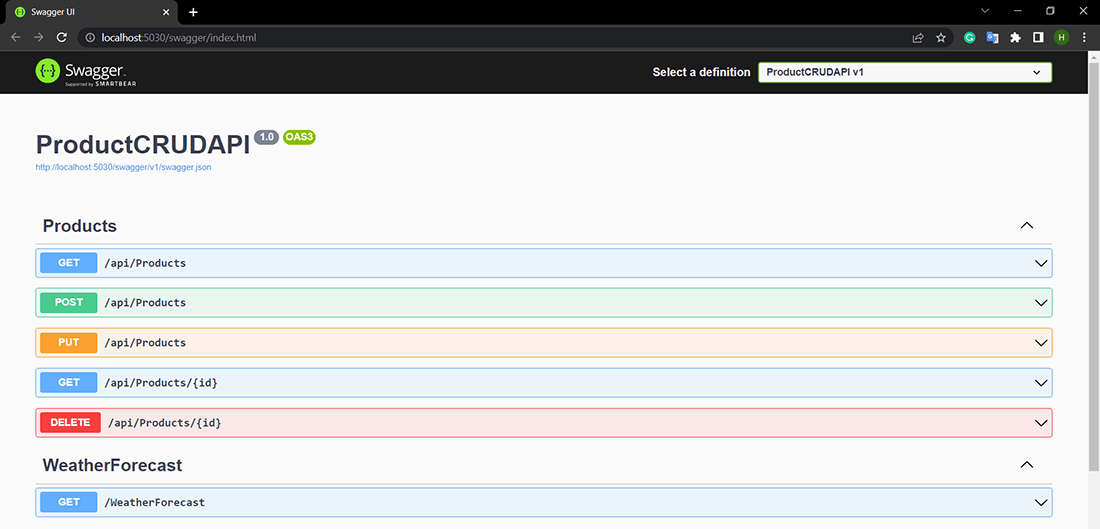
Finally, we are done with Web API in .NET 6.0 tutorial. Now, it’s time to launch this API, press F5. As we are using Swagger UI, we can execute API directly.
We can see GET, POST, PUT AND DELETE under Products. We can execute different API methods from this page itself.
Here’s the source code of Web API in .NET 6.0 example. Feel free to clone the repository and play around with the code. Start developing your demo application and learn how to build a CRUD operation.
So, this was all about how to develop Web API in .NET 6.0. I hope the tutorial helped you to begin with building a basic CRUD operation application using .NET. If you have any questions or feedback, feel free to contact us.
Your Success Is Guaranteed !
We accelerate the release of digital product and guaranteed their success
We Use Slack, Jira & GitHub for Accurate Deployment and Effective Communication.