MYSQL is a famous open-source relational database management system that provides scalable and easy-to-use function sets. It uses a relational DB and Structured Query Language (SQL) for managing its data. This tutorial describes a basic MySQL installation and setup; later we will connect MySQL to EC2 instance from Ubuntu. Once done with the basics, we will create a user for our database.
MYSQL is a famous open-source relational database management system that provides scalable and easy-to-use function sets. It uses a relational DB and Structured Query Language (SQL) for managing its data.
This tutorial describes a basic MySQL installation and setup; later we will connect MySQL to EC2 instance from Ubuntu. Once done with the basics, we will create a user for our database.
Table of Contents
What is AWS EC2?
AWS EC2 – AWS Elastic Compute Cloud is one of the most famous Amazon services that provides the ability of running the app on the public cloud. It offers safe, reliable, and resizable cloud capacity with minimum obstacles.
I assume that you are quite familiar with Amazon EC2 and MySQL to proceed with MySQL Setup in EC2 Ubuntu Instance.
Prerequisites
To get started with the tutorial for setting up MySQL in EC2 Ubuntu Instance, please make sure of the following prerequisites-
⦿ Create EC2 Ubuntu Instance in AWS Account
⦿ Connect EC2 Instance using SSH or Putty
Now, let’s move towards how to set up and connect MySQL to EC2 Instance Ubuntu.
6 Steps to Setup and Connect MySQL to EC2 Instance from Ubuntu
Step 1: Update System Packages and Install MySQL
Run install update for your server system packages
Now, install MySQL using the below command to install the latest MySQL.
After successful installation of mysql-server, we can check the MySQL version by using this command-
Step 2: Configure MySQL Installation
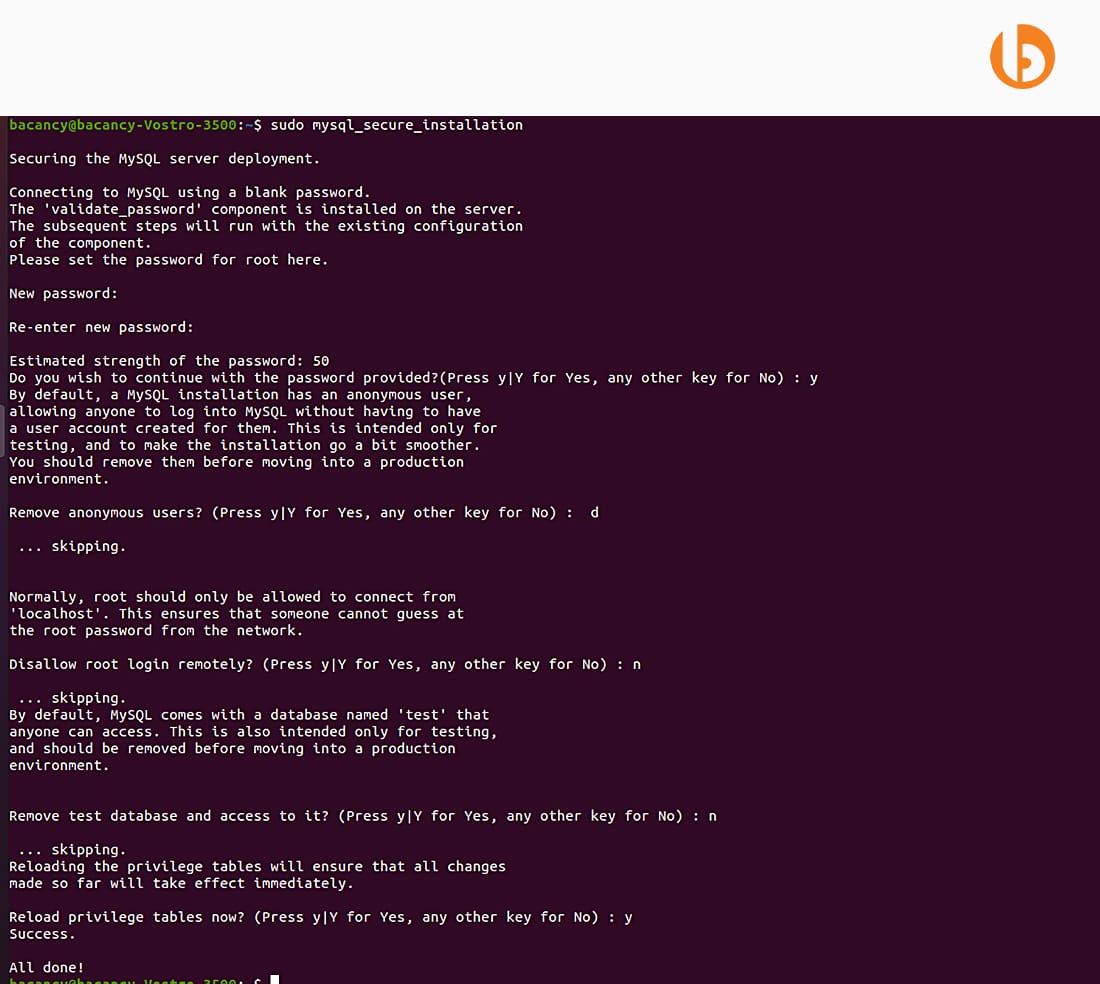
To configure the installation of MySQL, run the security script with sudo to run as the root user- the super privileged user.
Run the below command-

When we install MySQL for the first time, we will be prompted to create a new password.
If you are getting an error while setting up the password, check the temporary password in the log file.
Use the below command to get a temporary password.
We can find something like this:

Step 3: Login into MySQL and Create a User
Use the below command to login into MySQL:
The command will log in to MySQL using the root user. Once you are logged in, create a user in the MySQL database using these commands:
Step 4: Grant Access Privileges to User
Now, to grant access privileges to this newly created user, use this command:
Once this is done, run this command,
Step 5: Connect User with MySQL
Now you can use this user to connect with MySQL like this:
Once prompted for a password, provide the password, and you will be connected.
Trick: If you want to store passwords for that user, so prompting will not annoy us, do these things.
Create .my.cnf file inside /home/Ubuntu path
Write this command:
Write these lines in that file and save.
Now, whenever you want to connect, you can use this .my.cnf file like this, and no need to provide a password.
This file is generally needed when running the CI/CD pipeline and connecting to another server’s MySQL server.
Step 6: Restart MySQL Service
To affect these changes, restart the MySQL service by following commands:
to check the status of MySQL service:
Now, if it is in “Running” mode, then restart it using the below command:
This will restart the service and will reflect our changes.
Now, your MySQL has been set up in your Ubuntu Ec2 Instance.
Conclusion
So, this was about how we can set up MySQL in EC2 Ubuntu Instance. If you have followed all the steps as discussed above, then MySQL setup is successfully done in EC2 Ubuntu Instance. Moreover, we covered creating a new database and adding a user to it. For more such tutorials, you can visit the Cloud Tutorials page to explore more about Cloud and DevOps services.
Are you looking for a certified architect for managing AWS services? Then, without wasting your time, connect us to hire AWS developers. Bacancy has proficient and qualified experts with AWS certifications who have competence in providing optimum solutions.
Your Success Is Guaranteed !
We accelerate the release of digital product and guaranteed their success
We Use Slack, Jira & GitHub for Accurate Deployment and Effective Communication.


