Quick Summary:
This tutorial guide will provide comprehensive insights and a step-by-step process for building a chat application with React JS, Socket.IO, and Node JS. It will help you develop and deploy chat and messaging apps from scratch, implement innovation features, and manage server-side operations.
Table of Contents
Why Does It Still Make Sense to Create a Chat Application
A messaging and chat application have become a popular and most used application. The reason is none other than that it helps us communicate and interact easily in our daily lives. Hence, creating a messaging and chat application could be a wise decision. Even though the messaging app market is crowded, there is still room for unique messaging applications.
With new innovations and dynamic features, you can generate messaging apps that stand out among competitors. Moreover, you can address the unmet need in the existing platforms, which signifies the opportunity to tap into emerging markets. According to GlobalNewswire, the global market for messaging apps will reach 6.9 million users by 2030.
Nevertheless, you need to identify the particular niche, prioritize user privacy, and offer outstanding features like AI integration, real-time updates, voice text, and more.
Here are the chief reasons why creating a messaging app is still a good idea in 2024.
- Expanded market
- Modern technologies integration
- Good monetization
Key Features to Include in Your Messaging and Chat App
To make a successful messaging app, you need to include essential features that can enhance your messaging experience and make chat applications user-friendly and engaging.
1. Data Security and Encryption
Creating a messaging and chat application with protected data is crucial for every business. Moreover, you must offer end-to-end encryption to secure the user’s vital information. The chat and messaging apps should include features like safe login and security updates to prevent unauthorized access.
2. AI-Chatbot
Following the latest trends can help you develop excellent message applications. One of the modernized features is an integrated chatbot, which makes communication easier. An AI chatbot can solve numerous queries in minutes, provide automated responses, and assist users in real time, enhancing user experience and seamless communication.
3. Real-time Support
Another feature that has been discussed in every messaging app is real-time support. Now, every user wants quick responses for any issues, and thus, providing live chat support and real-time customer service representatives can make a significant difference. It will resolve the problem rapidly and ensure a smooth customer experience.
4. Push Notifications
Implementing push notifications informs users about new information, messages, updates, and critical events. However, you can customize the notification setting, enable users to determine the functionality according to their preferences, and avoid unnecessary notifications. Push notifications are also a mandatory feature in messaging apps.
5. Customization and Personalization
The last but equally essential feature in chat apps is allowing users to customize and personalize functionality per their requirements and choices. For instance, you can offer custom themes, background options, and profile settings. In fact, personalized features like chat settings make the app more engaging and user-friendly.
What is Socket.IO?
It’s impossible to corner socket.io when we are discussing how to create a chat application or transfer real-time data!
So what is this Socket.IO?
Keeping it short: Socket.IO is a Javascript library built for real-time data transfer.
Things to be kept in mind regarding Socket.IO:
- Javascript library used for real-time apps
- Enables bidirectional real-time communication between servers & clients
- It uses WebSocket protocol with polling as a fallback
- It’s not just a wrapper for WebSocket; it provides various features, such as broadcasting, async I/O, and storing data of the respective client.
- Socket.IO requires socket.io libraries on the client and server sides.
Tutorial Goal: What are we building?
The Flow of Building Chat App
After watching the video, you might have got an idea of what we are building. Let’s see the technical concept and flow behind the room, and we will then move to high-level development flow.
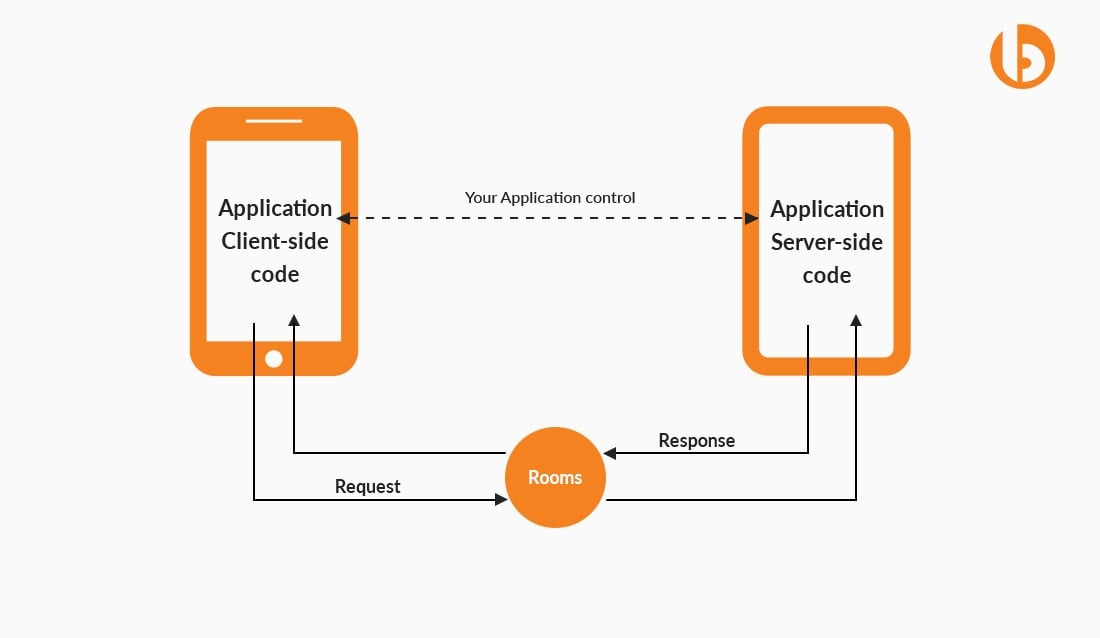
You have seen what we are building. Let’s see a high-level overview of the development flow.
1. Server Side
- We will deal with the server-side first.
- Install all the dependencies concerned with the back-end.
- Establish socket connection at server-side.
- getRoom API for room ID
2. Client-Side
- On the client-side, after creating the client application, install its dependencies.
- Establish basic socket connection at client-side.
- Add socket listeners.
- Build front-end components for UI.
Steps: How to Build a Chat Application with ReactJS, Socket.IO and NodeJS
Follow these steps to build a chat application using ReactJS, Socket.IO and NodeJS.
Server-Side
Getting Started
Create a new folder, navigate to the folder, and generate a package.json
Install Dependencies
Basic Server Setup
For that, create a file named app.js and start coding with me! Now in that, import required packages.

const express = require("express");
const path = require("path");
const http = require("http");

const app = express();

// Creating http server
const server = http.createServer(app);

const PORT = process.env.PORT || 3000;
console.log('Server listening to PORT: ', PORT);
server.listen(PORT);
Socket.IO Connection
It’s time to add socket.io to the server.
We have already installed it in the above step. Now, make it required in the app.js, and then we are good to go for implementing socket.io.

const activeUsers = new Set();

let roomId = "";

// Creating socket connection

// A socket is one endpoint of a two-way communication link between two programs running on the network.
// ... An endpoint is a combination of an IP address and a port number.

io.on("connection", (socket) => {

 // Joining room for conversation
 socket.on("JOIN_ROOM", (room) => {
   roomId = room;
   socket.join(room);
 });


  // To emit an event from your client, use the “emit” function
  // on the socket object

  // To handle these events, use the “on” function on the
  // socket object

  // Create an event NEW_MESSAGE. It will be used to
  // send messages from the client-side.


  // Listen to NEW_MESSAGE for receiving new messages
 socket.on("NEW_MESSAGE", (msg) => {
   io.to(roomId).emit("NEW_MESSAGE", msg);
 });

 // To disconnect participant from room
 // And remove specific user from object

 socket.on("disconnect", () => {
   activeUsers.delete(socket.userId);

   // Triggering this event disconnects user
   io.to(roomId).emit("user disconnected", socket.userId);
 });
});
Explanation
- When a user sends a message in the room, we want all the users to receive that message.
- We will import socket.io and create its object.
- The cors parameter is used for executing the code locally and handling cors errors.
- After establishing the socket connection, we will let the user join the room with its unique roomId.
- For sending and receiving messages through socket.io, we will use event. NEW_MESSAGE event will listen to new messages in the joined room. Make sure to use the same event at the client side for sending messages.
- On disconnecting the socket, the user is disconnected from the room and removed from the object.
API for Room ID- getRoom
Create a file named users.js and use this code to generate and send room ID.

const { v4: uuidv4 } = require('uuid');

const getRoom = (req, res) => {
 const randomGenUniqueName = uuidv4();
 res.status(200).send({ roomUrl: randomGenUniqueName });
};
Moving towards the Front-end part.
Client-Side
Getting Started
Create client folder named chat-app-frontend using the below command-
Install Socket.IO for Client
Client-Side Socket.IO connection
I have created helper.js and will establish the client socket connection in that file itself. Further, I will import the function wherever I need to send and receive the messages at the client-side.
Open helper.js and use this code to establish a connection.

import socketIOClient from "socket.io-client";

// socketIOClient connects front-end to with socket backend URL

export const socket = socketIOClient(process.env.REACT_APP_SOCKET_URL, {
 transports: [ "websocket" ],
 reconnectionAttempts: 20,
 reconnectionDelay: 5000
});
Front-end Components
Let’s make front-end components for our UI.
One by one, we will edit the file. Kindly replace your files with the following code. Keep in mind that we will focus on the Socket.IO.
There are two scenarios on our Login page-
1. Create Room: When the user has to create a room and share the room id with other users to join the room and start a conversation.
2. Join Room: If you have a room id, click the Join Room by filling in the required text fields.
The UI for Login would be something like this-
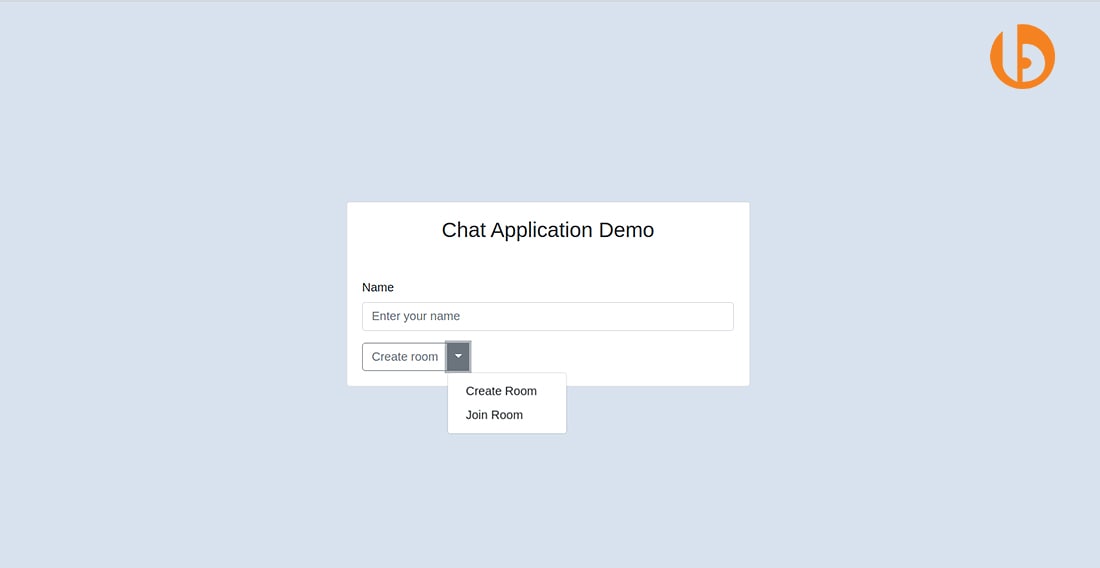
Create a file named Login.js. And use this logic while clicking the button.
handleOnJoinRoom() will be called when the user clicks Join Room. setItemInStorage() will store the username in the local storage.
If the user clicks Create Room, an API will be called, giving you the roomId. Again, store the username in the local storage.

const handleOnJoinRoom = () => {
   if (roomId.trim().length > 0) {
     auth.login();
     setItemInStorage('user', {
       name: userName,
     });
     history.push(`/${roomId}`);
   }
 };

 const onLoginClick = (e) => {
   e.preventDefault();
   if (roomType === ROOM_TYPE.createRoom) {
     setLoading(true);
     toastSuccess('Room created!!');
     getCreateRoom()
       .then((res) => {
         setLoading(false);
         if (res && res.roomUrl) {
           auth.login();
           setItemInStorage('user', {
             name: userName,
           });
           history.push(`/${res.roomUrl}`);
         }
       })
       .catch((err) => {
         setLoading(false);
         toastError(err);
       });
   } else {
     handleOnJoinRoom();
   }
 };
Once the user is logged in, they are redirected to the Dashboard.
The UI for Dashboard will be something like this-
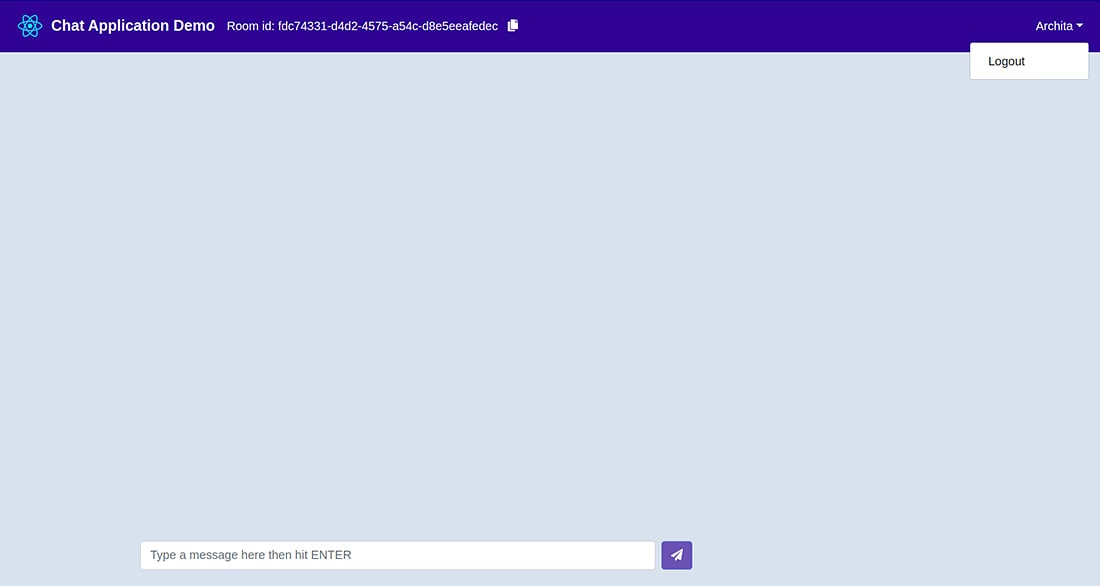
Create Dashboard.js and replace it with this code.

import React, { useEffect, useState } from 'react';
import { Container } from 'reactstrap';
import ChatContainer from '../components/chat-components/ChatContainer';
import MessageBar from '../components/chat-components/MessageBar';
import Header from '../components/common/layout/Header';
import { socket } from '../utils/helper';

const DashBoard = (props) => {
 const { params } = props.match;
 const [messages, setMessages] = useState([]);

 useEffect(() => {
   // Trigger JOIN_ROOM with unique room ID

   socket.emit('JOIN_ROOM', params.roomId);
 }, [params.roomId]);

 useEffect(() => {
   // Trigger 'NEW_MESSAGE' event
   // Message received in the event NEW_MESSAGE

   socket.on('NEW_MESSAGE', (message) => {
     setMessages((prevState) => [...prevState, message]);
   });
 }, []);
 return (
   <>
    <Header roomId={params.roomId} />
     <Container fluid className="p-0">
       <Container className="d-flex flex-column chat-container">
         <div className="scroll-content pl-2 pr-2">
           <ChatContainer messages={messages} />
           <MessageBar />
         </div>
       </Container>
     </Container>
   </>
 );
};

export default DashBoard;
Explanation
1. The first useEffect() will trigger JOIN_ROOM with a unique room_id. You might wonder what emit does? The Socket.IO API is inspired by the Node.js Event Emitter, which means you can emit events on one side and register listeners on the other.
2. The second useEffect() will trigger NEW_MESSAGE. Due to this event, we can receive the messages and then can use setMessages() to store them.
Moving on two other two components-
ChatContainer.js – Used for displaying chat
MessageBar.js – Text Field for typing a message and then sending it
Open ChatContainer.js and write this code.
We will display the message and sender’s name in the chat room.

import React, { useEffect, useRef } from 'react';
import PropTypes from 'prop-types';
import { getItemFromStorage } from '../../utils/helper';

const ChatContainer = ({ messages }) => {
 const { name } = getItemFromStorage('user');
 const messagesEnd = useRef(null);

 useEffect(() => {
   // used for scrolling the chat smoothly
   messagesEnd.current.scrollIntoView({ behavior: 'smooth' });
 }, [messages]);

 return (
   <>
     {messages && messages.length
       ? messages.map((message, index) => (
           <div
             className={`msg-container msg-container-${
               message.userName === name ? 'right' : 'left'
             }`}
             key={index}
           >
             <div className="msg-header">
              <span	className="msg-user-name">
                {message.userName}
              </span>
             </div>
             <div className="msg-content">
               <span className="msg-text">
                 {message.msg}
               </span>
             </div>
           </div>
         ))
       : null}
     <div style={{ float: 'left', clear: 'both' }} ref={messagesEnd} />
   </>
 );
};

ChatContainer.propTypes = {
 messages: PropTypes.array.isRequired,
};

export default ChatContainer;
Open MessageBar.js .
Import socket from helper.js
Write this logic for sending the message on the button click.

const [ value, setValue ] = useState("");
const { name } = getItemFromStorage("user");

// On submit
const handleSubmit = (msg) => {

  setValue("");
  // Trigger NEW_MESSAGE with object containing userName & msg
  socket.emit("NEW_MESSAGE", { userName: name, msg });
};
Here’s the UI part for the button-

<Button
  className="ml-2"
  color="primary"
  disabled={!value.trim().length}
  onClick={() => handleSubmit(value)}
>
   <FontAwesomeIcon icon={faPaperPlane} />
</Button>
Explanation
- Whenever the user clicks on the button to send the message, the event NEW_MESSAGE will be triggered. It will contain an object with a username and message. This event NEW_MESSAGE is being listened to at the server.
The User Interface will look something like this-
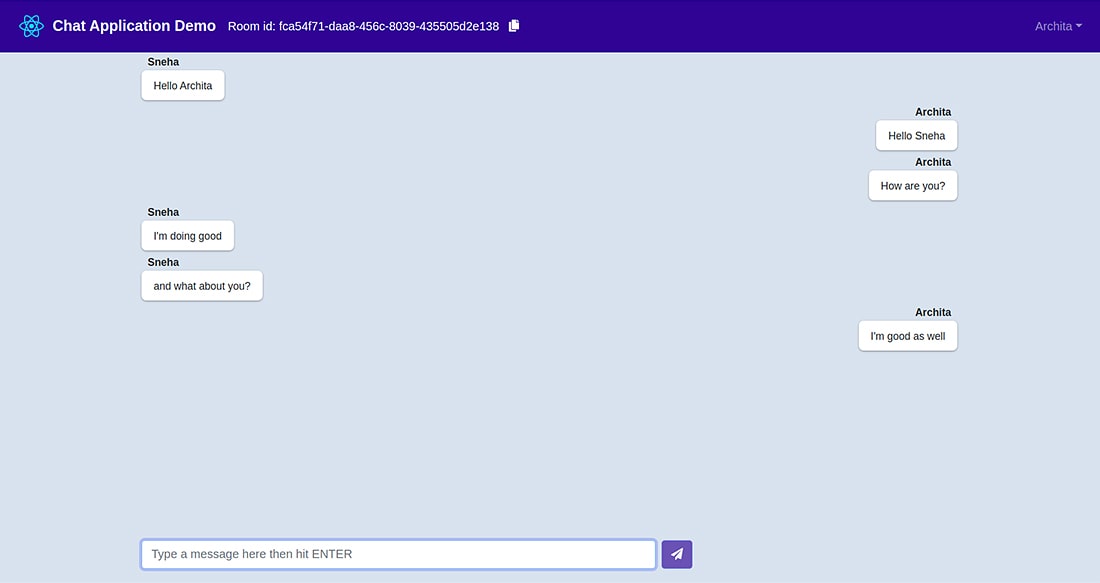
Open your Network Tab to see the sending and receiving of the messages. Here’s the screenshot for the same.
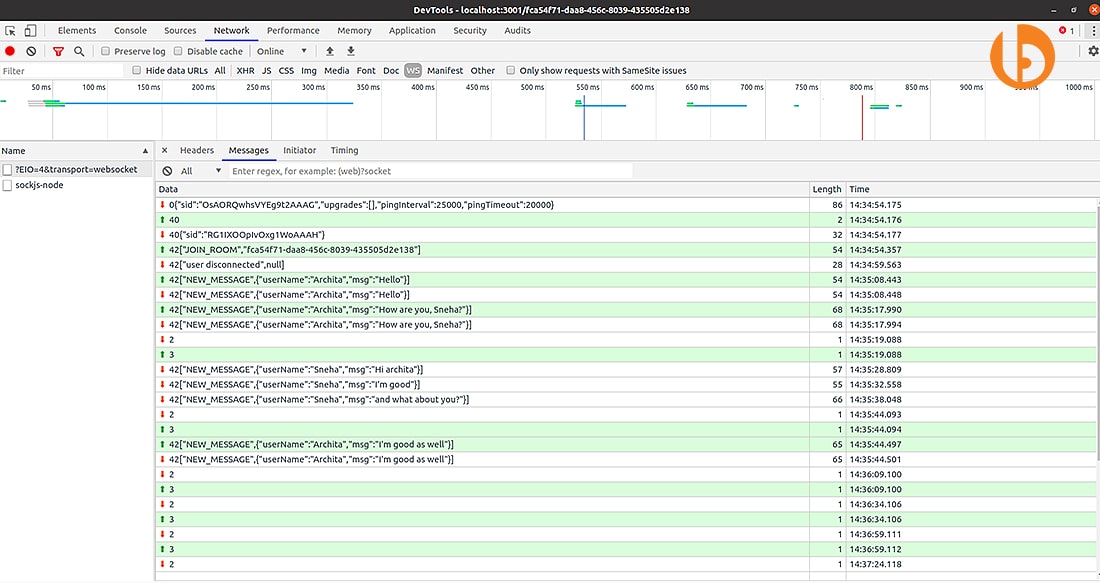
The entire source code is available at the Github repository. Feel free to clone and play around with the code!
Conclusion
I hoped the tutorial helped you understand the steps of building a chat application. For more such knowledge, visit Bacancy’s Tutorials Page and learn about different technologies. You will be glad to know that each of the tutorials consists of a github repository, so feel free to clone and play around with the code.
Full-stack developers are best to hire because they have front-end and back-end insight for designing a solution. They try to give the best solutions for both the client and server sides. You can connect a reliable resource to hire full-stack developer for your project. It will ease your process and provide efficient solutions on how to build a chat app with React, Node.js, and other frameworks.


