How to Implement Golang JWT Authentication and Authorization
Last Updated on November 19, 2024
Would you let anyone enter your house without knowing the person’s identity? The answer would be – obviously no! The same scenario applies to our web applications. It’s essential to ensure authentication and authorization in Golang before allowing access to APIs. This is often achieved with JWT (JSON Web Token). If you’re curious about what JWT is in Golang or how Golang authentication and authorization work with JWT, don’t worry! This tutorial will guide you through implementing Golang JWT authentication and authorization. Let’s get started.
This section will comprehensively explain JWT, how a JSON Web Token looks, and what it consists of, focusing on its role in authentication and authorization in Golang.
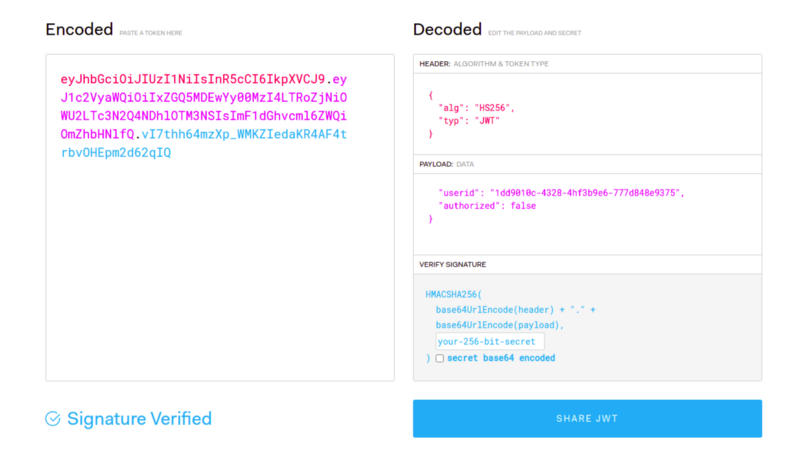
JWT authentication in Golang is a widely-used method for secure client-server communication. A JWT token is a cryptographically signed token generated by the server and provided to the client, enabling secure requests between the client and server. This token can be signed using two algorithms: HMAC or SHA256. SHA256 hashes the message without needing external input, ensuring message integrity. In contrast, HMAC requires a private key to hash the message, offering both message integrity and authentication, making it a suitable choice for robust JWT authentication in Golang.

eyJhbGciOiJIUzI1NiIsInR5cCI6IkpXVCJ9.eyJ1c2VyaWQiOiIxZGQ5MDEwYy00MzI4LTRoZjNiOWU2LTc3N2Q4NDhlOTM3NSIsImF1dGhvcml6ZWQiOmZhbHNlfQ.vI7thh64mzXp_WMKZIedaKR4AF4trbvOHEpm2d62qIQ
The above token is invalid. It cannot be used for production.
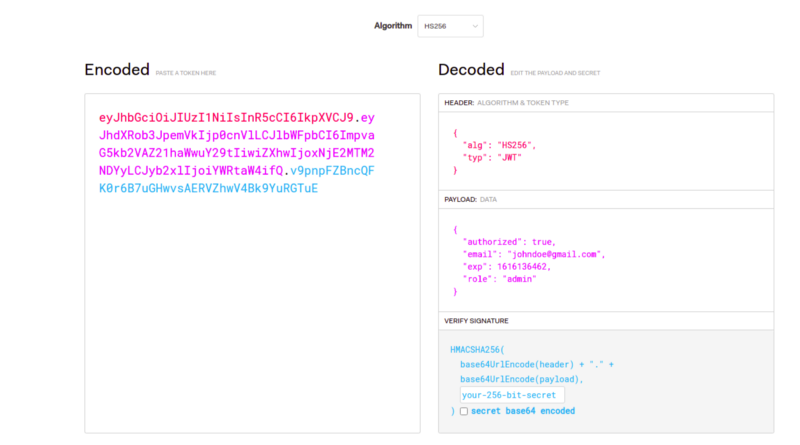
A JSON Web Token consists of three parts which are separated using .(dot) :
To test the token, you can go to https://jwt.io/.

We can set the expiration period for any JSON Web Token. Here in this application, we will consider Access Token and Refresh Token. Let’s see the difference.
Access Token: An access token is used for authenticating the requests sent to the server. We add the access token in the header of the request. It is recommended that an access token should have a short lifespan (say 15 minutes) for security purposes. Giving an access token for a brief period can prevent severe damages.
Refresh Token: A refresh token has a longer lifespan( usually 7 days) compared to an access token. Whenever an access token is expired, the refresh token allows generating a new access token without letting the user know.
Follow these steps to set up JWT in Golang Authentication and Authorization for secure authentication.
Create a directory called jwt-practice.
Initialize it with go.mod, for dependency management, using –
Create a main.go file in the root directory of the project. For simplicity, I will the entire code in main.go
Copy and paste the following code snippets, which I will show you in the coming steps.
Next, we will download the required dependencies. We will use

$ go get github.com/gorilla/mux
$ go get github.com/jinzhu/gorm
$ go get github.com/lib/pq
$ go get golang.org/x/crypto/bcrypt
Download the jwt package using this command-
In this step, we will create a router and initialize routes. Add this code in your main.go

var router *mux.Router

func CreateRouter() {
	router = mux.NewRouter()
}

func InitializeRoute() {
	router.HandleFunc("/signup", SignUp).Methods("POST")
	router.HandleFunc("/signin", SignIn).Methods("POST")
}

func main() {
	CreateRouter()
	InitializeRoute()
}
Let’s get our hands on to create some structs.

type User struct {
	gorm.Model
	Name     string `json:"name"`
	Email    string `gorm:"unique" json:"email"`
	Password string `json:"password"`
	Role     string `json:"role"`
}

type Authentication struct {
	Email    string `json:"email"`
	Password string `json:"password"`
}

type Token struct {
	Role        string `json:"role"`
	Email       string `json:"email"`
	TokenString string `json:"token"`
}
User is for storing User details.
Authentication is for login data.
Token is for storing token information for correct login credentials.
The best practice would be to add the code related to the Database connection to your .env file but for simplicity purpose, I have implemented it in main.go itself.
As said before, I’ll be using the Postgres database. Add the following code to establish a database connection.

func GetDatabase() *gorm.DB {
	databasename := "userdb"
	database := "postgres"
	databasepassword := "1312"
	databaseurl := "postgres://postgres:" + databasepassword + "@localhost/" + databasename + "?sslmode=disable"
	connection, err := gorm.Open(database, databaseurl)
	if err != nil {
		log.Fatalln("wrong database url")
	}

	sqldb := connection.DB()

	err = sqldb.Ping()
	if err != nil {
		log.Fatal("database connected")
	}

	fmt.Println("connected to database")
	return connection
}
func InitialMigration() {
	connection := GetDatabase()
	defer Closedatabase(connection)
	connection.AutoMigrate(User{})
}

func Closedatabase(connection *gorm.DB) {
	sqldb := connection.DB()
	sqldb.Close()
}
The SignUp function opens the database connection, receives user data from the form, and checks if the user already exists in the database or not. If the user is already present in the database, it returns an error, otherwise hash the user password and creates a new database entry. Copy-paste the below-mentioned code in your file.

func SignUp(w http.ResponseWriter, r *http.Request) {
	connection := GetDatabase()
	defer Closedatabase(connection)

	var user User
	err := json.NewDecoder(r.Body).Decode(&user)
	if err != nil {
		var err Error
		err = SetError(err, "Error in reading body")
		w.Header().Set("Content-Type", "application/json")
		json.NewEncoder(w).Encode(err)
		return
	}
	var dbuser User
	connection.Where("email = ?", user.Email).First(&dbuser)

	//checks if email is already register or not
	if dbuser.Email != "" {
		var err Error
		err = SetError(err, "Email already in use")
		w.Header().Set("Content-Type", "application/json")
		json.NewEncoder(w).Encode(err)
		return
	}

	user.Password, err = GeneratehashPassword(user.Password)
	if err != nil {
		log.Fatalln("error in password hash")
	}

	//insert user details in database
	connection.Create(&user)
	w.Header().Set("Content-Type", "application/json")
	json.NewEncoder(w).Encode(user)
}
Use GeneratehashPassword for hashing the password.

func GeneratehashPassword(password string) (string, error) {
	bytes, err := bcrypt.GenerateFromPassword([]byte(password), 14)
	return string(bytes), err
}
We have completed the setup in main.go. Let’s start coding for Authentication and Golang Authorization. But first, here’s a quick overview of the differences between them.
Do you need assistance to solve your Golang error?
Work With Our Golang development company to fix the bugs and fine-tune your Golang app user experience.
Authentication can be defined as validating the users of any particular application. And that’s why it is said to be the crucial and foremost step in developing an application. It directly concerns security issues. Allowing someone to make a request to the server is a basic example of authentication.
Authorization is a process of where the user roles are being managed. It can be briefed as giving a user some specific permissions for accessing particular resources.
First, we will begin the process of authentication.
Write the following function to create Golang JWT:
The GenerateJWT() function takes email and role as input. Creates a token by HS256 signing method and adds authorized email, role, and exp into claims. Claims are pieces of information added into tokens.

func GenerateJWT(email, role string) (string, error) {
	var mySigningKey = []byte(secretkey)
	token := jwt.New(jwt.SigningMethodHS256)
	claims := token.Claims.(jwt.MapClaims)

	claims["authorized"] = true
	claims["email"] = email
	claims["role"] = role
	claims["exp"] = time.Now().Add(time.Minute * 30).Unix()

	tokenString, err := token.SignedString(mySigningKey)


	if err != nil {
		fmt.Errorf("Something Went Wrong: %s", err.Error())
		return "", err
	}
	return tokenString, nil
}
The SignIn function checks if the user is already present in the database. If the user is not present, then redirect the user to the login page. If the user is present in the database, then hash the password the user gave in the login form and compare that hashed password with the stored hashed password. If both the hashed passwords are the same, then generate a new Golang JWT authentication and give it back to the user or redirect the user to the login page.

func SignIn(w http.ResponseWriter, r *http.Request) {
	connection := GetDatabase()
	defer Closedatabase(connection)

	var authdetails Authentication
	err := json.NewDecoder(r.Body).Decode(&authdetails)
	if err != nil {
		var err Error
		err = SetError(err, "Error in reading body")
		w.Header().Set("Content-Type", "application/json")
		json.NewEncoder(w).Encode(err)
		return
	}

	var authuser User
	connection.Where("email = ?", authdetails.Email).First(&authuser)
	if authuser.Email == "" {
		var err Error
		err = SetError(err, "Username or Password is incorrect")
		w.Header().Set("Content-Type", "application/json")
		json.NewEncoder(w).Encode(err)
		return
	}

	check := CheckPasswordHash(authdetails.Password, authuser.Password)

	if !check {
		var err Error
		err = SetError(err, "Username or Password is incorrect")
		w.Header().Set("Content-Type", "application/json")
		json.NewEncoder(w).Encode(err)
		return
	}

	validToken, err := GenerateJWT(authuser.Email, authuser.Role)
	if err != nil {
		var err Error
		err = SetError(err, "Failed to generate token")
		w.Header().Set("Content-Type", "application/json")
		json.NewEncoder(w).Encode(err)
		return
	}

	var token Token
	token.Email = authuser.Email
	token.Role = authuser.Role
	token.TokenString = validToken
	w.Header().Set("Content-Type", "application/json")
	json.NewEncoder(w).Encode(token)
}
CheckPasswordHash() function compares the plain password with a hashed password.

func CheckPasswordHash(password, hash string) bool {
  err := bcrypt.CompareHashAndPassword([]byte(hash), []byte(password))
  return err == nil
}
Now let’s start the process of authorization.
IsAuthorized() function verifies the token, and if the token is valid, it will extract the role from the token. And based on the role, the user will be redirected to the appropriate page.
There are two roles: Admin and User.
Now, finally, it’s time to write the middleware function. Copy-paste the below-mentioned code.

func IsAuthorized(handler http.HandlerFunc) http.HandlerFunc {
	return func(w http.ResponseWriter, r *http.Request) {

		if r.Header["Token"] == nil {
			var err Error
			err = SetError(err, "No Token Found")
			json.NewEncoder(w).Encode(err)
			return
		}

		var mySigningKey = []byte(secretkey)

		token, err := jwt.Parse(r.Header["Token"][0], func(token *jwt.Token) (interface{}, error) {
			if _, ok := token.Method.(*jwt.SigningMethodHMAC); !ok {
				return nil, fmt.Errorf("There was an error in parsing")
			}
			return mySigningKey, nil
		})


             	if err != nil {
			var err Error
			err = SetError(err, "Your Token has been expired")
			json.NewEncoder(w).Encode(err)
			return
		}

		if claims, ok := token.Claims.(jwt.MapClaims); ok && token.Valid {
			if claims["role"] == "admin" {

				r.Header.Set("Role", "admin")
				handler.ServeHTTP(w, r)
				return

			} else if claims["role"] == "user" {

				r.Header.Set("Role", "user")
				handler.ServeHTTP(w, r)
				return
			}
		}
		var reserr Error
		reserr = SetError(reserr, "Not Authorized")
		json.NewEncoder(w).Encode(err)
	}
}
Source code for the entire demo application is here – Github Repository
After all the coding, let’s verify whether the Golang JWT authentication is working as expected.

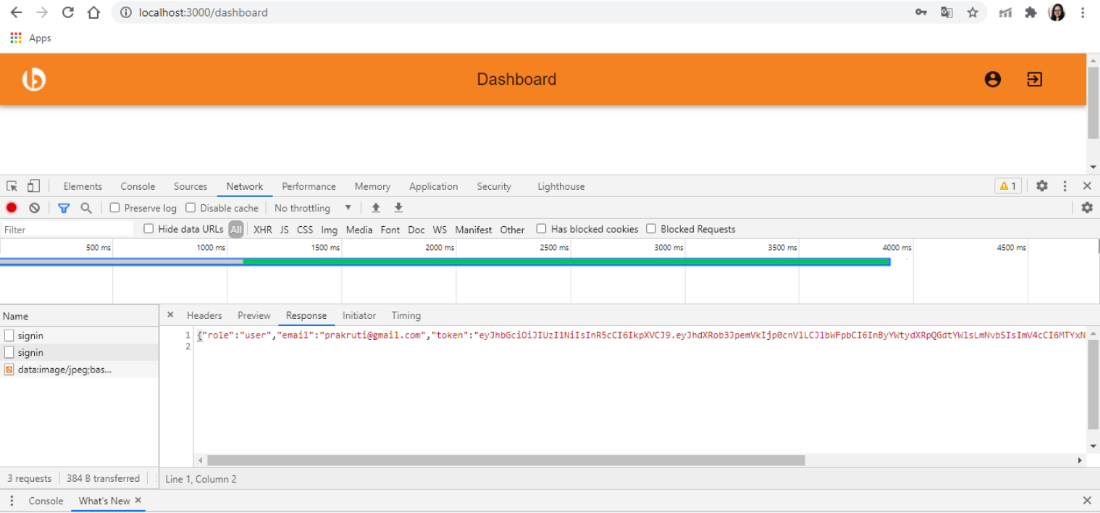
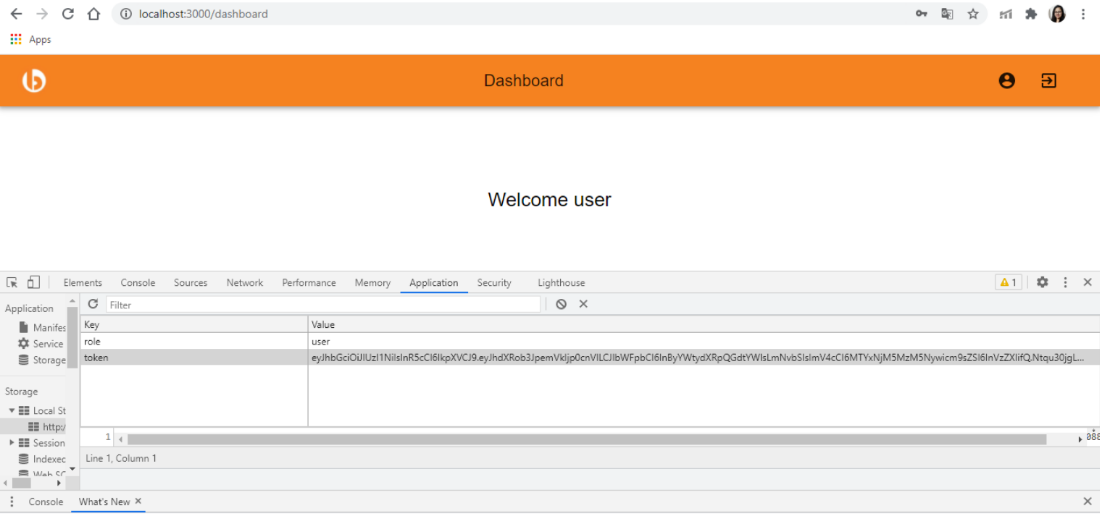
Thus, you are done with generating the Golang JWT. Further, for your frontend side, you can store this token in your local storage and use it in different API requests. Refer to the below images-
(1) Signed In successfully and receiving Golang JWT in the response. You can see the “role”: “user” which satisfies the authorization part. It means that only specific resources will be accessible to the user role.

(2) Storing Golang JWT in the local storage so that you can use this token for different API calls.

In summary, implementing JWT authentication and authorization in Golang provides a secure, efficient way to manage user access. With a strong foundation in token creation, validation, and usage, your application can now ensure data security and enhance user trust, creating a scalable and resilient authentication system. As a business owner, if you need assistance with Golang JWT implementation, hire Golang developer to leverage our industry-leading expertise.
Your Success Is Guaranteed !
We accelerate the release of digital product and guaranteed their success
We Use Slack, Jira & GitHub for Accurate Deployment and Effective Communication.