Quick Summary:
This blog covers Vue 3 Typescript tutorial, where we are creating a to-do list using the Vue CLI. Vuejs and TypeScript is a perfect combination- it gives you the flexibility of Javascript and the strictness of TypeScript. I hope you find the blog to be useful.
Table of Contents
Introduction
I always like to code with defining types and maintaining strictness, and that’s why TypeScript has fascinated me. Being a JavaScript developer, you indeed have encountered this error – Cannot read property ‘x’s of undefined.
For getting rid of such an error, you should either verify all the possible use-cases of the error or give TypeScript a fair shot. I preferred the latter one, and I’m super satisfied and happy with my code quality now.
That’s why when VueJS came up with support for TypeScript, I made up my mind for trying Vue 3 Typescript. Believe me; the struggle was real and worth it! Vuejs and TypeScript is a perfect combination- it gives you the flexibility of Javascript and the strictness of TypeScript. I referred to VueJs official documentation and a few other blogs/tutorials for the starters. As nothing was available in one place, I had to juggle between blogs to build a demo application. That’s when I decided to write a blog post for helping fellow VueJS developers. Here are the topics which I will cover in this Vue 3 Typescript tutorial.
VueJS framework is undoubtedly one of the best JS frameworks. Its progressive take on the coding part helps developers to build lightweight and excellent applications. Unlike AngularJS, VueJS didn’t provide prominent support for TypeScript in its older versions. That’s why we have rarely heard of Vue TypeScript. But, we can quickly build large-scale front-end apps with Vue 3 Typescript from scratch with the help of Vue CLI. Still, there’s a drawback for full-fledged application development; one might need to install different third-party packages for decorators and features. Let’s see what’s the goal of this blog post.
>VueJS framework is undoubtedly one of the best JS frameworks. Its progressive take on the coding part helps developers to build lightweight and excellent applications. Unlike AngularJS, VueJS didn’t provide prominent support for TypeScript in its older versions. That’s why we have rarely heard of Vue TypeScript. But, we can quickly build large-scale front-end apps with Vue 3 Typescript from scratch with the help of Vue CLI. Still, there’s a drawback for full-fledged application development; one might need to install different third-party packages for decorators and features. Let’s see what’s the goal of this blog post.
Goal
Here’s a step-by-step tutorial on how to build a simple Todo application with Vue 3 Typescript.
Link of the source code – Github Repository.
We will build something like this:
How to Install Vuejs using Vue CLI
Open your terminal and follow these steps to install VueJS in your system if you are new to VueJS.
Check the version-
You will see the latest version installed in your system as shown below-

If you have already installed it, you can make sure to update Vue CLI to its latest version by running the following command-
In this blogpost we won’t going to discuss regarding TypeScript Vue, Vue CLI with typescript and Vue.js typescript individually. This blogpost is written to build Todo app, setting up Vue 3 using TypeScript. Though you can check these below-mentioned links for basic understanding-
For VueJS:
Vue 3 Complete Guide
For TypeScript:
Up and Running with TypeScript
TypeScript Github Repository
TypeScript in 5 mins
Vue 3 Typescript Tutorial: Steps to Build Todo App with Vue3 Typescript using Vue CLI
Step 1: Create and Set up Vue 3 Typescript Project
Create a todo app using this command-
We will use Vue CLI to set up our Vue Typescript project. You will see something like this. Select Manually select features.
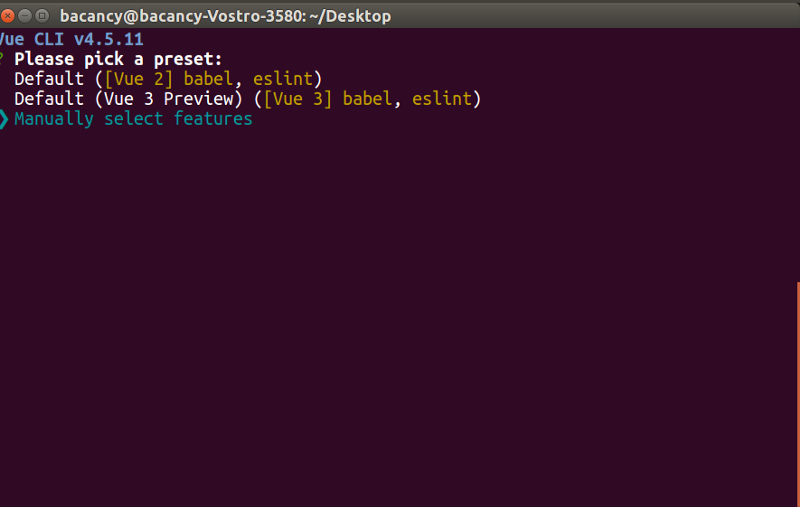
Set up your todo-app with these configurations-
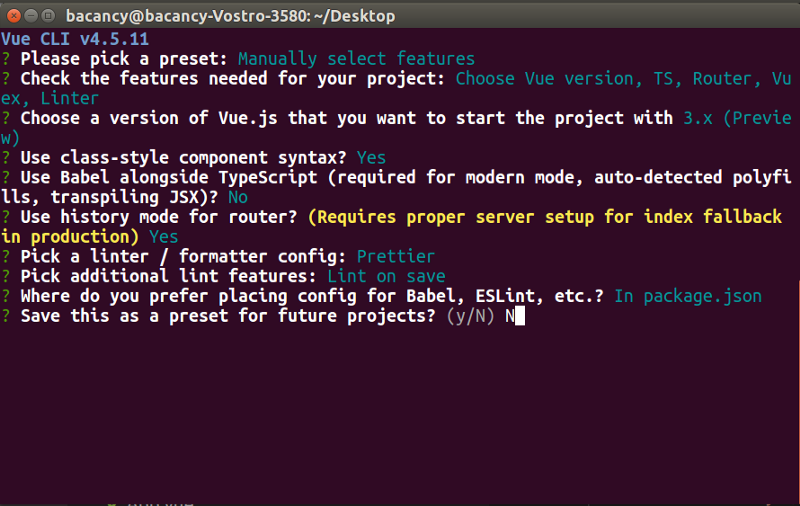
Navigate to the application-
Step 2: Run Project
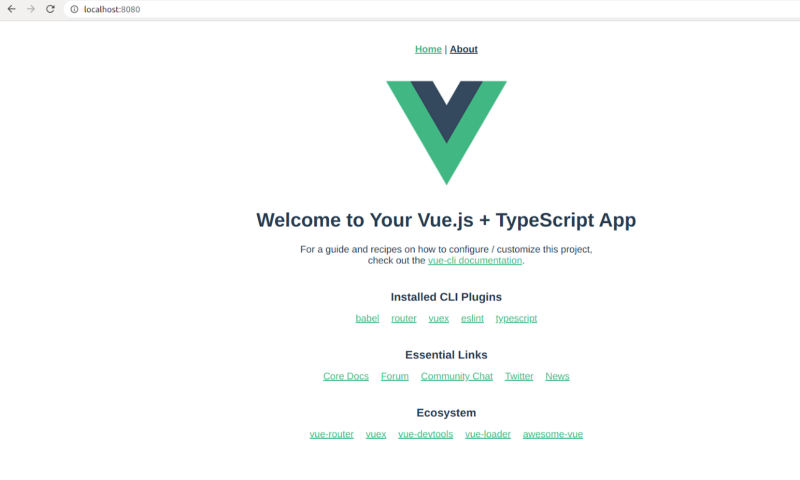
After running the above commands, hit the localhost in your browser, and you’ll see why use VueJS application’s default view.
Let’s start coding of building to do app with Vue 3 Typescript! The below-mentioned image will be our project structure –
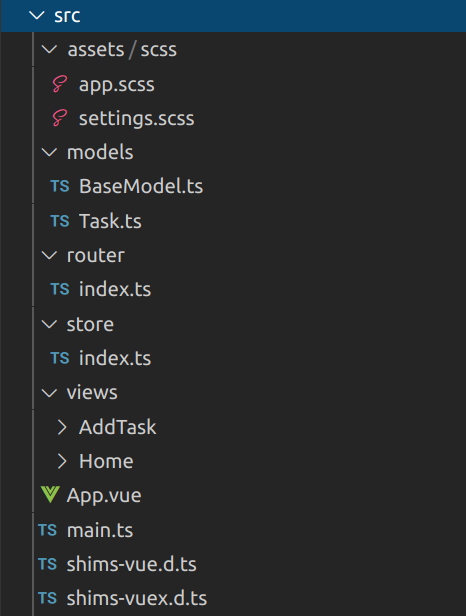
Models – For managing the type of tasks in the to-do app.
Router – Handles routing of the components.
Store – Managing central state (Vuex store)
Views – Consists of pages that will be displayed. It will have two folders – AddTask and Home. Each of them consists of four files, as shown below:
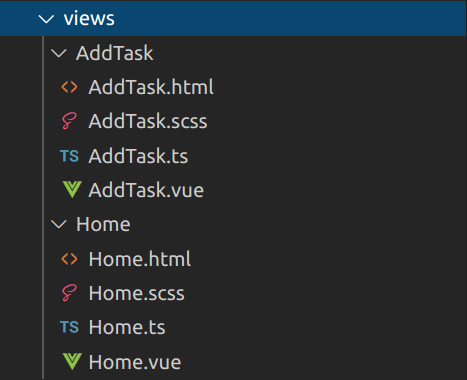
Now I’ll take one module at a time and start editing its files. You can replace these with your files.
Build responsive websites and applications to help your business grow
Hire Vue Developer from us to bring your idea to reality in record time
? router/index.js
Routing enables applications to display components on their respective URLs.So, let’s get our hands on Vue router.
Here, ‘/ and /add_task’ will render Home and AddTask component respectively. You can visit here to learn more about Vue 3 Router and Vue 3 composition API the way it works.

import { createRouter, createWebHistory, RouteRecordRaw } from "vue-router";
import Home from "@/views/Home/Home.vue";
import AddTask from "@/views/AddTask/AddTask.vue";

const routes: Array = [
  {
    path: "/",
    name: "Home",
    component: Home
  },
  {
    path: "/add_task",
    name: "AddTask",
    component: AddTask
  }
];

const router = createRouter({
  history: createWebHistory(process.env.BASE_URL),
  routes
});

console.log("history", process.env.BASE_URL)

export default router;
? App.vue
Consists entire application which will server-side render on “app” Node. You can open your developer tools and check the very first parent < div > – It will consist of id=app.

Now, moving towards the Vue TypeScript part. We will create two files – BaseModel.ts and Task.ts for declaring the type of the objects of each task.
? BaseModel.ts

export class BaseModel {
 constructor() {
   this.createdAt = new Date();
   this.updatedAt = new Date();
   this.deletedAt = new Date();
 }
 createdAt: Date;
 updatedAt: Date;
 deletedAt: Date;
}

export default BaseModel;
? Task.ts

import { BaseModel } from "./BaseModel";

export class Task extends BaseModel {
  name: string;
  completed: boolean;

  constructor(name: string) {
    super();
    this.name = name;
    this.completed = false;
  }
}

export default Task;
We will import Task.ts in AddTask.ts to define the type of the variable.
Moving towards pages – AddTask and Home
AddTask Folder
? AddTask.html
The .html covers the UI part for Adding Task page.
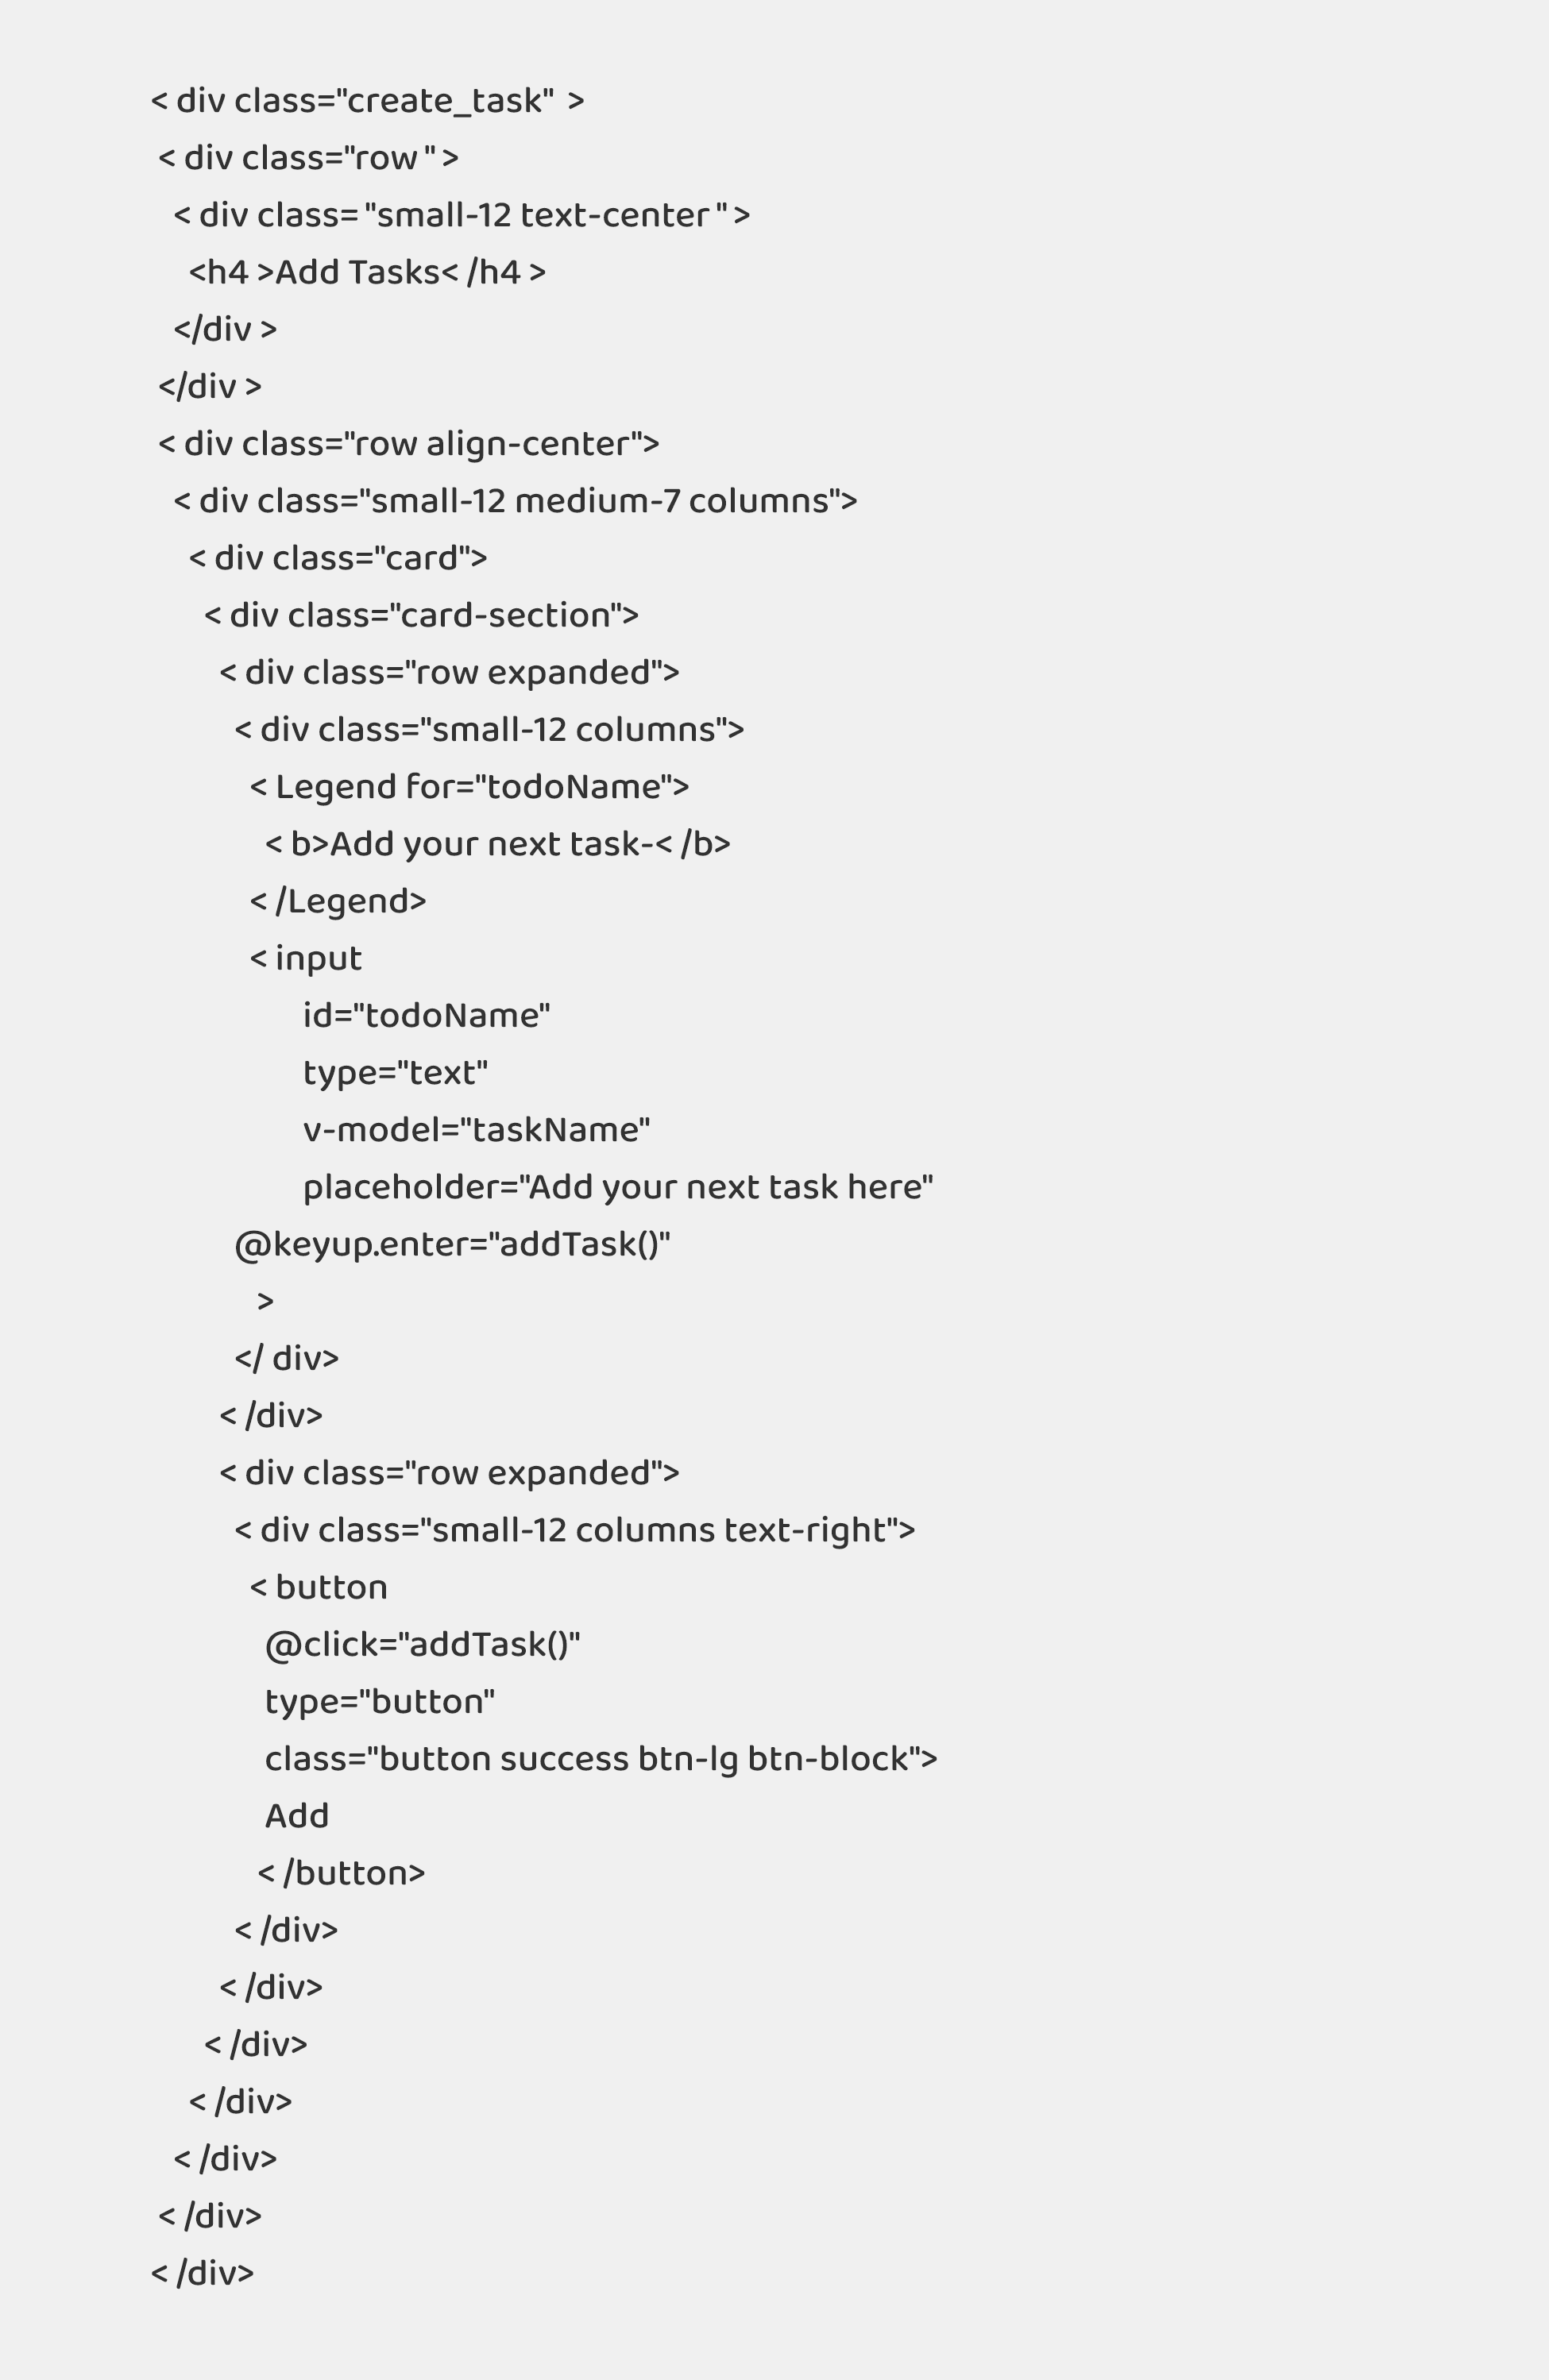
? AddTask.scss

.create_task {
    margin-top: 2rem;
    h4 {
      font-family: "Helvetica Neue", Helvetica, Arial, sans-serif;
      margin: 2rem 0;
    }
    .card {
      background-color: #8080800d;
    }
    .card-section {
      padding: 1.5rem;
      legend {
        font-size: 20px;
      }
      input {
        border-radius: 5px;
      }
      button {
        border-radius: 5px;
        font-size: 18px;
        padding: 10px 20px;
      }
    }
  }
AddTask.vue
It comprises all the three files. You can choose not to separate code into different files and rather write the code here in just one file. But, this looks cleaner and neat, so I chose this.
? Home Folder
Home.html
The .html part covers the UI part for Home page where we will display tasks in the list and take further action.

< div class="home" >
< div class="row" >
< div class="small-12 text-center" >
< h4>VueJS + TypeScript Todo Application
< /div>
< /div>
< div class="row align-center">
< div class="small-12 medium-7 columns">
< table class="main-table">
< thead>
< tr>
< th>To-do List
< th>
< th>
Home.scss

.home{
 margin-top: 2rem;
 h4{
   font-family: 'Helvetica Neue', Helvetica, Arial, sans-serif;
   margin: 2rem 0;
 }
 tbody{
   background-color:#8080800d;
 }
 thead{
   background-color: #0000002e;
 }
 th{
   font-family: 'Helvetica Neue', Helvetica, Arial, sans-serif;
   color: #0b0a0a
 }
}
Home.ts

Home.vue
It comprises all three files. You can choose not to separate code into different files and rather write the code here in just one file. But, this looks cleaner and neat, so I chose this.

Now, it’s time to configure Vuex Store.
store/index.ts
Here in this file we will have a state initiated with static data to be displayed, mutations for altering the state. Mutations are nothing but functions which are used to add, edit, and delete the values.

import { createStore } from "vuex";
import Task from "../models/Task";
import { findIndex } from "lodash";

export default createStore({
 state: {
   tasks: [
     {
       name: "Demo for VueJS and TS",
       createdAt: new Date(),
       updatedAt: new Date(),
       completed: false
     },
     {
       name: "UI design",
       createdAt: new Date(),
       updatedAt: new Date(),
       completed: false
     }
   ] as Task[]
 },
 mutations: {
   setTask: (state, task) => state.tasks.push(task),
   deleteTask(state, task) {
     let taskIndex = findIndex(state.tasks, task);
     state.tasks.splice(taskIndex, ++taskIndex);
   },
   completeTask(state, task) {
     const taskIndex = findIndex(state.tasks, task);
     state.tasks[taskIndex].completed = true;
   }
 },
 actions: {},
 modules: {}
});
app.scss

$fa-font-path: "../../../node_modules/font-awesome-sass/assets/fonts/font-awesome/";
@import "../../../node_modules/font-awesome-sass/assets/stylesheets/font-awesome";
@import "~foundation-sites/scss/foundation";
@import "settings";
@include foundation-flex-classes;
@include foundation-flex-grid;
@include foundation-everything(true);

body{
 font-family: 'Helvetica Neue', Helvetica, Arial, sans-serif;
 color: #4d4d4d;
 font-size: 18px;
 line-height: 1.4em;
}
.text-line-through {
 text-decoration: line-through;
}

.button {
 margin: 0;
}

.bottom_bar {
 background-color: #0000002e;
 font-size: 1.5rem;
 position: fixed;
 width: 100%;
 bottom: 0;
 padding: 1.5rem;

 a {
 color: #0b0a0ab0;

   &.router-link-exact-active {
     color:  #0b0a0a;
   }

   i{
     margin-right: 10px
   }
 }
}

.fade-enter-active, .fade-leave-active {
 transition: all .2s ease;
}

.fade-enter, .fade-leave-active {
 opacity: 0;
}
So, these were all the files that had to be changed for developing a To-do app with Vue 3 Typescript. If you have followed all the steps mentioned above, then definitely your small application would be running as desired.
You might have heard about another feature of Vue 3 i.e Vue Composition API. Visit How to Build To-do App using Vue Composition API and Vuex 4 to explore and learn more about Composition APIs.
Conclusion
This was just for your starter of building web apps with Vue 3 and TypeScript. This combination of Vue 3 Typescript is a very vast concept to explore and learn. You can manage your project efficiently with Vue 3 using TypeScript. In case, you need any guidance for building a VueJS application using TypeScript then without further ado, contact Bacancy Technology and hire TypeScript developers. Our skilled team will dedicatedly work to meet your requirements and expectations.
Your Success Is Guaranteed !
We accelerate the release of digital product and guaranteed their success
We Use Slack, Jira & GitHub for Accurate Deployment and Effective Communication.


